Exchange 2010 UM – Creating Custom Prompts (Video)
Overview
In this tutorial, we’ll show you how to create custom prompts for your Unified Messaging (UM) Auto Attendants. We’ll start by briefly discussing your options for creating these prompts. Then we’ll zoom in to a particular method, which I’m sure you’ll find rather cool, and discuss that method in detail.
(Instructional video below provides a walkthrough of the steps contained in this article.)
Various methods for creating custom prompts for your auto attendants
There are a couple of ways for creating custom prompts for your auto attendants. All of them involve recording your voice in some kind of sound recorder. Note that custom prompts have to be recorded in a very specific format, which is: 16-bit, 8KHz, Mono, stored in a .wav file format.
Alternatively, you can initially save the recording in some other format and then convert the file into the format specified above (i.e., 16-bit, 8KHz, etc.). The problem with this method is that, even if you have the right format, the codec used may not be acceptable to the Unified Messaging server.
One way to remedy this would be to use a Windows XP sound recorder to record your voice and then save it. Or you can bring in a wav file, open it using the Windows XP sound recorder, and then save it in the accepted format. There are also third-party tools (e.g. Blaze Media Pro) that can record your voice and save them into the accepted format, so you can use those as well.
Of course, many of these third-party tools require a fee, so if you want something that’s free, then the Windows XP sound recorder would be the option best suited for you.
Now, while these options may suffice, there’s another way to create custom prompts that you really might want to try out. You can actually use a telephone – assuming of course certain requirements are met – to create those custom prompts.
In order to use a telephone to create custom prompts, you need to meet the following requirements:
- You have to enable the feature in the UM to allow telephone user interface (TUI) prompt recordings.
- Users must have the proper permissions (roles) assigned.
- You must have a custom .wav file already in place for the prompt you are looking to record.
Why use a telephone to create custom prompts?
One major reason why you might want to use a telephone to create these custom prompts is that, sometimes, it’s just the fastest, most practical way to do so.
Let’s say, a storm is fast approaching and you need to notify individuals who might call in and tell them that your office is going to be closed. Unfortunately, if you’re not in the office yourself, you may not be able to change the auto attendant’s prompt to a message that would give them that notification using an XP sound recorder or a third-party tool.
In an emergency situation like this, you will want to change the prompt as quickly as possible. So if you can change the prompt through the telephone, that would work best for you in this particular scenario.
In turn, when a customer dials into your telephone system after you’ve changed the prompt through the telephone, the auto attendant can then respond, for instance like, “As a result of the storm that’s coming through, we’re going to keep things closed today.”
That would certainly save the individual from making a drive that they don’t have to and even probably shouldn’t considering the conditions on the road. So, as you can see, having the ability to change the custom prompts through the telephone can have very practical benefits.
Now it’s time to go over to your Unified Messaging server and see how you can enable it for this feature.
Configuring your UM server to allow for custom prompt recording using a Telephone User Interface (TUI)
Before you can start configuring your UM server for this particular feature, make sure the following are in place:
- an existing Dial Plan;
- at least one Auto Attendant; and
- an existing Custom Greeting under that particular Auto Attendant.
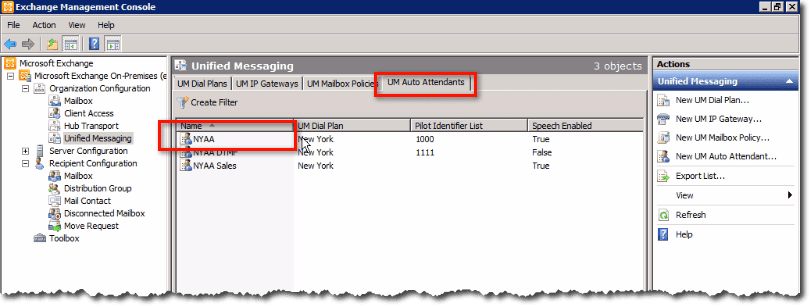
So, for example, here in our list of Auto Attendants, if we click on the New York Auto Attendant (NYAA) …
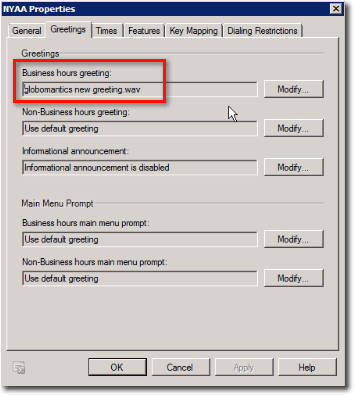
… and then go to the Greetings tab, we see that it has a custom greeting, which we can later on change by calling in using the telephone.
Basically, once you call in to change that custom greeting, the system will simply record a new version of that custom greeting file. Therefore, it would be a good idea to keep a copy of the original custom greeting somewhere else so that you can easily change it back when you need to.
Obviously, not everyone should have the capability to call in and change the custom greeting, as that would pose a security risk. For the same reason, you also wouldn’t want to have a single admin account that could do practically everything.
Instead, you would want to create accounts delegated with the least amount of permissions so that they cannot do more than what they’ve been assigned to do. In this case, in Exchange, you can create a domain user account. However, it should perhaps not be able to login interactively.
And then, that user account should be given the Exchange Organization Administrator role. That’s the role that’s going to give that user the ability to perform the tasks of changing the prompts. Next, you can create a mailbox for that user and enable it for Unified Messaging.
So, you’ll give the user an extension and a PIN even if the domain user doesn’t actually use the Unified Messaging service for himself. This is the account you’re going to give others in your organization so that you’ll not be the only one who has it. That means, they can also call in and make these changes to the greetings.
So once you have this, the custom greetings, and so on, in place, the only thing you need to do is to make a change to the way the UM Dial Plan allows for prompt adjustments. However, you can’t do this in the Exchange Management Console. Rather, this is done in the Exchange Management Shell.
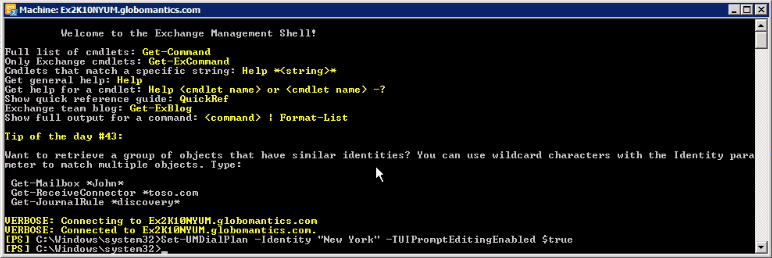
Inside the Exchange Management Shell, type in:
Set-UMDialPlan -Identity “New York” -TUIPromptEditingEnabled $true
where New York is the name of the Dial Plan.
Hit the Enter button when you’re done.
After that, you should be able to check the existing greetings and make changes to them through the phone. Now, let me warn you. When you first do this, it can be somewhat confusing because you don’t really know whether it really worked. However, if you can hear how it works once, then you’ll understand how it will work going forward in the future.
But this is one of those lessons where I would really recommend you watch the video. There, you’ll be able to hear the actual conversation between a person calling in and the Auto Attendant.
Anyway, just so you have an idea for now, I’m going to show you transcripts of some sample conversations. The events that will normally precede such conversations go like this:
A caller dials a phone and then uses the extension to call the Auto Attendant. Then, the moment the Auto Attendant picks up, the caller proceeds to hit the pound (#) key and then the star (*) key. This will tell the Auto Attendant that the caller wants to make changes to the prompts. The caller will then be asked to enter his/her extension and PIN.
Here’s a sample conversation between an ordinary user named Jane Smith and the Auto Attendant. This user doesn’t have the right permissions to make changes to the prompt.
Jane dials and enters extension to Auto Attendant.
Auto Attendant: Welcome …
Jane hits # and then *.
Auto Attendant: Please enter your extension.
Jane enters her extension.
Auto Attendant: Jane Smith. Please enter your PIN, then press the pound key. If this is not your mailbox…
(at this point, the Auto Attendant has already identified the caller as Jane Smith)
Jane enters her PIN and then presses # key.
Auto Attendant: Sorry, I’m not able to do that for you. Goodbye!
Because Jane Smith didn’t have the right permissions to make changes to the prompts, even if she entered the # and * keys and even provided her extension and PIN, she wasn’t allowed to proceed.
Here’s another conversation. This time, it’s between an Administrator account who has the necessary permissions and the Auto Attendant.
Admin dials and enters extension to Auto Attendant.
Auto Attendant: Welcome …
Admin hits # and then *.
Auto Attendant: Please enter your extension.
Admin enters her extension.
Auto Attendant: Administrator. Please enter your PIN, then press the pound key. If this is not your mailbox…
(at this point, the Auto Attendant has already identified the caller as the Administrator)
Admin enters her PIN and then presses the # key.
Auto Attendant: Auto Attendant prompt. For Business Hours prompt, press 1. To exit prompt provisioning press the star key.
Admin presses ‘1’.
Auto Attendant: Business Hours prompt. For the Welcome Greeting, press 1. To return to …
Admin presses ‘1’ again.
The message in the custom prompt will play.
Auto Attendant: To accept, press 1. To re-record, press 2. To cancel, press the star key.
Admin presses ‘2’ again.
Auto Attendant: Please record your prompt after the tone. When you have finished recording, press the pound key.
Tone sounds, indicating that the user can now start speaking.
Admin starts speaking and recording begins.
Admin: As a result of the recent snow storm that is passing through our area, we are going to keep the office closed for today. We look forward to seeing you tomorrow. Thank you. Bye!
Admin presses the pound key to tell the system to stop recording.
System plays the newly recorded prompt so the admin can listen and check if changes need to be made.
Auto Attendant: To accept, press 1. To re-record, press 2.
Admin presses 1 or 2.
Assuming the admin accepted the new message, this new recording will now be used every time a caller dials in. As you can see, everything that needs to be done to create a custom prompt for the Auto Attendant can be done through the phone.
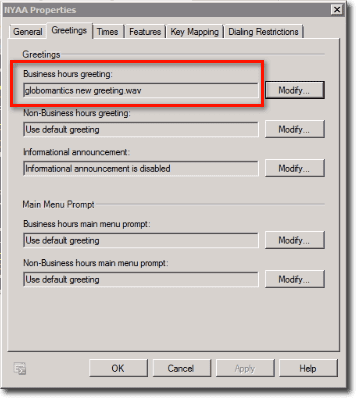
Now, going back to the Exchange Management Console, if we take a look back at those custom greetings, we’ll see that the file name for the Business hours greeting (or whichever greeting you changed) remains unchanged. However, it doesn’t get saved in the same location.
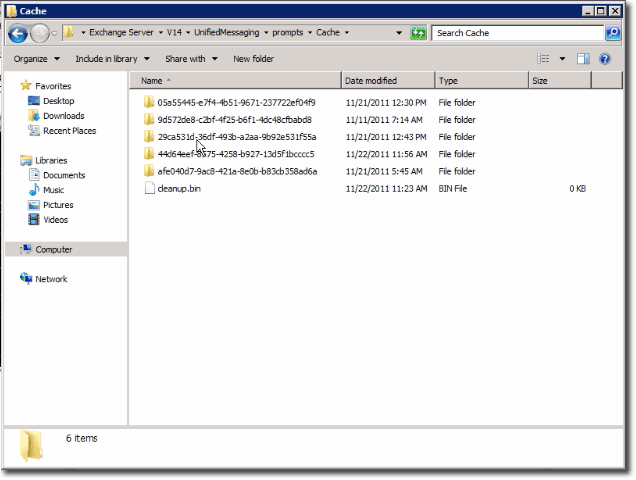
Instead, all prompts that are called-in are held in Cache:
C:/Program Files/Microsoft/Exchange Server/V14/UnifiedMessaging/prompts/Cache
Now, if you recall, Jane Smith wasn’t allowed to make any changes. It was only the Administrator who was able to make changes. So, what if you wanted another individual, or a specific account created for this purpose, to have the ability to make all these kinds of changes?
Configuring role group permissions to users to enable custom prompt creation via TUI
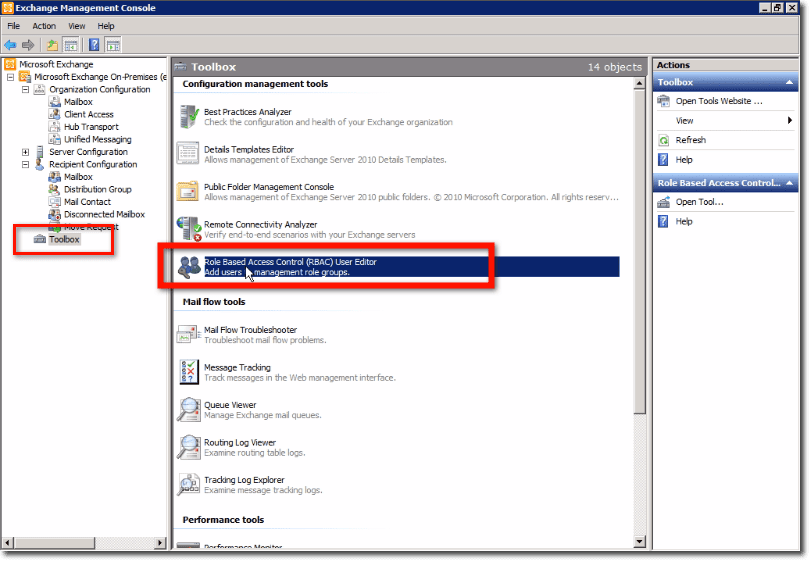
To do that, you would need to assign the necessary roles to that account. Let’s now use Jane Smith as an example. Start by going to the Exchange Management Console > Toolbox > Role Based Access Control (RBAC) User Editor.
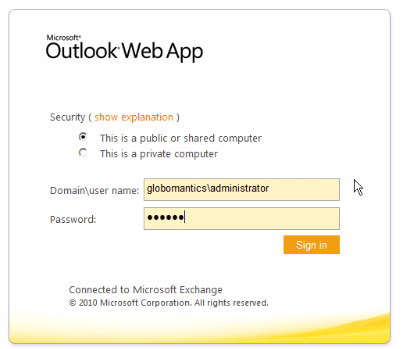
Enter your login credentials.
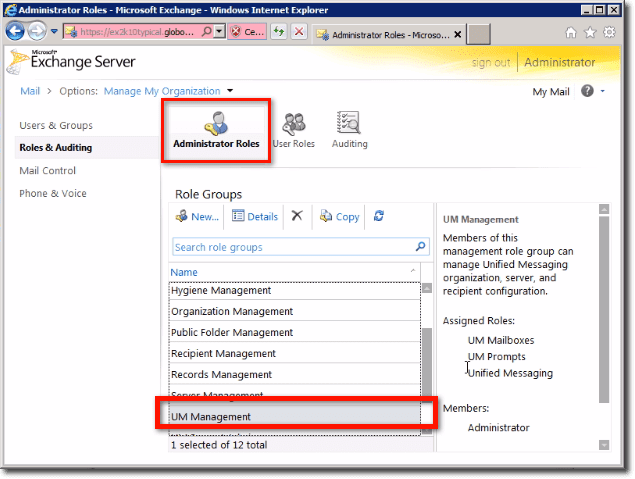
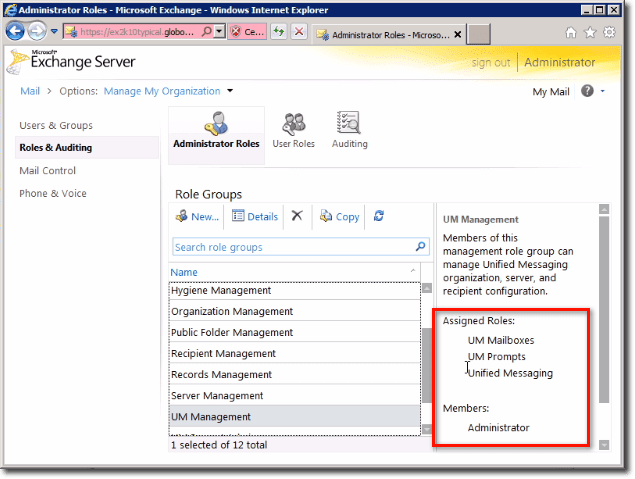
Under Administrator Roles, you’ll see a list of existing role groups. If you scroll down that list, you’ll see one of them named UM Management.
Now, if you click that UM Management role group, you’ll then see it’s own list of assigned roles. In this case, they’re UM Mailboxes, UM Prompts, and Unified Messaging. You’ll also see that it has only one member: Administrator.
If we want, we can add Jane Smith into this group. But remember, Jane Smith will not only have permission to change UM Prompts. Rather, she will have the entire UM Management role. Because she’s not a domain admin and doesn’t have a lot of the other roles, she may not be able to do much damage.
But still, we don’t want to give her all those privileges. We want to follow the least-privileged model for any of our IT admins, which will prevent individuals from bypassing security and doing things that might be harmful, intentionally or otherwise.
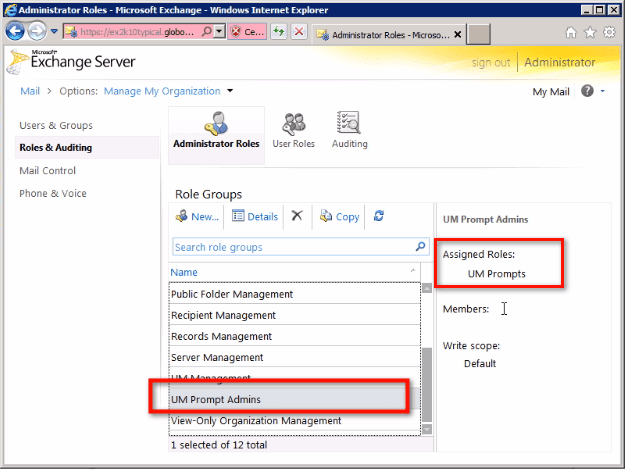
What I’m trying to say here is that we really don’t want to assign Jane Smith to UM Management. Instead, what I recommend is to create an entirely new role group strictly for this purpose. Here’s the role group I created:
As you can see, the role group I created, which is named UM Prompt Admins, only has one assigned role: UM Prompts. Therefore, after we add Jane Smith to this group, she would be able to call in, enter # + *, and she would be allowed to go through to create a custom prompt just like the admin. However, she wouldn’t be able to do anything else.
Conclusion
So there you have it. You now know how to create custom prompts for your Auto Attendants. I hope you learned a lot here and I look forward to having you again soon.


