Managing SharePoint 2013 with PowerShell: Creating the Search Application
- Blog
- SharePoint
- Post
Like many things in SharePoint 2013, to do things right you really need to use PowerShell to do it. Managing your search infrastructure can all be done with PowerShell, and some parts of it has to be done in PowerShell. In this article, I’m going to show you how to create the SharePoint 2013 search service application and create a search topology using PowerShell. So log onto the machine that is going to host your search service application and we’ll get started!
Getting Ready
To begin, create some variables for easy reference.
$SearchServer = $Env:Computername $DatabaseName = “SP2013_Search” $SearchServiceName = “Search Service Application”
Next, you’ll want to decide whether you’re going to have your search service application use an existing application pool or a new one.
$ApplicationPoolName = “SharePoint Services App Pool”
If you wish to create a new application pool, use the New-SPServiceApplicationPool cmdlet to create the new app pool and assign it a user to run as. I’m going to go with my previously existing application pool.
$ServiceAppPool = Get-SPServiceApplicationPool | Where-Object {$_.Name –eq $ApplicationPoolName }
In the end, you should have a service applications pool stored in your variable in which you’ll want to run the search service application.
Now you’re ready to start the search server instance on the server. Even though you haven’t created a search service application yet, we’ll need to prepare the server to run it. There are already some services on each server in your farm waiting to be started. Go ahead and start them on your search server. You can start each from PowerShell.
Start-SPEnterpriseSearchServiceInstance $SearchServer Start-SPEnterpriseSearchQueryAndIndexServiceInstance $SearchServer
Create a SharePoint 2013 Search Service Application
Next, create the Search Service Application itself. You will use the previously created variables to populate the parameters needed to name the database, the search application, and identify the service application pool to use.
$SearchServiceApp = New-SPEnterpriseSearchServiceApplication -Name $SearchServiceName -ApplicationPool $ServiceAppPool -DatabaseName $DatabaseName
The search application now exists, but you’ll need to create a service application proxy for it to be accessible. The proxy is what allows connections to the service through an IIS website, so for your search service to function you’ll need a proxy.
$SearchServiceProxy = New-SPEnterpriseSearchServiceApplicationProxy -Name "$SearchAppName Proxy" -SearchApplication $SearchServiceApp
Create a Single Server Topology
The topology is the list detailing which servers are handling search functions, and which of the six search components each of those servers is processing. As search topology scales out, each component can be run on multiple servers.
There is already a default topology with your search service application. It’s against the rules to change an active topology. You have to either copy the active topology or you can create a new blank topology using New-SPEnterpriseSearchTopology.
To create a new topology
The New-SPEnterpriseSearchTopology cmdlet uses the –SearchApplication parameter to identity which service application to use. We’ve already saved this in the variable $SearchServiceApp
$Topology = New-SPEnterpriseSearchTopology –SearchApplication $SearchServiceApp
To copy the existing topology
This is almost the same as above, except you specify the topology you want to copy as well as the –Clone parameter.
$OldTopology = Get-SPEnterpriseSearchTopology –SearchApplication $SearchServiceApp -Active
$Topology = New-SPEnterpriseSearchTopology –SearchApplication $SearchServiceApp –Topology $OldTopology
Next, we’ll need to reference the computer that is going to be handling each of the six search components in out topology. We reference those computers through the Service Application Instance, not through the computer name itself. So save a reference to the service instance into a variable
$SearchServiceInstance = Get-SPEnterpriseSearchServiceInstance
Set Servers Within the Search Topology Using PowerShell
Now take each of the six search components (Admin, Crawl, Content Processing, Indexing, Analytics, and Query Processing) and assign each of those components a service instance. Since we’re using only one server in this example we only have the one search service instance to reference. However, you could add resiliency to your search application by having two servers each running all components, or multiple servers splitting the components among them.
Since you have to type in the same parameters to each of these commands, you can save them into a hashtable and splat them in.
$TopArgs = @{ SearchTopology = $Topology; SearchServiceInstance = $SearchServiceInstance }
New-SPEnterpriseSearchAdminComponent @TopArgs
New-SPEnterpriseSearchContentProcessingComponent @TopArgs
New-SPEnterpriseSearchAnalyticsProcessingComponent @TopArgs
New-SPEnterpriseSearchIndexComponent @TopArgs
New-SPEnterpriseSearchQueryProcessingComponent @TopArgs
New-SPEnterpriseSearchCrawlComponent @TopArgs
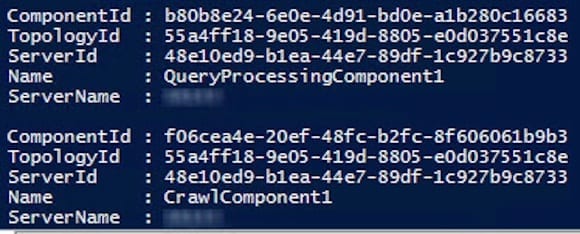
Your components are added into the topology as shown in the picture. Notice that the components are labeled as “CrawlComponent1” because each service instance that is running a component will be a unique component as far as the search service topology is concerned.
Finally, your topology is ready. All you have to do is make it the active topology for the search service application. This is done with the Set-SPEnterpriseSearchTopology cmdlet. The cmdlet takes several parameters, but we don’t really need them since we already have a topology saved into our variable and the topology is already associated with a search service application. We only need to pipe our new topology into it and we’re done.
$Topology | Set-SPEnterpriseSearchTopology
You can see the results in a visual way by looking at Central Administration. Your server will now be responsible for handling the search components and your search service application is ready to start crawling content. Luckily, PowerShell can be used to set all of that up, too.
Now that you’ve activated your topology, your initial (and blank) topology still exists. You can delete it with the Remove-SPEnterpriseSearchTopology cmdlet.
Get-SPEnterpriseSearchTopology –SearchApplication $SearchServiceApp | Where-Object {$_.State –NE “Active”} | Remove-SPEnterpriseSearchTopology
Next steps
First, now would be a great time to backup your SharePoint farm. Next, let me know how it worked for you in the comments below, or by connecting with me on Twitter or Facebook.


