Configure Operational Insights for Azure Virtual Machines
In today’s Ask the Admin, I’m going to show you how to quickly set up an OpInsights workspace in your Azure subscription, along with steps on how to deploy the OMS agent to virtual machines.
Azure Operational Insights utilizes the cloud to store and index large amounts of data collected from on-premise and cloud servers, and provides a deep insight into operations, allowing you to find and fix issues quickly, predict needs for future growth, and better adhere to best practice knowledge collected by Microsoft. For more information on OpInsights, see What is Azure Operational Insights? on the Petri IT Knowledgebase.
Configure an OpInsights workspace in Azure
Before starting, you’ll need to have an Azure subscription. If you’re not already signed up, you can register for a free trial here.
- Sign in to the management portal.
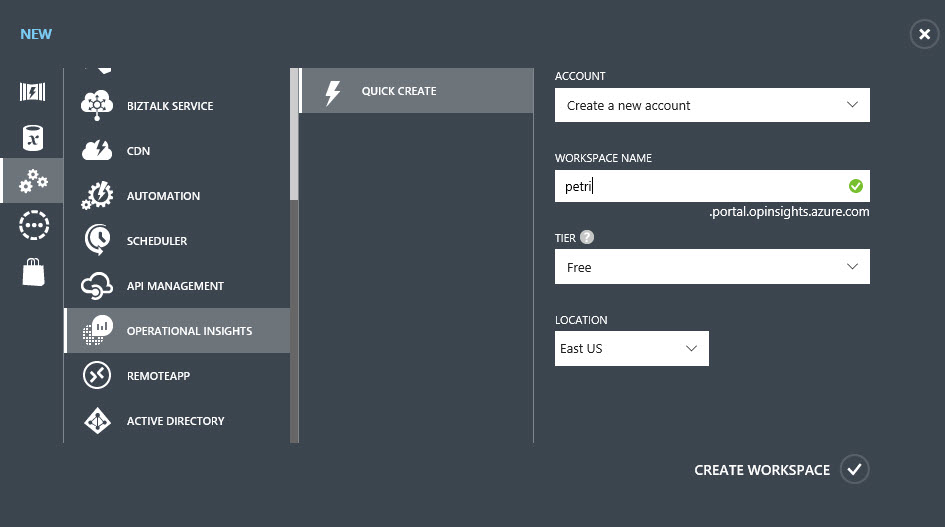
- Scroll to the bottom of the portal window, and click NEW in the bottom left corner.
- Click APP SERVICES in the pop-up window.
- In the column to the right, click OPERATIONAL INSIGHTS.
- Click QUICK CREATE.
- Give the new workspace a name, choose a tier (free, standard, or premium) and location.
The pricing tiers offer different daily limits on data collection in GBs and retention periods. For the latest information on pricing, see the Azure Operational Insights website.
- Click CREATE WORKSPACE.
The portal will switch to the OpInsights pane, and the status of the workspace changed to Active when it’s ready to use. It’s worth noting that you can create one or more workspaces in your Azure subscription.

Install the OpInsights agent in an Azure VM
Now that we have a workspace configured, OpInsights can be enabled for our Azure VMs.
- Click OPERATIONAL INSIGHTS in the list of services on the left of the management portal.
- In the OpInsights pane, click your workspace to select it.
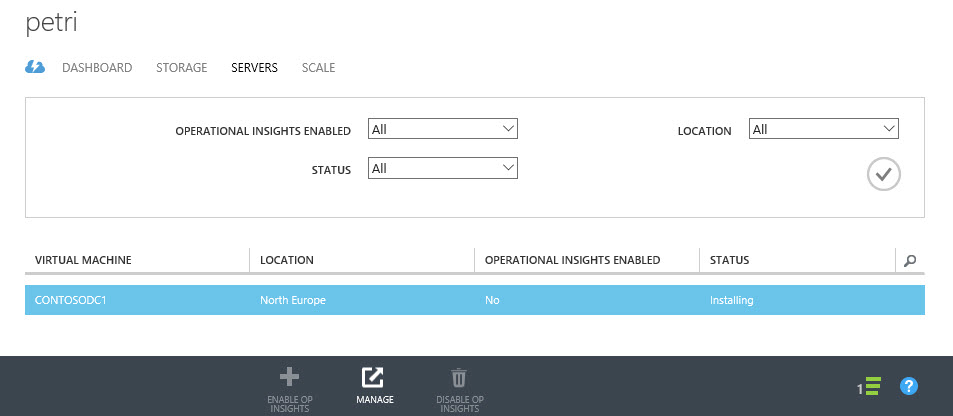
- Switch to the SERVERS tab. You’ll see a list of all servers in your Azure subscription, including the current status of OpInsights for each server.
- Click a virtual machine in the list where OpInsights is currently not enabled, and then click ENABLE OP INSIGHTS at the bottom of the portal window.
- Click YES in the pop-up dialog to confirm that you are sure you want to install the Microsoft Monitoring Agent on the VM.

Installation will take a few minutes, and you can see the status of the operation by clicking the progress bar icon in the bottom right corner of the management portal window. You may need to refresh the browser window to update the status in the OpInsights pane of the management portal. To access the OpInsights dashboard, click the MANAGE icon at the bottom of the Azure management portal window.


