Backing Up Microsoft Azure Virtual Machines
This post will discuss new functionality in Microsoft Azure that allows you to backup running Azure virtual machines. I will also show you how to protect virtual machines with this new feature.
Until recently, there has not been a way to backup running Azure virtual machines, other than installing a backup agent into the guest OS. That was not an optimal way of doing things. For example, if you were to do this with System Center 2012 R2 Data Protection Manager:
- You would need one Datacenter SML license for every eight protected virtual machines, making it an expensive backup solution.
- You could only backup from within the guest OS, which on the positive side makes backup jobs granular. On the negative side, this increases the complexity of backup and restore.
It was astonishing that the Azure cloud could not provide a per-virtual machine storage level backup system for running virtual machines as you have been able to deploy with vSphere and Hyper-V for many years. How could Azure be the future of IaaS?
Microsoft officials might quote the ‘treat your servers like cattle’ line, but in reality, both large and small business have many services that run on one or a few machines, and losing one is catastrophic. Azure needs a way to restore valuable machines from a backup.
Announcing Backup of Azure IaaS Virtual Machines
Microsoft announced that Azure Backup will now support backing up running Azure virtual machines. Windows virtual machines will have application level consistency, thanks to VSS running in the guest OS, and Linux will have file system consistency.
The backup mechanism is described by Microsoft as agentless. It is true that you don’t install an agent, but the process of protecting a virtual machine will deploy an Azure backup extension. You don’t have to deploy any infrastructure or backup software; you will deploy a backup vault and start protecting virtual machines.
Backup is deployed and managed from the Azure management portal. You discover and protect virtual machines from this portal, and create a policy-driven backup schedule. You can also perform on-demand (manual) backups. And you can track the success, failure, and progress of backups.
Microsoft has designed some efficiencies into the backup process. Azure maintains change tracking and performs incremental backups; this should make the storage of Azure Backup for virtual machines very efficient. A fabric as big and complex as Azure will have transient errors, so Microsoft built in retry mechanisms in the event of a backup failure.
Backing up Virtual Machines
You first need to create a backup vault. Log into the Azure management portal, and click New > Data Services > Recovery Services > Backup Vault > Quick Create. Name the backup vault and select the same Azure region as the virtual machines that you want to protect.
Browse into the new vault after it is created, and then into Registered Items. You must first discover your virtual machines by clicking the Discover button at the bottom of the screen.
Note: At this time, the feature is in preview and Discover has been a little temperamental. Retry the discovery after waiting a few minutes if it fails.
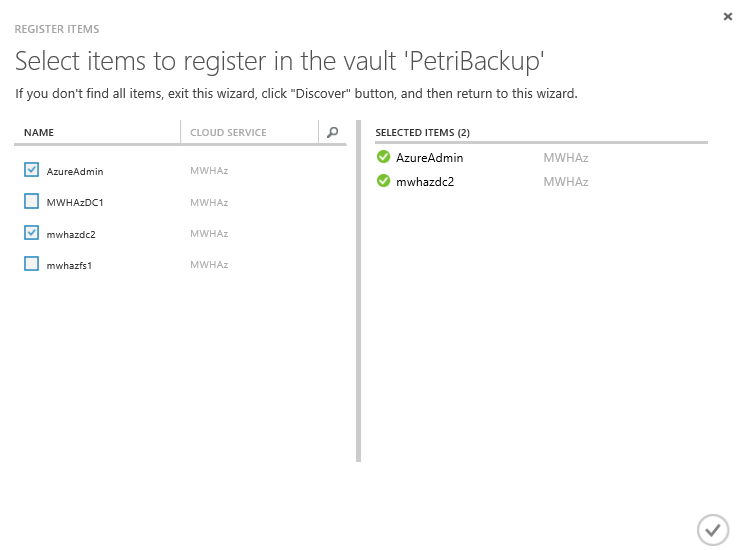
Click Register in Registered Items to select which virtual machines you want to protect. Note that the registration process requires virtual machines to be in a running state to succeed.
Note that at the time of writing, I found the registration process to be quite unreliable, and it could take several attempts to register machines one at a time.
- Name the policy.
- Select either a daily or weekly backup.
- If you selected Daily backup then select 1 time per day to do the backup. If you selected weekly then select 1 day and 1 time per week to do the backup.
- You can set the retention period to be up to 30 days or 4 weeks.
At this point the virtual machines that you included in the policy will be automatically backed up according to the policy’s schedule. You can see the status of protection in Protected Items, and you can track job progress in Jobs. Note that you can also start a manual backup by selecting a machine in Protected Items and clicking Backup Now.


![An Azure virtual machine is registered for backup [Image Credit: Aidan Finn]](https://petri-media.s3.amazonaws.com/2015/03/AzureVMRegisteredForBackup.png)
![Create an Azure virtual machine backup policy [Image Credit: Aidan Finn]](https://petri-media.s3.amazonaws.com/2015/03/DefineAzureVMBackupSchedule.png)
![Protected Items in Azure VM Backup [Image Credit: Aidan Finn]](https://petri-media.s3.amazonaws.com/2015/03/AzureVMBackupProtectedItems.png)
![Monitoring a backup job in progress [Image Credit: Aidan Finn]](https://petri-media.s3.amazonaws.com/2015/03/AzureVMBackupJobInProgress.png)