Auto-Triggering VPNs in Windows 10
Dialing a VPN before remotely connecting to an intranet application is often a necessary evil and to that end, Microsoft has made it easier in Windows 8.1 and later versions of the OS to get users working without having to remember to dial up before launching business apps. In today’s Ask the Admin, I’ll show you how to set up VPN auto-triggering in Windows 10.
End users like applications to ‘just work’ and don’t want to be bothered with having to remember to perform one or more steps before starting programs. While it’s not that difficult to explain how to establish a VPN connection, users don’t always remember what to do, especially if it’s not something they need to do frequently, and moving from one OS to another, such as from Windows 7 to 10, requires some retraining because of changes to the GUI.
Starting in Windows 8.1, Microsoft added the ability to auto-trigger a VPN when a Windows Universal or desktop apps are launched. Not only that but it’s also possible to have the VPN automatically disconnect after a given period of time once the application has been closed.
Add an auto-trigger application to a VPN profile
In this demo I’m going to use Windows 10, although the following procedure also works in Windows 8.1, with a few minor differences in where GUI elements are located. For more detailed instructions on how to set up auto-triggering in Windows 8.1, see Auto-Triggered VPN in Windows 8.1: Overview on the Petri IT Knowledgebase.
Log into Windows 10 with a user account that contains an existing VPN profile. My user account has a VPN already set up called My Private Network, and I’m going to configure an application called JRiver Media Center to automatically trigger this VPN.
- Open a PowerShell console by typing powershell in the search box on the taskbar and then select Windows PowerShell from the search results.
- In the PowerShell console, run the Add-VpnConnectionTriggerApplication cmdlet as shown below, replacing the value (My Private Network) of the $vpn variable with the name of your VPN, and $app variable (C:\Program Files (x86)\J River\Media Center 20\Media Center 20.exe) with the full path to the app that will trigger the VPN.
-
- You will be prompted to confirm the operation, and notice in the screenshot below that split tunneling for the specified VPN is disabled. Type Y for YES anyway, and then ENTER.

Now that Media Center is configured to auto-trigger the VPN, we need to enable split tunneling:
Split tunneling isn’t enabled by default when you create a new VPN in Windows, forcing all network traffic to be routed through the VPN when connected. Split tunneling allows the VPN client to determine which traffic should be routed to the public Internet and which to the dialed VPN connection, potentially creating a security risk.
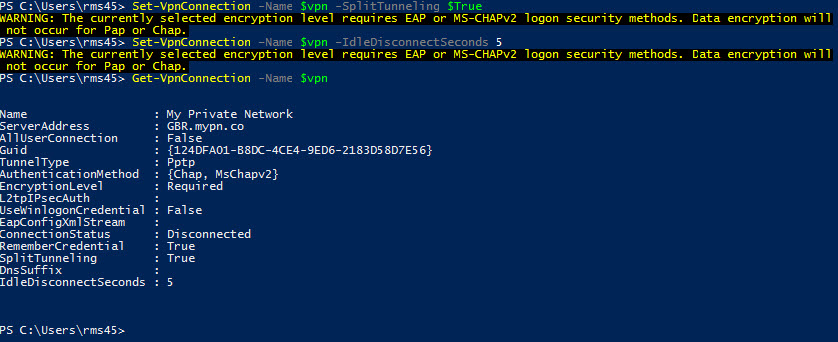
Let’s also set the idle disconnection time so the VPN will automatically disconnect once the application has closed:
To confirm the new split tunnel and idle disconnect settings on the VPN connection, run the
Get-VpnConnection

Now launch the application and you should see in the networking panel, which is accessible by clicking the network icon in the system tray, that a VPN connection has been established. Close the application, and after five seconds, or the time you specified in the
–IdleDisconnectSeconds
parameter, the VPN will be disconnected.
Remove auto-triggering
To remove auto-triggering configuration from a VPN connection, use the Remove-VpnConnectionTriggerApplication cmdlet as shown below:
Configure a trusted network
If you don’t want auto-triggering to occur when the client is already connected to a specific network, such as the corporate intranet, you can configure a list of trusted networks for which auto-triggering is disabled. This works by matching a list of trusted DNS suffixes configured for the VPN connection against the DNS suffixes set on the device’s physical network adapter. If a match is found on the physical NIC, the VPN will not be auto-triggered. Use the Add-VpnConnectionTriggerTrustedNetwork cmdlet as shown below, replacing contoso.com and acme.com with one or more DNS suffixes of trusted networks:
To remove the trusted networks, use the
Remove-VpnConnectionTriggerTrustedNetwork
cmdlet:
Notes from the field
If a user manually disconnects the VPN after it’s been auto-triggered, when the app is launched subsequently, a connection to the VPN will not be established. To re-enable auto-triggering, open the Network settings panel by clicking the network icon in the system tray, and then click the VPN connection in the panel. This will open the NETWORK & INTERNET page in the Settings app. Click the VPN connection in the Settings app and check Let apps automatically use this VPN connection. You should note that this option is only available if the VPN is configured for split tunneling.

I haven’t tested auto-triggering a VPN in Windows 8.1 but in Windows 10 RTM (build 10240), and despite the warning messages, a split tunnel isn’t necessary for auto-triggering, so you can set split tunneling on the VPN connection to $False:
This could be an undocumented feature in Windows 10 or a bug, but probably the former. There is the important caveat in disabling split tunneling: users won’t be able to re-enable auto-triggering of the VPN if a connection is manually disconnected after having been auto-triggered by the application.
Confirming auto-trigger settings
If you need to confirm the auto-trigger settings on a VPN connection, run the Get-VpnConnectionTrigger cmdlet as shown here:

Windows Universal Apps
Windows Store apps can also auto-trigger a VPN. All you need to do is specify the app’s package name instead of a path in the –ApplicationID parameter. To get a list of installed Universal apps and their corresponding package names, run the Get-AppXPackage cmdlet, where you’ll find the package names in the Name field.


