Using Virtual Desktops in Windows 10
I last visited virtual desktops in Windows 10 when the OS was still in preview. But now it’s time to look at this feature again to see how it’s matured since initial conception.
I’ve always considered virtual desktops to be a bit of a gimmick. Whether it be add-on software, such as Stardock’s Virtual Desktops, or the built-in virtual desktop feature in Windows 10. And while I’ve never integrated virtual desktops into my workflow, I know that others have. So, I wanted to revisit virtual desktops in Windows 10 to see if there were any significant changes since the last time I looked.
What’s Changed?
Microsoft has made some small but important changes to virtual desktops since the feature was in preview. The firstchange is that when an app that is pinned to the taskbar is open on another desktop, you don’t see any indication of that. In preview, Windows would mark the app as open in the taskbar, even if it wasn’t visible on the active desktop.

Microsoft has cleaned up Task View, making it more aesthetically pleasing, and there are now more options in the context menu when you right-click an app preview, such as the ability to snap apps left and right. But probably the most significant change is that it’s now possible to have multiple instances of Edge open on different virtual desktops. In preview, only one instance of Edge could run, and this one instance was displayed across all virtual desktops. As the browser is a key productivity app for many, the inability to have separate instances on each virtual desktop was a significant restriction.
Using Task View
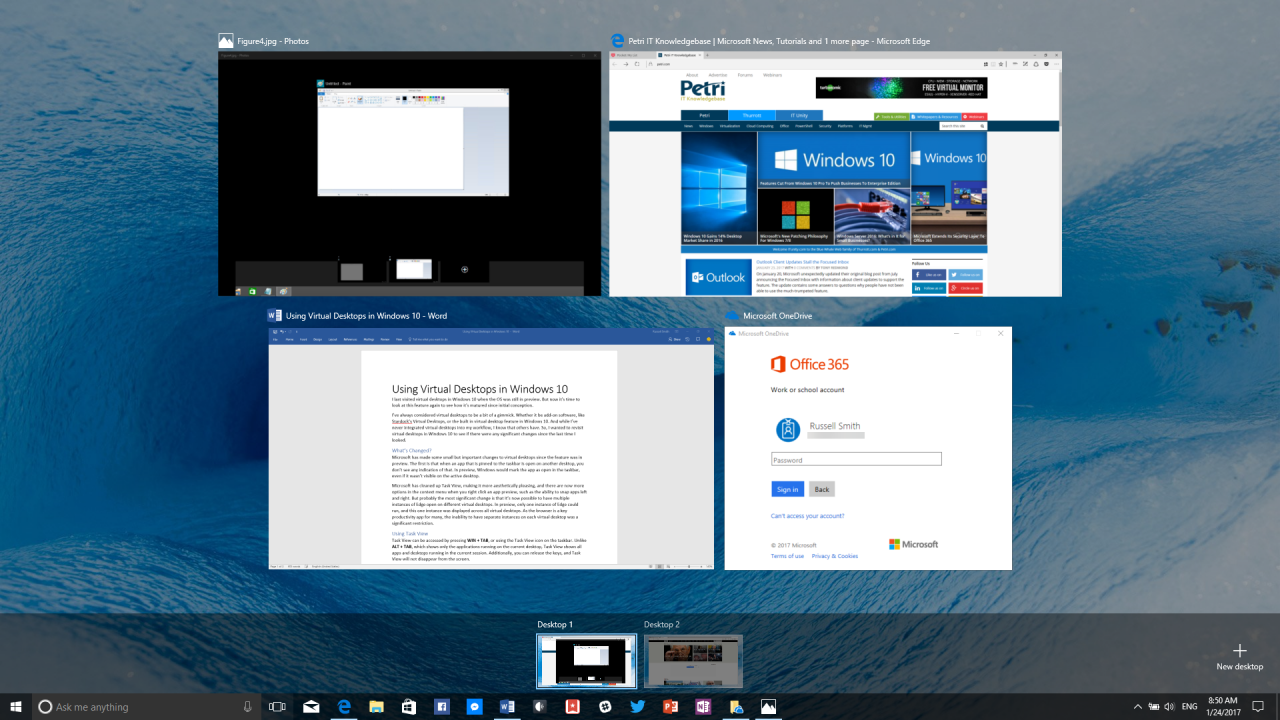
Task View can be accessed by pressing WIN + TAB or using the Task View icon on the taskbar. Unlike ALT + TAB, which shows only the applications running on the current desktop, Task View shows all apps and desktops running in the current session. Additionally, you can release the keys, and Task View will not disappear from the screen.
The easiest way to create a new virtual desktop is to press WIN + CTRL + D or open Task View, and then click + New desktop in the bottom right corner of the screen. Another option is to open Task View, right-click a running app, and select Move to > New desktop from the context menu.
Task View shows preview thumbnails of each desktop at the bottom of the screen, showing your original desktop on the far left, and any new desktop you’ve created to the right. You can click on these thumbnails to switch between virtual desktops or by pressing WIN + CTRL + LEFT and WIN + CTRL + RIGHT to scroll left and right respectively between virtual desktops.
In Task View, you can switch to any open desktop or app. But unlike ALT + TAB — where if you continue pressing, Windows scrolls through all open apps — the arrow keys are used in Task View to move between open apps and desktops. ALT + TAB can still be used to quickly cycle through all open apps, regardless of which desktop they’re running on.
For more information about keyboard shortcuts in Windows 10, see Learn the Most Useful Windows 10 Keyboard Shortcuts on the Petri IT Knowledgebase.
Moving Apps Between Desktops
Running apps can be moved to a different desktop in Task View. Right-click the app preview and select Move to > New Desktop or Move to > Desktop X, where X is the number of the desktop you want to move the app to.
In this article, I showed you how to use virtual desktops in Windows 10 and outlined the changes Microsoft has made since the feature was in preview.


