In part one of this three-part series, I showed you how to import security .inf files to a database. I also showed you how to configure and analyze security on a local server using secedit and the Security Configuration and Analysis tool. However, these tools are designed to be used with a local server, which means limited management capabilities.
In part two, I’ll show you how to get started with Microsoft’s free Security Compliance Manager (SCM) tool. We’ll also learn how it can be used to manage security and Group Policy settings, along with tracking changes to baseline security templates.
Download and Install Security Compliance Manager
You can download the latest version of the Security Compliance Manager from Microsoft. It’s best to install SCM on a management workstation, although it is possible to install it directly on Windows Server 2012. SCM requires the .NET Framework, and SQL Express Server 2008 and Microsoft Visual C++ are installed as part of the package. The following outlines steps for installing SCM:
- Log on to the device where you want to install SCM.
- Download SCM using the link listed above.
- Run the downloaded .exe file.
- In the setup dialog box, accept the license agreement for Microsoft Visual C++ and click Install.
- Click Finish on the Installation is Complete screen.
- On the Welcome to the Microsoft Security Compliance Manager Setup Wizard screen, make sure that Always check for SCM and baseline updates is checked, and click Next.
- Check I accept the terms of the license agreement, and click Next.
- On the Install Folder screen, accept the default install location by clicking Next.
- On the Microsoft SQL Server 2008 Express screen, click Next.
- Accept the license agreement for SQL Server, and click Next.
- Click Install on the Ready to Install screen.
If you get a warning from the Program Compatibility Assistant, click Run the program without getting help to continue. This is a known issue when installing SQL Server 2008 Express, even on supported OSes. Once the install has completed, click Finish.
SCM starts automatically and imports the included security baseline templates, which may take a few minutes. If you need to start SCM again, you can find it in C:Program Files (x86)Microsoft Security Compliance Manager.
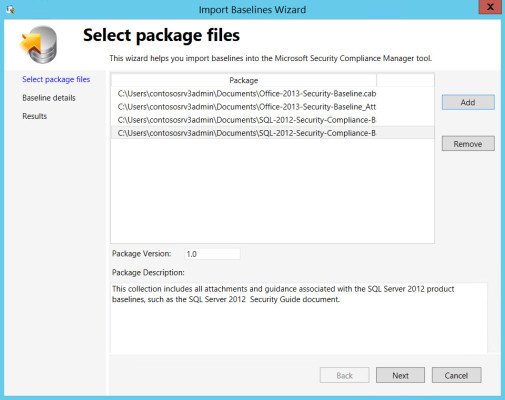
When you restart SCM for the first time, you’ll probably be prompted to download updated security templates. If you choose to download the updates, the Import Baselines Wizard will start.
- Click Run at the security prompt for each template.
- Any updated templates you choose to download should now appear in the wizard on the Select package files screen. Click Next to continue.
- On the Baseline details screen, click Import.
- Click Finish on the Results screen.
Importing updated baseline templates into SCM. (Image: Russell Smith)
Exploring Security Baselines in Security Compliance Manager
In the left pane of SCM, you’ll see all the imported baseline templates listed by product. At the time of writing, there are still no SCM baseline templates for Windows 8.1, Windows Server 2012 R2 or Internet Explorer 11. Microsoft has made baselines available as a separate download, but it is still working on versions that are compatible with SCM.
If you expand the Windows Server 2012 category in the left pane, then you’ll see a list of baseline templates for several different server roles, such as Domain Controller and File Server. Microsoft recommends that organizations only apply Domain Controller, Domain Security, and Member Server security templates to servers.
Templates for the other server roles include only settings that disable system services that are not required for the given functionality of the server. From time-to-time, this can cause compatibility issues with certain functions that need to start services on-demand in specific scenarios.
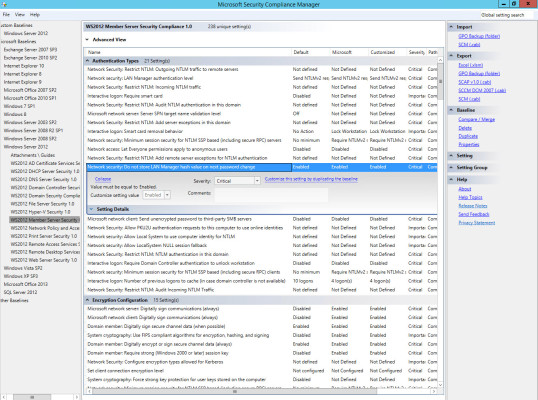
In the left pane, click WS2012 Member Server Security Compliance 1.0. The settings for this template will then load in the central pane. You’ll see along with the name of each setting, the default out-of-the-box status for Windows Server 2012. You’ll also see Microsoft’s setting in this template, where Customized shows any changes that you have made to the template.
If you click on a setting in the central pane, an additional box will appear that normally allows you to edit the setting, but because this is a baseline template that’s provided by Microsoft, you need to duplicate it before you can make changes.
Duplicate and Edit a Baseline Template
Let’s start by duplicating the WS2012 Member Server Security Compliance 1.0 template and make some customizations:
- Click the WS2012 Member Server Security Compliance 1.0 template in the left pane of SCM.
- In the right pane of SCM, make sure the Baseline section is expanded, and click Duplicate.
- In the Duplicate dialog, give the new template a name and click Save. For the purposes of this demonstration, I’ll keep the default name, which is Copy of WS2012 Member Server Security Compliance.
- The new template will now appear in the left pane and should already be selected. In the central pane, click Network security: Do not store LAN Manager hashes on next password change under Authentication Types.
You can see that this setting is Enabled by default in Windows Server 2012 and also set to Enabled in the template. Let’s change this setting to Disabled. Naturally it’s unlikely that you would want to apply this setting to a production server.
- In the dialog box for the setting, click the drop-down menu next to Customize setting value and select Disabled. It will take a few seconds to accept the new setting.
- Now click Collapse.
Notice that this setting is highlighted, showing that we have customized it, and it’s set to Disabled in the Customized column.
Compare Baseline Templates
One of the most powerful features of SCM is the ability to compare two templates to determine the differences between them, which is helpful when troubleshooting problems. The following instructions outlines how to compare baseline templates:
- In the left pane of SCM, expand Custom Baselines, Windows Server 2012 and then select the customized template that we created above.
- In the right pane, click Compare / Merge under Baseline.
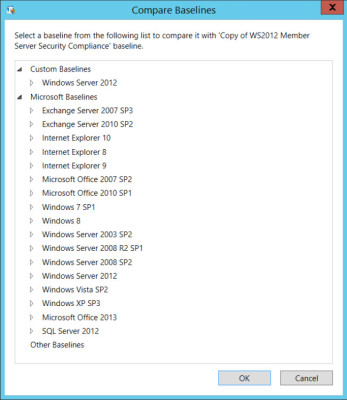
- In the Compare Baselines dialog, expand Microsoft Baselines, Windows Server 2012 and select WS2012 Member Server Security Compliance 1.0 and click OK.
Compare baseline templates with SCM. (Image: Russell Smith)
You should see straight away that SCM has detected one setting that is different, i.e. the Network security LAN Manager hashes configuration that we changed after duplicating Microsoft’s baseline template. The following instructions shows how to merge settings with SCM:
- Click Merge at the bottom of the dialog.
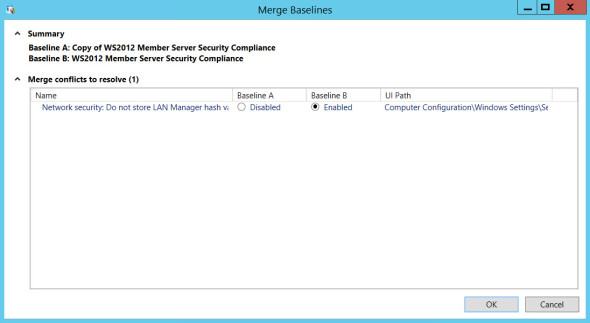
- In the Merge Baselines window, check Enabled in the Baseline B column to set the LAN Manager hashes configuration back to Enabled and click OK.
- In the Specify a name for the merged baseline dialog, type a name for the new template in the Baseline Name box and click OK.
Merge settings using SCM. (Image: Russell Smith)
A new baseline template will now appear under Windows Server 2012 in the left pane. If you compare this new template with Microsoft’s original baseline, you should see that they are identical.
Add a New Setting
Unlike the Security Configuration and Analysis tool that we used in part one, SCM can be used to manage not only security settings, but also all available Group Policy settings for a given platform. The baseline templates provided by Microsoft mainly focus on key security settings, but you can add any Group Policy setting to your custom baselines.
Let’s start by creating a new group for a category of settings not included in the default template:
- In the left pane of SCM, select the baseline template that you want to add a setting to.
- In the right pane, click Add under Setting Group.
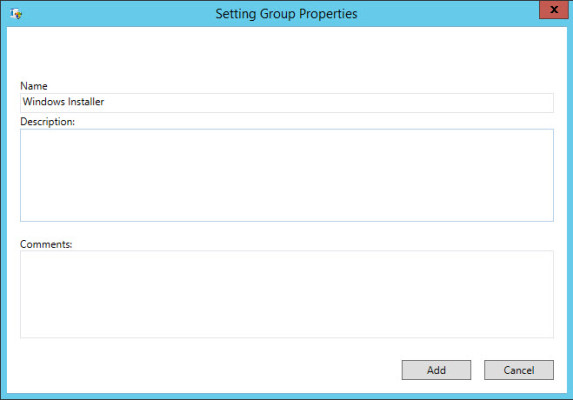
- In the Setting Group Properties dialog, type Windows Installer in the Name box and click Add. You can optionally add a description and comments to the setting.
Add a new Setting Group to a template. (Image: Russell Smith)
Now we can add a new setting for Windows Installer to the template:
- In the right pane, click Add under Setting.
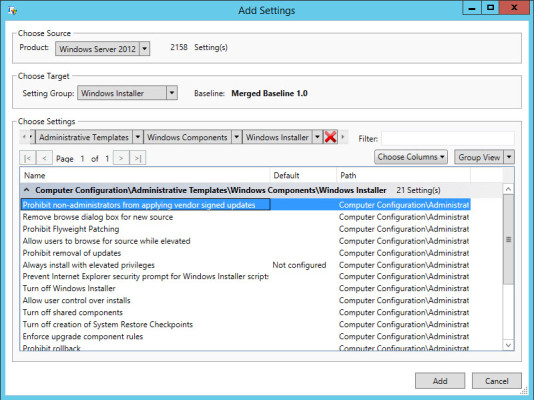
- In the Add Settings dialog, select Windows Server 2012 in the Product drop-down menu.
- Under Choose Target, select Windows Installer in the Setting Group menu.
- Under Choose Settings, click the black arrow to the left of the red cross and select Computer Configuration from the drop-down menu.
- A new menu will appear to the right. Set it to Administrative Templates. Set the following menus to Windows Components and Windows Installer respectively as shown in the figure below.
- In the list of settings below the menus, select Prohibit non-administrators from applying vendor signed updates and click Add.
Add a Group Policy setting to a baseline template. (Image: Russell Smith)
If you scroll down the list of settings in the template in the central pane of SCM, you should now see a Windows Installer group with the setting we added in the above steps.
In the third and final part of this series, I’ll show you how to export settings as Group Policy Objects (GPOs) and other useful formats, such as an Excel spreadsheet. I’ll also cover importing already existing GPOs into SCM and how to apply baseline settings to a local policy object on standalone servers.


