In the first part of this series, “Understanding Digital Audio,” I introduced you to some computer-based digital audio concepts, and to the idea that sound quality can be severely impacted by jitter, vibration, RFI and EMI. In the second part of this series, I’ll show you how to configure a new install of Windows 8.1 to ensure that sound quality isn’t significantly degraded by unwanted disk and CPU activity, and how to setup and configure JRIVER Media Center for optimal playback.
This is not an exhaustive guide of tweaks and configuration settings – there’s certainly much more you could potentially achieve – but this post will provide you with a solid grounding on which to experiment further. Most of the information in this article also applies to Windows 7 and is relevant for those who want to build a PC dedicated to music playback.
Install Windows 8.1
It’s best to start with a completely fresh install of Windows, and during the setup process, create a new local user that isn’t associated with a Microsoft account. Install any drivers required for your hardware and chipset. When you log on for the first time, run Windows Update from the control panel and make sure that all the latest patches get installed, as we’ll need to disable Windows Update later.
Configure Windows 8 for Audio
Let’s start by performing some basic tweaks to minimize CPU activity and disk I/O.
Remove Live Tiles from the Start Screen
I recommend that you remove all tiles from the Start screen. You can remove more than one tile at a time in Windows 8.1 by right-clicking the tiles you’d like to remove and then click Unpin from Start in the grey bar at the bottom of the screen.
Disable Services
So which services should you disable? As many as you can. But depending on how you will use your audio PC, there will be some services that shouldn’t be disabled, such as those relating to networking or Windows Audio services and the Multimedia Class Scheduler service (MMCSS), if you choose to use the Windows Audio Services API (WASAPI) (more on that later).
There are some services, however, that are vital to disable because of the high amount of disk I/O and CPU activity they generate. These include:
- Windows Update
- Windows Store Service
- Windows Search
- Windows Defender
- SuperFetch
- Task Scheduler
- Background Intelligent Transfer Service
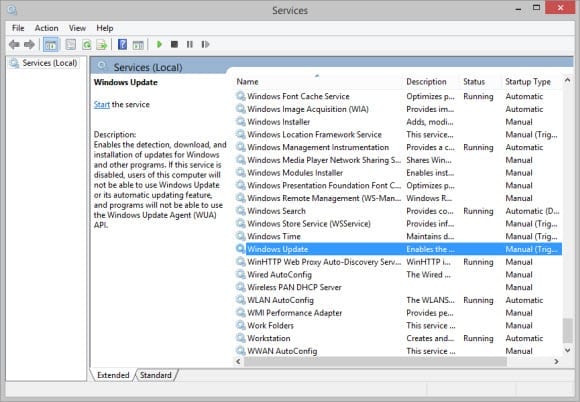
There are other services that should also be disabled, but the ones listed above are key. Most of these services can be disabled using the Services control panel applet, which you’ll find under System and Security, Administrative Tools. But some are more stubborn, such as Windows Store service and Task Scheduler, and they will require you to modify the registry.
- Switch to the Start menu and type regedit.
- Make sure that regedit is selected in the search results and press CTRL+SHIFT+ENTER to start Registry Editor with administrative privileges. Give consent or enter administrative credentials if prompted.
- In the Registry Editor window, expand HKEY_LOCAL_MACHINE, SYSTEM, CurrentControlSet, Services, in the left pane.
- Find Schedule in the list on the left and click it.
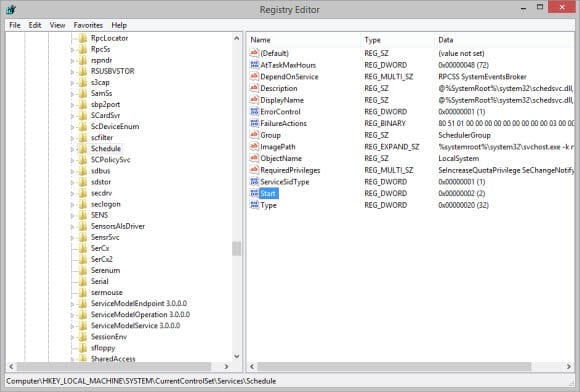
- In the right pane, double click Start, change the value to 4 in the Value data box and click OK.
- Now do the same for WSService.
Before rebooting Windows, let’s remove the page file. I have found this to be a critical step for ensuring good sound quality. Our PC doesn’t need this kind of memory management because there will always be enough RAM for our audio application.
- Switch to the Start menu and type system. Find the System control panel applet in the search results and open it.
- In the System window, click Advanced system settings on the left.
- In the System Properties window, switch to the Advanced tab.
- Under Performance, click Settings.
- In the Performance Options window, switch to the Advanced tab and click Change under Virtual memory.
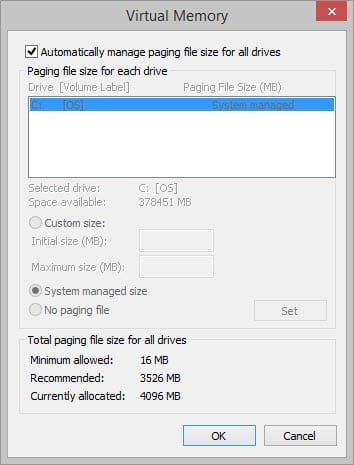
- In the Virtual Memory window, de-select Automatically manage paging file size for all drives.
- Select No paging file and click Set.
- Repeat this procedure if you have more than one drive configured with a page file.
- Click Yes in the warning dialog and then click OK in the Virtual Memory window.
- Click OK in the Performance Options window and close the System Properties control panel applet.
- Now reboot Windows.
Once Windows has restarted, we should also disable Windows Defender.
- Switch to the Start screen and type defender.
- Make sure that Windows Defender is selected in the search results and press CTRL+SHIFT+ENTER to start Windows Defender with administrative privileges. Give consent or enter administrative credentials if prompted.
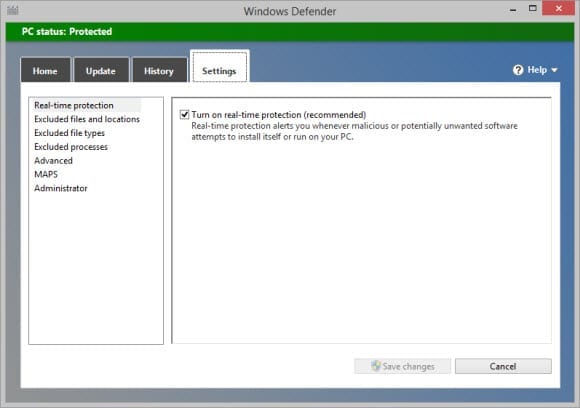
- In the Windows Defender configuration window, switch to the Settings tab.
- Under Real-time protection, de-select Turn on real-time protection (recommended) and click Save changes.
- Close Windows Defender.
Change the Power Plan
Most people find that setting the Windows power plan to high performance improves sound quality. You can change this setting in the Control Panel under System and Security and then select Power Options.
Now that you’ve gone through the list of services and disabled most of them, you should have a much quieter Windows. If you are not sure what a particular service does, then don’t disable it before doing some more research. Disabling security features, such as the Security Center and Windows Firewall, is also desirable, but do make sure you take provisions to keep your audio PC protected.
Configure USB and Audio Hardware
For the purposes of this article, I’m going to assume that you are using an external DAC connected to the PC via USB. In an ideal world, your DAC should be connected to a USB root hub that isn’t shared by any other devices. Let’s use Device Manager to check our USB configuration. Make sure that your DAC is connected and turned on.
- Right-click the Start icon on the desktop and select Device Manager from the menu.
- Go to the View menu and select Devices by connection.
- Expand ACPI x64-based PC, Microsoft ACPI-Compliant System and PCI Express Root Complex.
- Now expand each USB host controller one by one until you find your DAC. Make a note of the controller’s identifier, which is usually a four digit code shown at the end of the controller’s description in Device Manager.
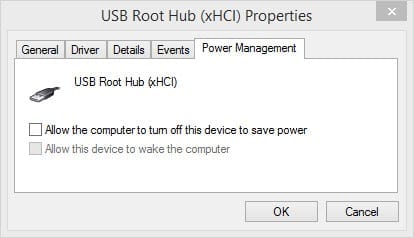
- Double-click each USB hub listed under the controller to which your DAC is connected, switch to the Power Management tab, de-select Allow the computer to turn off this device to save power and click OK. Note that you must run Device Manager as a local administrator to be able to see the Power Management tab.
- Close Device Manager.
Now let’s deprioritize some hardware devices to improve sound quality:
- Switch to the Start menu, type msinfo32 and press Enter.
- In the System Information application, expand Hardware Resources in the left pane and click IRQs.
- Locate the USB controller to which the DAC is connected, by its identifier that we made a note of earlier, and write down the IRQ number.
- Close System Information.
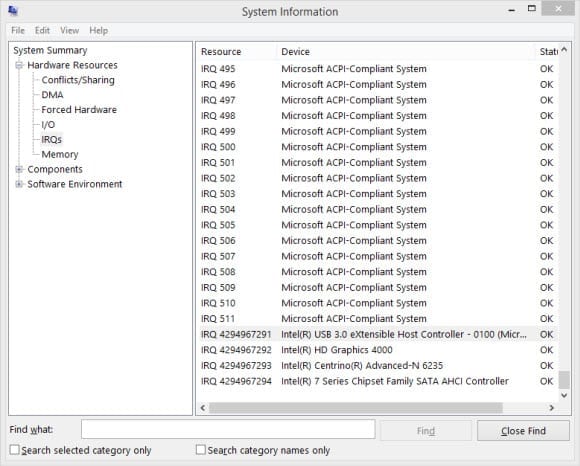
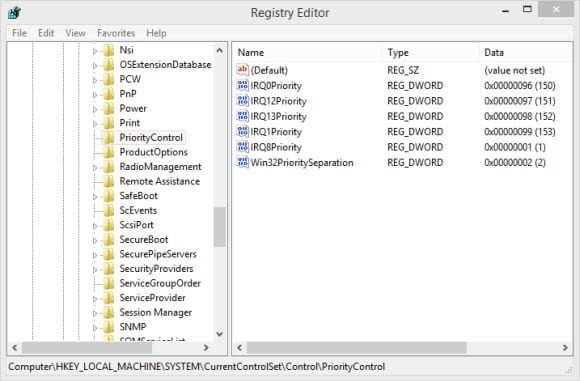
Let’s give priority to the System CMOS/real time clock (IRQ 8), and deprioritize the keyboard, PS/2 mouse, Numeric Data Processor and the System timer.
- Switch to the Start menu and type regedit.
- Make sure that regedit is selected in the search results and press CTRL+SHIFT+ENTER to start Registry Editor with administrative privileges. Give consent or enter administrative credentials if prompted.
- In the Registry Editor window, expand HKEY_LOCAL_MACHINE, SYSTEM, CurrentControlSet, and Control, in the left pane.
- Under Control, find PriorityControl and right click it, selecting New, DWORD (32-bit Value) from the menu.
- In the new value box on the right, type IRQ0Priority and press Enter.
- Double click the new value on the right and in the Edit DWORD (32-bit) Value dialog, click Decimal, type 150 in the Value data box and click OK.
Repeat this procedure and create the following DWORD values with associated data (decimal). I’ve included IRQ0Priority for completeness:
| Registry value | Registry data | Associated device |
| IRQ0Priority | 150 | System timer |
| IRQ1Priority | 153 | Keyboard |
| IRQ12Priority | 151 | Mouse PS/2 |
I recommend starting with the IRQ priority settings listed in the table above. You may later decide to add the IRQ of the USB controller that your DAC is connected to and assign it a priority of 2 for example, to give it priority over devices such as the graphics card. Listen to determine if this improves sound quality, the results may vary between systems.
- Reboot the computer for the IRQ priority settings to take effect.
Configure the DAC for “Exclusive Mode”
We should also set the DAC for exclusive mode, meaning that once your audio playback software starts to play music, no other software is able to share the DAC.
- Switch to the Start screen, type control panel and press Enter.
- In the Control Panel, click Hardware and Sound.
- Under Sound, click Manage audio devices.
- In the Sound control panel applet, find your DAC on the playback tab and double click it.
- In the Speaker Properties window, switch to the Levels tab and increase the audio output to 100.
- Switch to the Enhancements tab and check Disable all sound effects.
- Finally, click the Advanced tab and check both Allow applications to take exclusive control of this device and Give exclusive mode applications priority.
- Click OK to complete the procedure.

Setup JRIVER Media Center for Optimal Playback
The software used to play your music files has an influence on sound quality. The two most popular pieces of software are JRIVER Media Center and Foobar2000. Media Center is widely considered to sound superior to Foobar2000, and has better library management features. It’s not free like Foobar, but well worth the small $50 asking price. A 30-day trial is also available.
Let’s configure Media Center to make sure it doesn’t create unwanted disk I/O and CPU activity, and to work with our connected DAC.
- Download and install JRIVER Media Center.
- Launch JRIVER Media Center from the Start screen.
- In the left pane, expand Playing Now, Playing from Main Library and click Main Library.
- In the main window of Media Center, click Library Options.
- In the Options dialog, deselect Run auto-import in background and click OK.
Note that after modifying this setting, you will need to manually start auto-import to add new files to your Media Center library.
- Click the Help menu, select Update Channels and click Disable Automatic Updates (not recommended).
- Now select Options from the Tools menu.
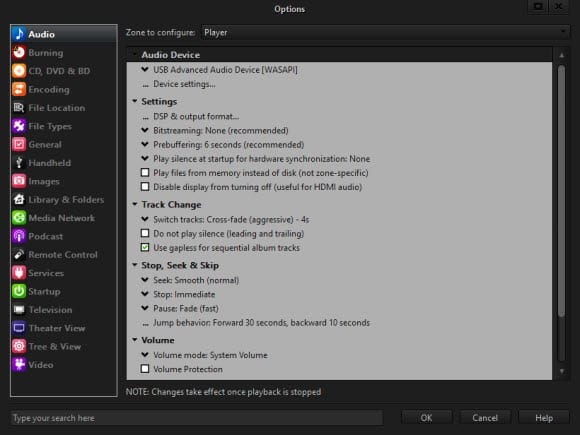
- On the Audio tab, select your DAC under Audio Device.
The driver for your DAC will likely support different audio outputs and be listed more than once under this menu. If your DAC supports ASIO, it’s advisable to select this option. If not, you can choose between WASAPI and Kernel Streaming. Some DACs sound better using WASAPI, and others using Kernel Streaming, so some experimentation will be required to determine the best setting.
- Now click Device settings.
- Under Device, check Open device for exclusive access and Maximize device volume during playback.
Under Buffering, note that the default buffer of 100 milliseconds, or 0.5 seconds for Kernel Streaming, can be lowered. Start with the recommended buffer setting, and experiment by gradually reducing the buffer. Smaller buffers should in theory sound better, but they do increase the load on the CPU, so the result isn’t always better sound quality. I recommend leaving all the other audio settings as default, unless you experience a problem with playback.
Now let’s enable WebGizmo. This will enable us to browse the media library and control playback without having to open the main JRIVER Media Center interface. This results in better sound, as GUI windows are known to introduce jitter.
- Switch to Media Network in the left pane of the Options window.
- Check Use Media Network to share this library and enable DLNA.
- Click Next in the Configure Media Network dialog.
- Click Next again and Allow access for any Windows Firewall warning that you receive.
- In the Configure Firewall dialog, click Yes to allow Media Center to configure Windows Firewall.
- In the Information dialog, click OK. We don’t require the DLNA Access Key.
- Click Finish.
- Back in the Options dialog, expand Advanced. Unless you plan to use DLNA, deselect the DLNA Server, DLNA Renderer and DLNA Controller options.
- Expand WebGizmo (play and control your media from a web browser) and click Open with web browser.
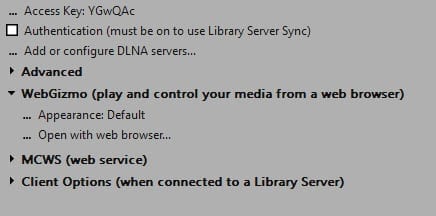
- A web browser will open with the link to your Media Center Media Server. It will fail to open because we haven’t started the media server yet, but create a shortcut on the desktop to the URL in the browser’s address bar.
- Click OK in the Options dialog and close Media Center.
- Reboot Windows.
Playback Using Media Center
Once Windows has restarted, launch JRIVER Media Center.
- Go to the Tools menu and select Advanced Tools > Media Server.
- Double-click the shortcut you created earlier for WebGizmo; you should now be taken to the Gizmo home page.
- Close the main JRIVER Media Center interface.
- You can now navigate your media library using Gizmo, and control playback from the web browser. Once playback has started, be sure to close the browser window, or alternatively, run Gizmo on a remote computer.
Now sit back and enjoy the music!


