Infrastructure-as-Code Part 3: Deploy Active Directory and Certificate Services in Azure
In the final part of this series, I’ll show you how to use the code I created in the previous two installments to provision the resources in Azure.
In part one, I explained how I created the JSON template that provisions the resources in Azure. I combined two templates from Microsoft’s Quickstart gallery and walked you through how the resources are provisioned. The final template provisions two domain controllers and a member server. In part two, I showed you how to add a PowerShell Desired State Configuration (DSC) resource to the project.
The final step is to provision the resources, which you can do directly from Visual Studio.
Prerequisites
In part one, I showed you how to import the project template into Visual Studio. But before you can use it to provision resources in Azure, there are several components that need to be in place. If you haven’t already got an Azure subscription, sign up for a free trial here.
You’ll also need the latest version of PowerShell, which is part of the Windows Management Framework (WMF). If you have Windows 10, the latest version of WMF should be installed on your device. If you are using an earlier version of Windows, you can download WMF 5.1 from Microsoft’s website here. You will also need Microsoft Azure PowerShell installed. I recommend that you use Microsoft’s Web Platform Installer to get the Azure PowerShell cmdlets.
Because we’re using PowerShell Desired State Configuration (DSC) as part of the project, you’ll need to install the following modules on your PC:
- xActiveDirectory
- xAdcsDeployment
- xDisk
- xNetworking
- xPendingReboot
- xStorage
To install a module, open Windows PowerShell and use the Install-Module cmdlet as shown below:
Install-Module -Name xActiveDirectory -Scope CurrentUser
Deploy the Project
Now we are ready to deploy the project. Follow the instructions to provision the resources from VS.
- In the Solution Explorer panel, right click the project name and select Deploy > New from the menu.
- In the Deploy to Resource Group dialog, select an account that you will use to connect to Azure in the first dropdown menu. If no accounts appear, click Add an account and follow the onscreen instructions to add a new account.
- Select an Azure subscription from the Subscriptions menu.
- Click the Resource group menu and select <Create New…>.
- In the Create Resource Group dialog, enter a name for the new resource group and then select a region.
I recommend setting the name of the resource group to ActiveDirectory. If you want to call it something different, it is best to modify the $ResourceGroupName string in the parameters section of Deploy-AzureResourceGroup.ps1.
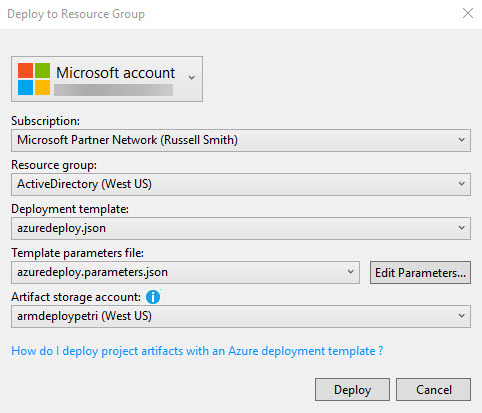
- Select azuredeploy.json from the Deployment template menu.
- Select azuredeploy.parameters.json from the Template parameters file menu.
- Select a storage account from the Artifacts storage account menu. If no storage accounts exist in the subscription, the deployment script will automatically create a new storage account.
Artifacts are items like PowerShell DSC files that virtual machines must access as part of the provisioning process. The artifacts storage account should be in the same region to avoid access token expiry errors like that shown below.
Deployment sometimes stops with the following error:
The access token expiry UTC time ’12/19/2017 1:23:07 PM’ is earlier than current UTC time ’12/19/2017 1:23:09 PM’.
I created the artifacts storage account manually and put it in its own resource group. This allows me to delete the deployed resources by deleting the ActiveDirectory resource group without losing the artifacts storage account. If you decide to create a storage account manually, you can use the New-AzureRmResourceGroup and New-AzureRmStorageAccount PowerShell cmdlets as shown below.
New-AzureRmResourceGroup -Name 'ARM_Deploy_Staging' -Location 'US West'

New-AzureRmStorageAccount -ResourceGroupName 'ARM_Deploy_Staging' -AccountName 'armdeploypetri' -Location 'US West' -SkuName 'Standard_LRS'
- Click Deploy.
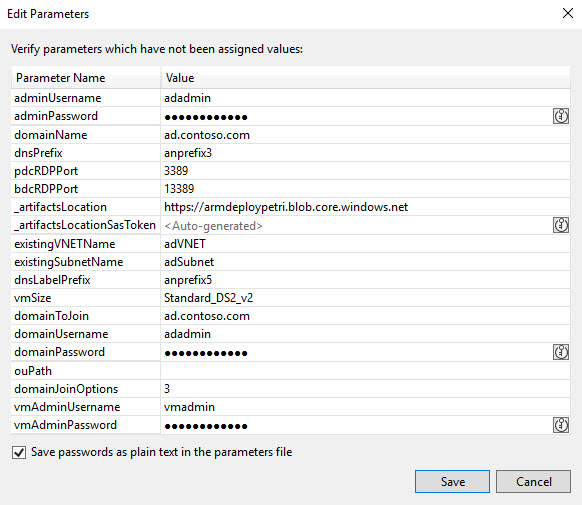
- Before provisioning starts, there is the opportunity to edit deployment parameters. Check that you are happy with the parameter values and click Save.
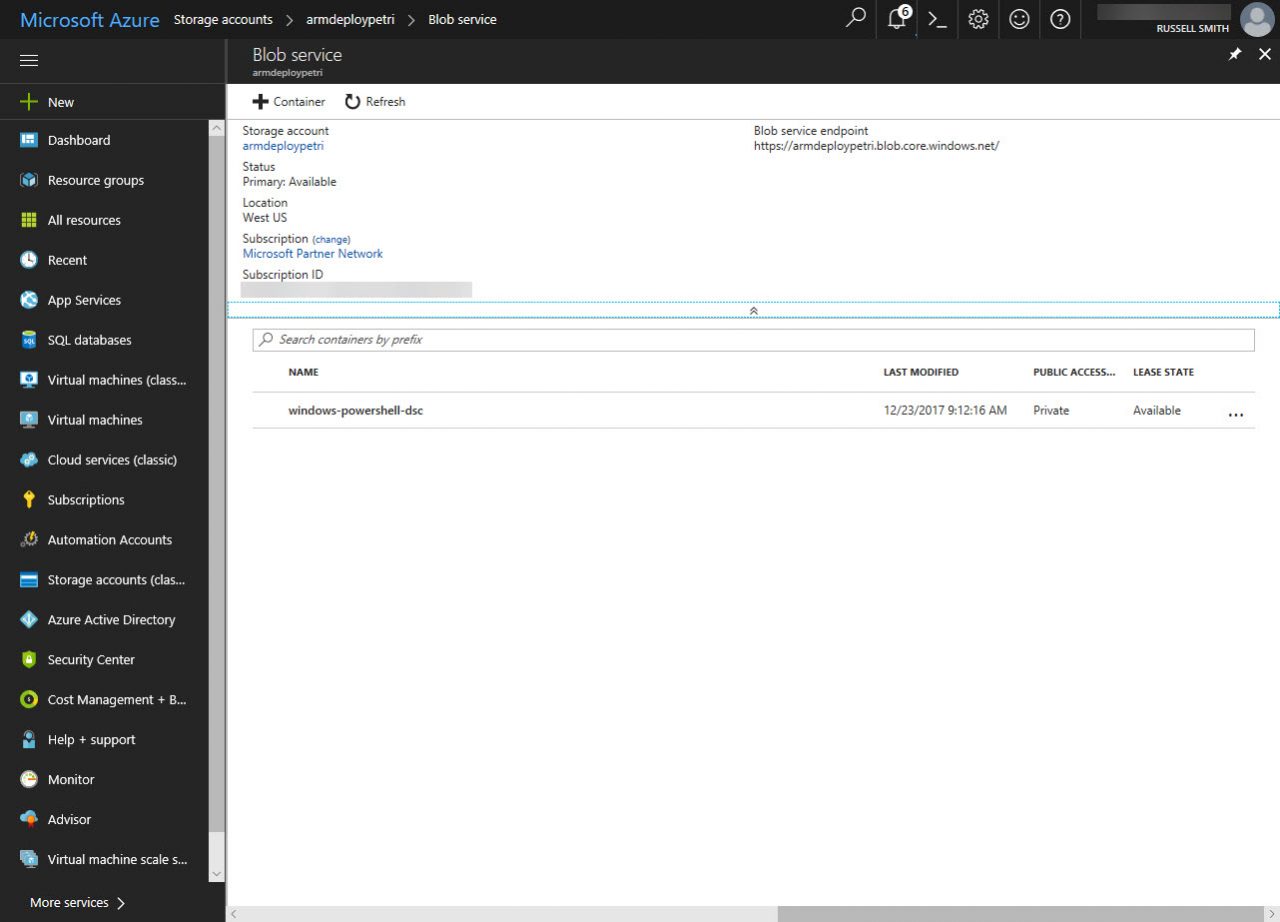
The password for both the adadmin and vmadmin accounts is Password12341234. You can change this if you want. The _artifactsLocation and _artifactsLocationSasToken parameters are automatically generated by default. But I found that the _artifactsLocation parameter value should be set manually. You can get the URL for your storage account in the Azure management portal. Make sure that there is no backward slash on the end of the URL.
Right:
https://armdeploypetri.blob.core.windows.net
Wrong:
https://armdeploypetri.blob.core.windows.net/
Deployment will now start, and you can monitor its progress in the Output panel. If you can’t see the Output panel, click CTRL+ALT+O. The deployment can take a long time. Anything from 30 minutes to an hour. So, be patient.
Notes From the Field
If you’ve observed the notes I made about working with PowerShell DSC and JSON templates in the previous two parts of this series, your resources should be provisioned without any errors. The deployment might fail with an error message like this:
Error: Code=InvalidContentLink; Message=Unable to download deployment content from ‘https://************.blob.core.windows.net/windows-powershell-dsc/nestedtemplates/vnet.json.’
The deployment validation failed
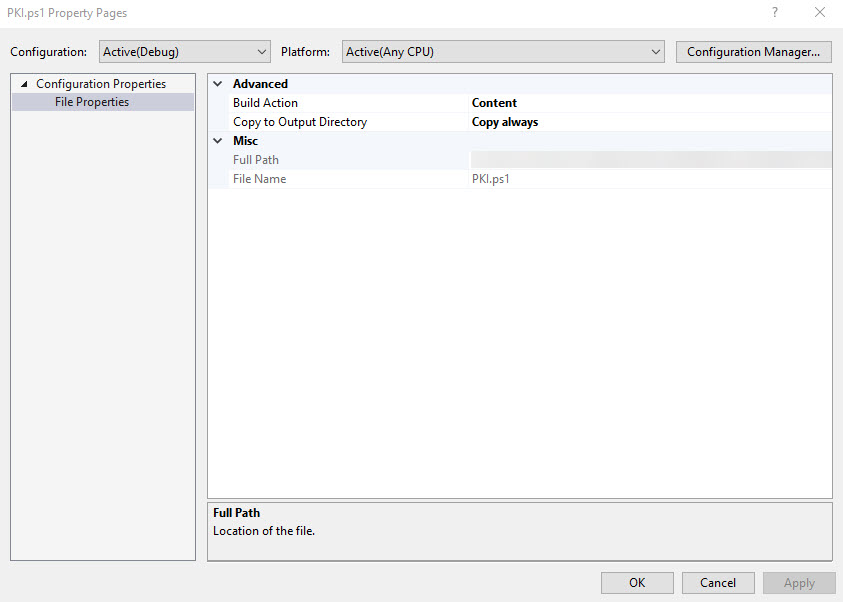
To solve this problem, make sure that all the .json and .ps1 files in the project have the Build Action set to Content and Copy to Output Directory set to Copy always. Right click each file in Solution Explorer and select Properties from the menu to access the Property Pages dialog.
Most other problems I encountered were with PowerShell DSC. My original script used a separate file for the $ConfigData section. This is not supported by Deploy-AzureResourceGroup.ps1, which is an automatically generated script that manages deployment and uploads artifacts to Azure storage. Moving the $ConfigData into my PowerShell DSC script also didn’t help.
The solution was to use the same method for passing parameters as the DSC scripts used to provision Active Directory on the VMs. A parameters section is required at the top of the DSC script and I added the DomainName and AdminCreds parameters to the part of the azuredeploy.json template that runs DSC for the certification authority configuration. The values for username and password are taken from variables at the top of the template (adminUserName and adminPassword). Note that AdminPassword is in the protectedSettings section. There’s a reference to it in the settings section: “Password”: “PrivateSettingsRef:AdminPassword”.
           "settings": {
              "modulesUrl": "[variables('pkiTemplateUri')]",
              "sasToken": "",
              "configurationFunction": "[variables('pkiConfigurationFunction')]",
              "properties": {
                "DomainName": "[parameters('domainName')]",
                "AdminCreds": {
                  "UserName": "[parameters('adminUserName')]",
                  "Password": "PrivateSettingsRef:AdminPassword"
                }
              }
            },
            "protectedSettings": {
              "Items": {
                "AdminPassword": "[parameters('adminPassword')]"
              }
            }
File path locations are also important. Especially if you decide to tidy up a project by moving files to different locations. For example, I moved PKI.ps1 from the root of the project to the DSC folder so that it was located with the 3 other PowerShell DSC scripts. But this also required me to update the pkiTemplateUri parameter in azuredeploy.json to reflect the new file location. windows-powershell-dsc is a container in Azure artifact blob storage where DSC archives that are generated by Deploy-AzureResourceGroup.ps1 are uploaded from the DSC project folder.
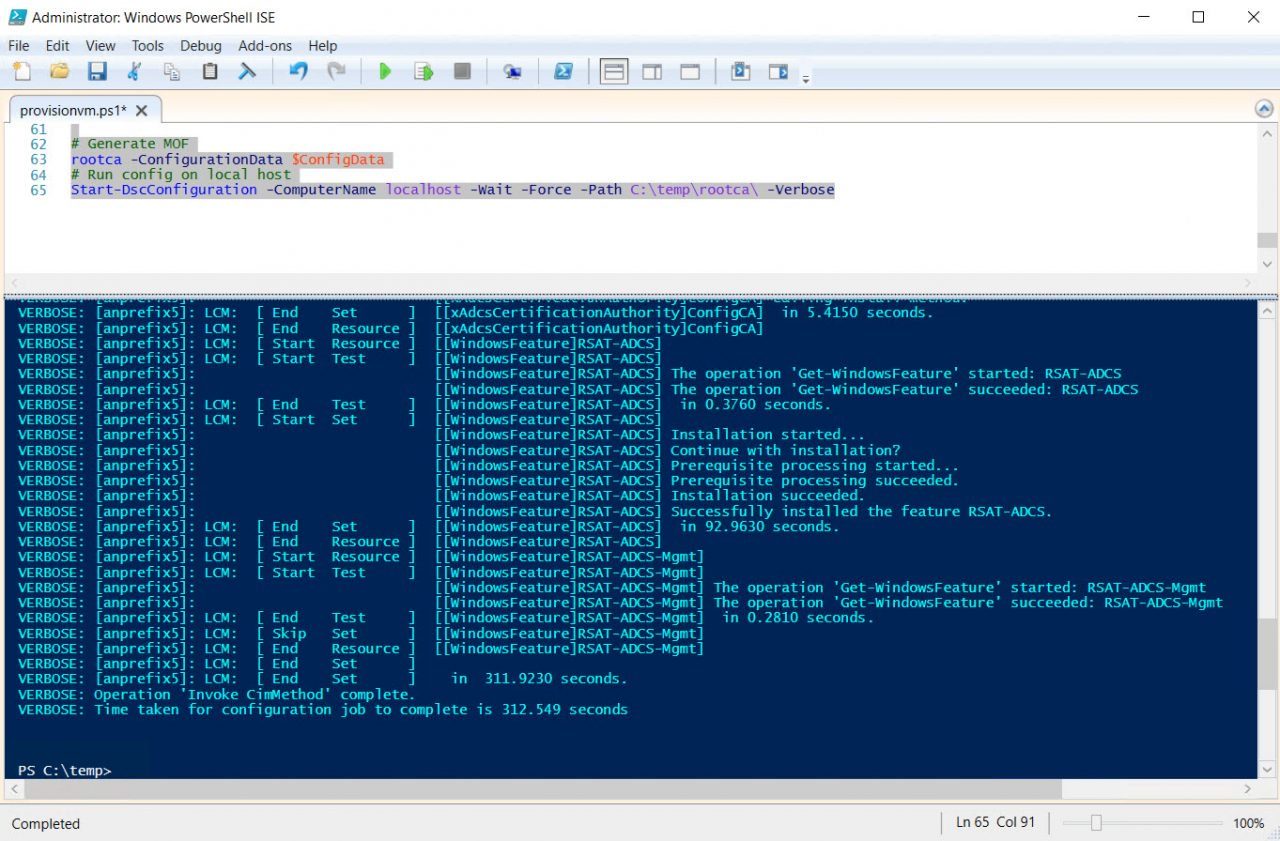
To test the deployment, you should make sure that your PowerShell DSC script runs correctly on a server before trying to deploy it remotely from VS because it’s much faster to carry out the testing locally. I commented out two lines of code in the PowerShell DSC script (PKI.ps1) that you can use to generate a MOF file and run the configuration locally. I also commented out the $ConfigData section because I’m using the param section at the top of the script to pass those values from the JSON template. If you want to test the script locally on the device, you need to uncomment the $ConfigData section and comment the param section.
rootca -ConfigurationData $ConfigData
Start-DscConfiguration -ComputerName localhost -Wait -Force -Path C:\temp\rootca\ -Verbose
To use this code, create a directory called temp in the root directory of the server where you want to test the configuration. The PowerShell DSC script should be placed in the temp directory. Open a PowerShell prompt, change the working directory to temp (cd c:\temp), and uncomment the two lines of code shown above and the $ConfigData section in PKI.ps1 by removing the hashes. Then run all the code in the file. The Local Configuration Manager will start the configuration and you can check to see if it works. You can also use Test-DscConfiguration to check all the components are deployed as expected:
Test-DscConfiguration -ComputerName localhost
If you need to add new or existing files to the project, right click a folder in Solution Explorer and select Add > New Item or Existing Item from the menu. If you are adding a new item, in the Add New Item dialog select PowerShell Script Data File. For example, change the name if needed in the Name: field and click Add. Don’t forget to set the Copy to Output Directory and Build Action properties for the new file.
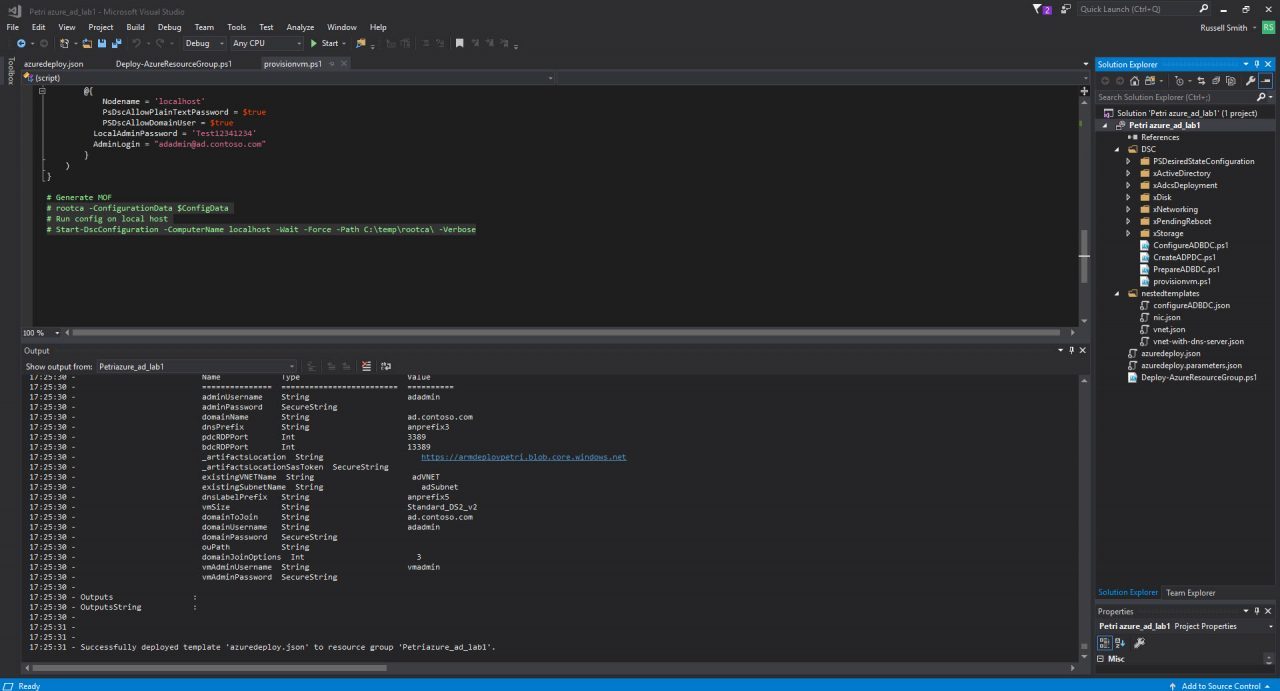
Azure ARM templates are supposed to be idempotent. I.e. if a resource has already been deployed, ARM will not redeploy it if it is still configured as set out in the JSON template. So, you should be able to redeploy the project in VS, and provisioning will pick up where it left off without redeploying already existing resources. But in practice, I found that I needed to delete the resource group containing the resources before I could redeploy the project without receiving an error. But it might depend at what stage in the process the deployment stops.
Template deployment returned the following errors:
Resource Microsoft.Compute/virtualMachines ‘anprefix5’ failed with message ‘{
“error”: {
“code”: “PropertyChangeNotAllowed”,
“target”: “osDisk.vhd.uri”,
“message”: “Changing property ‘osDisk.vhd.uri’ is not allowed.”
– }
– }’
When a DSC script has finished running successfully, you’ll see a message in the Output panel in Visual Studio:
09:43:42 – VERBOSE: 9:43:42 AM – Resource Microsoft.Resources/deployments ‘UpdateBDCNIC’ provisioning status is succeeded
You won’t always see this message for the last DSC script to run. But that doesn’t mean that it hasn’t run successfully. The last DSC script in the template provisions certificate services on the third VM. So, log on after deployment and check to see if AD Certificate Services appears on the dashboard in Server Manager. You might need to wait a few minutes for the DSC script to complete.
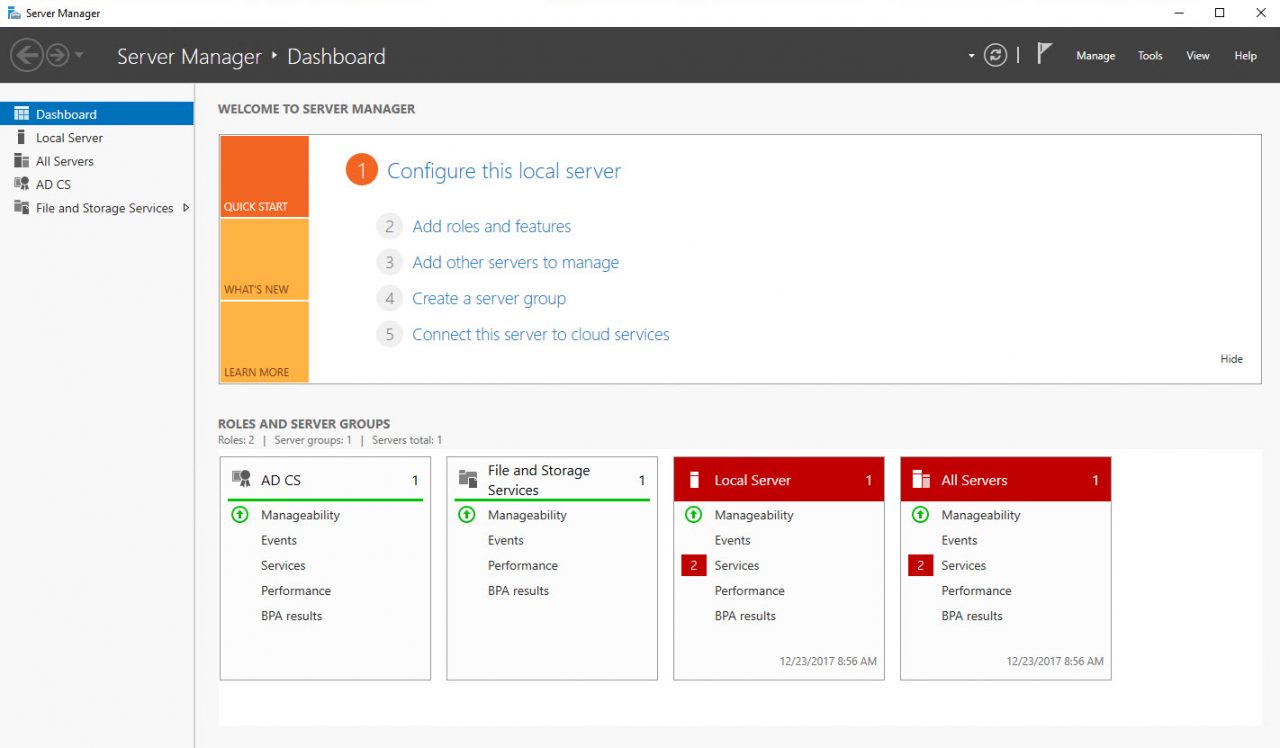
In this article, I showed you how to use a set of Azure JSON templates and PowerShell DSC to deploy an Active Directory forest with two domain controllers and a third server as an Enterprise Root Certification Authority.


