How to Get Outlook to Play Nice with Windows 10 Virtual Desktops
Virtual desktops allow you to organize open applications on one or more ‘virtual’ desktops. Not to be confused with Windows Virtual Desktop (WVD), the new Windows 10 Desktop-as-a-Service (DaaS) solution from Microsoft that is currently in preview, virtual desktops is a feature inside Windows 10 aimed at improving workflow and productivity. For more details on how to work with virtual desktops, see Using Virtual Desktops in Windows 10 on Petri.
I like to keep Microsoft To Do and Outlook open on a virtual desktop in Windows 10. To Do behaves as expected. If I click the pinned taskbar icon on desktop 1, I get taken to the running instance of the app on desktop 2. But like other Office 365 ProPlus desktop applications, Outlook can run multiple instances. Now that makes sense for most Office apps, like Word and Excel. But I don’t think I’ve ever needed to run two instances of Outlook at the same time. So, when clicking the pinned Outlook taskbar icon on desktop 1, instead of being taken to the running instance of Outlook on desktop 2, Windows opens a new instance of Outlook on desktop 1.
Change Virtual Desktop Settings
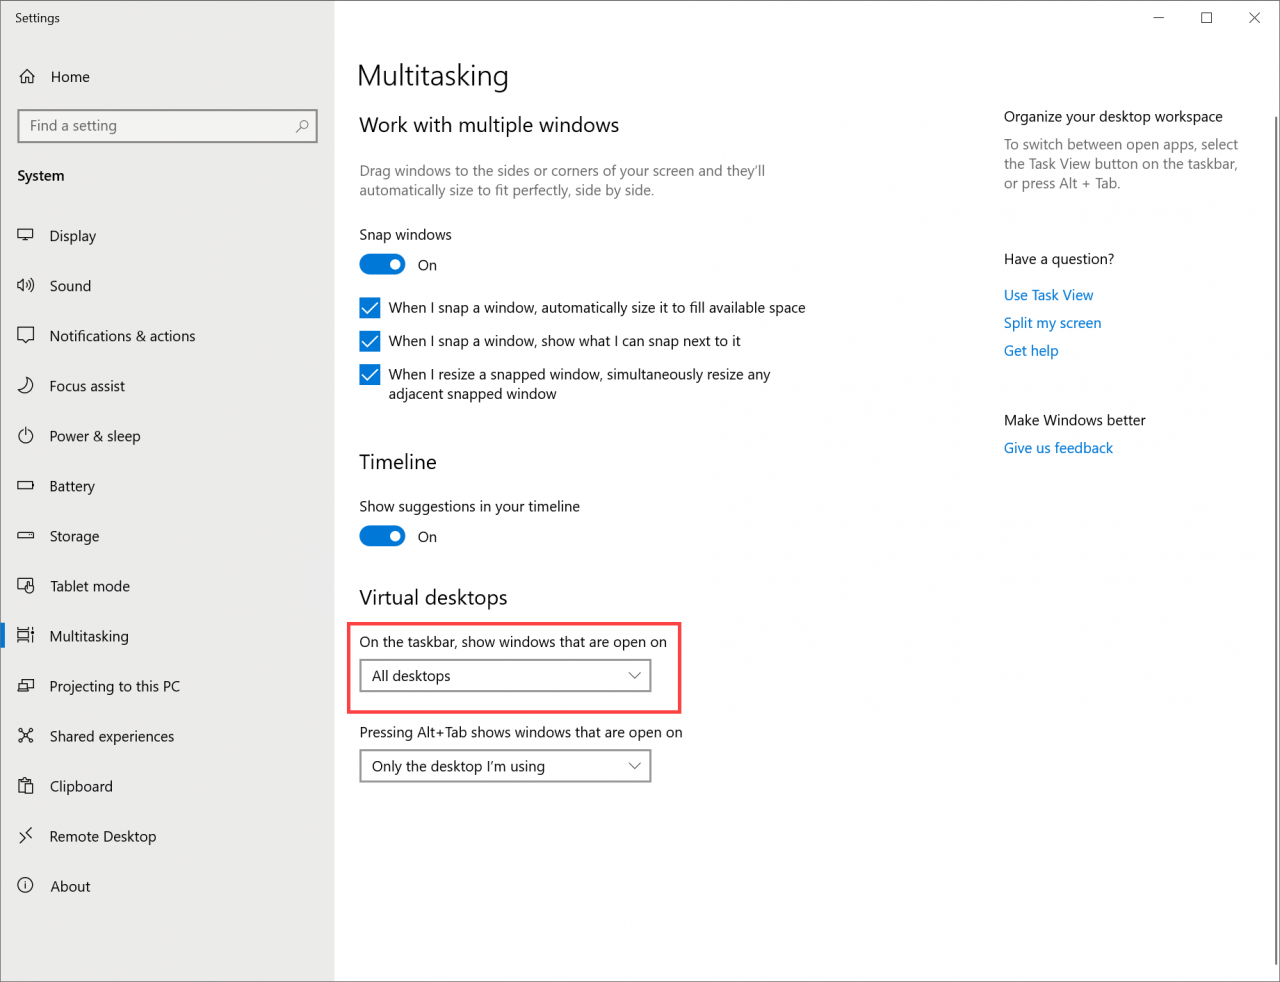
One way to solve quickly solve this issue is by changing the default virtual desktop settings to show all running apps on the taskbar, regardless of the desktop on which they are running.
- Open the Settings app in Windows 10 by pressing WIN+I.
- In the search box at the top of the Settings window, type virtual and then select Customize virtual desktop settings in the list of results.

- Scroll down to Virtual desktops and change Only the desktop I’m using to All desktops using the dropdown menu.
- Close the Settings app.
Now, when you click the Outlook icon pinned to the taskbar, it will open any currently running instance regardless of which desktop it is located on. The disadvantage to changing this setting might be that you see your open applications, from all virtual desktops, on the taskbar.
Create a Taskbar Shortcut to Recycle the Running Instance of Outlook
Here is an alternative method that lets you keep the default virtual desktop behavior. If you currently have Outlook pinned to your taskbar, right click it and select Unpin from taskbar. We’ll create a new shortcut for Outlook that opens (recycles) the currently active instance instead or creating a new one.
- Type Outlook in the search box on the taskbar.
- Click Open file location in the list of options on the right of the search dialog. You might need to click the small arrow to expand the list of available options.
- File Explorer will open and Outlook’s shortcut file (.lnk) will be highlighted.
- Right click the highlighted shortcut file, drag it to the desktop, and then let go of the mouse button.
- A context menu will appear. Select Copy here.
- A copy of the Outlook shortcut will now appear on your desktop. Right click it and select Properties from the menu.
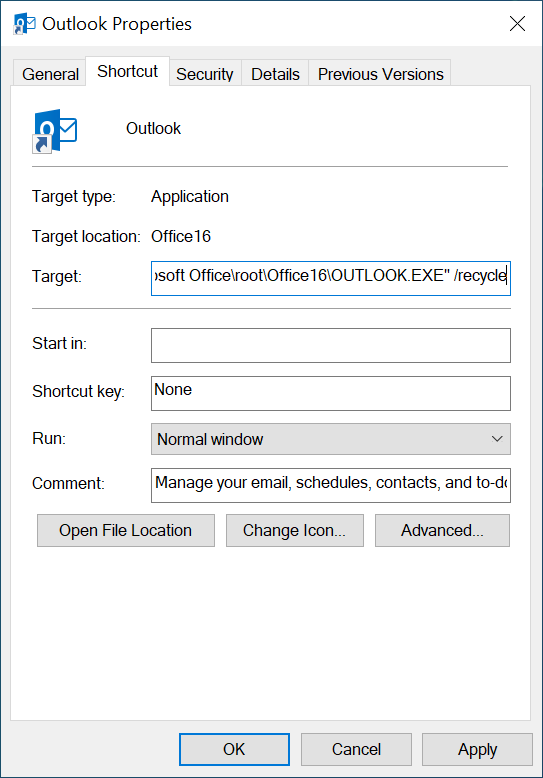
- Locate the Target field on the Shortcut tab.
- In the Target field, you should see something like “C:\Program Files\Microsoft Office\root\Office16\OUTLOOK.EXE”
- Append /recycle to the end of the string and click OK.

- Right click the modified shortcut link on the desktop again and this time select Pin to taskbar from the menu.
- You can delete the shortcut file from the desktop if you want.
Now Outlook will only ever open one instance of the app if you use the taskbar shortcut. This should make working with Outlook and virtual desktops in Windows 10 easier and help you set up a logical workflow.
The Reminders Popup
The Reminders popup window will open on whatever is the currently active virtual desktop. So, if Outlook is running on desktop 2 but I’m working on desktop 1, the Reminders popup window will appear on desktop 1. That’s quite annoying, especially if you are using the default virtual desktop settings.
Nuking the Outlook Reminders Popup Window
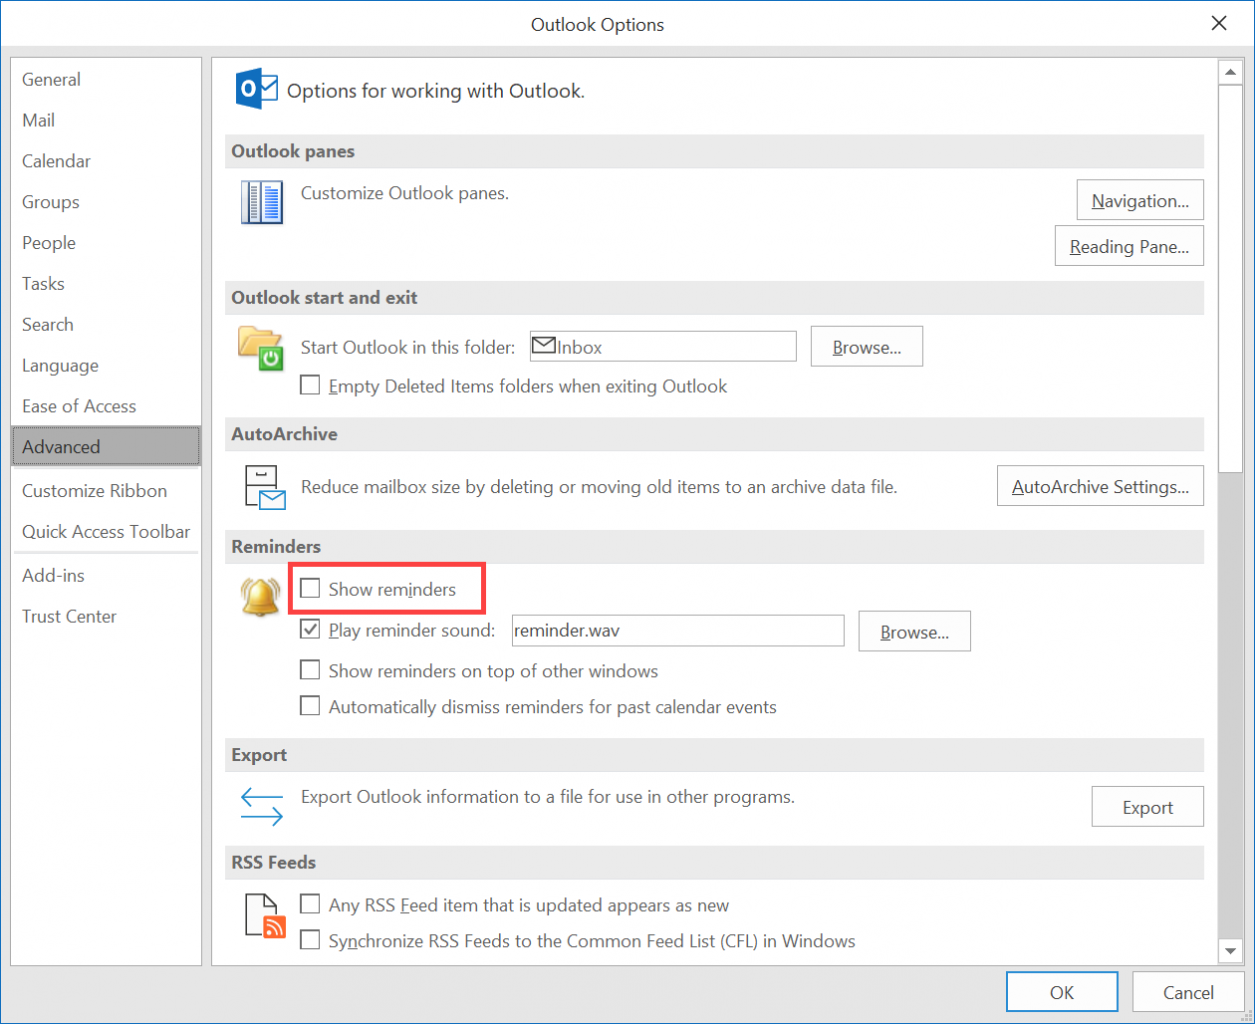
The only solution I have is the sledgehammer approach and that is to disable the Reminders window in Outlook’s advanced options. I have Outlook reminder notifications on my Android handset, flagged emails appear in To Do, and Outlook notifications also appear in the Windows 10 Action Center. So, I figure that I can probably live without the Reminders popup. You can still manually open the Reminders window if you need to from Outlook.
- Open the File menu in Outlook and click Options.
- In the list of categories on the left of the Outlook Options window, click Advanced.
- In the Reminders section, uncheck Show reminders and then click OK.

And that is it. The Reminders window will no longer be displayed automatically by Outlook.


