Windows Firewall is enabled by default in all versions of Windows, but sometimes it gets manually disabled by an administrative user, or maybe disabled surreptitiously by malware without your knowledge. In this Ask the Admin, I’ll show you how to check that Windows Firewall is enabled and working effectively using the GUI and PowerShell.
The Windows Firewall blocks all unsolicited incoming connections and some outbound connections. Even if you are on a private network, or connected to the Internet behind a Network Address Translation (NAT) router, the firewall still plays an important role in making sure that your PC isn’t exposed to other devices that might appear on your local network.
Check Windows Firewall Status
The easiest way to check the status of Windows Firewall is to open the Action Center and make sure there are no related warnings. The Action Center continuously monitors the firewall to check that it is enabled. To open the Action Center:
Open the Action Center using Windows Search:
- Press the WINDOWS key to switch to the Start screen.
- Type action and the Search panel will appear on the right.
- Select Action Center from the results.
Once the Action Center has opened, check there are no red alerts pertaining to Windows Firewall.
Open the Windows Firewall settings in the Control Panel to check your protection status:
- Press the WINDOWS key to switch to the Start screen.
- Type firewall and the Search panel will appear on the right.
- Select Check firewall status from the results.
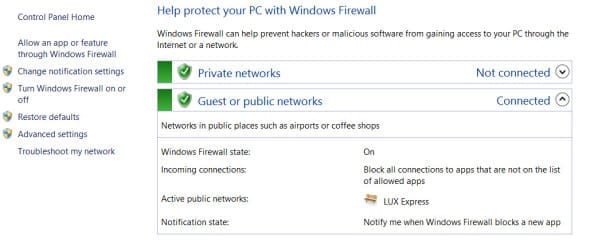
A new window will open showing you the status of the networks you’re connected to, and a green shield icon if Windows Firewall is protecting the network connections.
Enable Windows Firewall Using GUI Tools
If you find that Windows Firewall is disabled, you can enable it from the Action Center by clicking Turn on now in the related warning message. If you chose to use the Windows Firewall settings dialog to check the status:
- Click Turn Windows Firewall on or off on the left of the Control Panel to enable the firewall.
- Enter administrative credentials or give consent if prompted.
- Select Turn on Windows Firewall by each type of network displayed in the dialog window and click OK.
Enable Windows Firewall from the Command Line
If you prefer to use the command line to enable Windows Firewall, you can also enable Windows Firewall as follows:
- Switch to the Start screen, type powershell and press CTRL+SHIFT+DELETE.
- Enter administrative credentials or give consent if prompted.
- In the PowerShell window, type Set-NetFirewallProfile -Profile Domain,Public,Private -Enabled True and press Enter to enable Windows Firewall for all network profiles.
You can omit one or more network profiles (Domain, Public and Private) from the command above, or specify False for the –Enabled parameter.
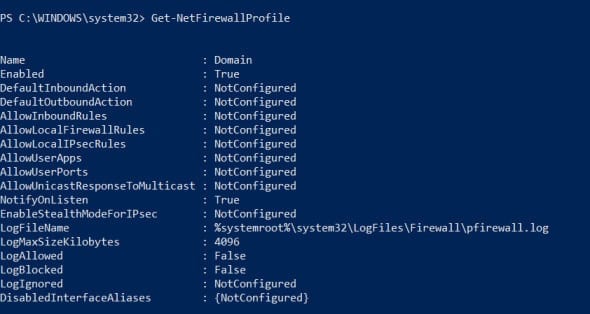
To get the current status of Windows Firewall using PowerShell, just type Get-NetFirewallProfile in the PowerShell window and press Enter. You’ll be shown a list of all the network profiles, whether Windows Firewall is enabled for each profile and information about various other Windows Firewall settings.


