Creating a Recovery Plan for Hyper-V VM failover to Microsoft Azure
Part of the attractiveness of Microsoft Azure Site Recovery (ASR) is the ability to orchestrate failover of virtual machines. Microsoft calls this orchestration “one-click failover.” In this article, I will explain how you can create a Recovery Plan (RP) for managing the failover of Hyper-V virtual machines to Microsoft Azure.
What are Recovery Plans?
A recovery plan (RP) is a set of ordered steps that allows you to conduct a failover in a prescribed fashion. Virtual machine startup can be ordered, thus modelling application dependencies (database first, then application, then web interface), and to conduct other operations that are either scripted or completed manually.
An RP can orchestrate the failover of up to 50 virtual machines. When you failover to Azure, the virtual machines will be a part of a single cloud service. You can have up to 20 cloud services in a subscription, so you can failover up to 20 RPs, assuming that the subscription doesn’t have any other deployed cloud services.
The original intention of an RP was to orchestrate the failover of an n-tier application. If you have three n-tier applications (each up to 50 virtual machines), then you have three RPs, one for each application. If you operate in an SME environment, however, you might have just a single RP for all virtual machines. Keep in mind that if you do this then all of the virtual machines will share a single public IP address (the cloud service) after a failover, so you will not be able to open a public port, such as TCP 80 to more than one machine.
What can a Recovery Plan do?
A simple recovery plan will automatically instantiate and boot any selected virtual machines. You can create groups to order the start-up of those machines.
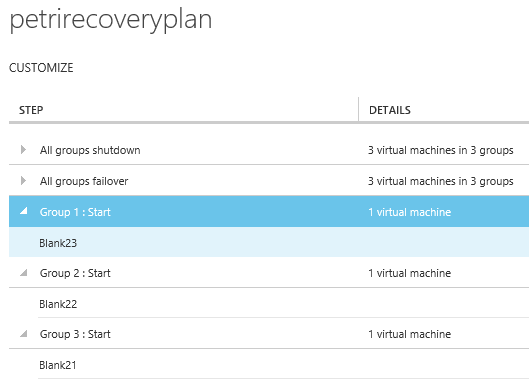
When you create a RP, you can select it and run a test with planned or unplanned failover, which affects all virtual machines in the plan. By default, a RP will have a single group. All virtual machines in that group will failover at the same time. To model dependencies, you can create groups. When you run a planned failover, the virtual machines in the last group are shut down in the production site first, and the virtual machines in the first group are started up first. In unplanned and test failovers, the plan simply starts with Group 1 and works in forward order.
We can also create scripted and manual groups that run before or after a virtual machine group. A scripted group will execute an automation runbook. This can be useful to create endpoints for Internet accessible services or to reserve virtual network IP addresses. A manual group allows the runbook to prompt the operator to start a documented action; the runbook will pause until an operator confirms that the action was done.
Creating a Recovery Plan
You can start engineering RPs once your virtual machines are replicated. Make sure that you have done the following:
- Set the failover virtual machine type and failover virtual network in the properties of the protected item in the Azure portal
- Create an isolate virtual network in Azure for test failovers
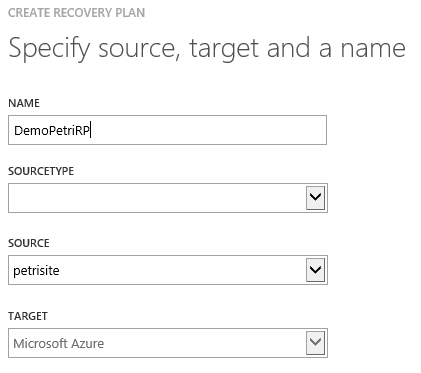
Browse into your recovery vault and select Recovery Plans. Click Create and confirm the configuration of your new RP as shown below.
The following screen is where you select the virtual machines that will be managed by this RP. You can add virtual machines later if you want to.
Editing a Recovery Plan
Browse into a RP to edit it. A new RP will have a group called Group 1: Start. This contains all of the virtual machines that you originally added to the RP. At the bottom of the screen, you have the option to add:
- Group: This will create another group, such as Group 2.
- Script: You can select a runbook from an automation account to run some scripts. This is how we can perform a variety of different tasks, such as creating endpoints or reserving IP addresses.
- Manual Action: You can name some action and enter instructions for the operator. The RP will pause until the operator confirms that the action was completed in the Jobs view in the recovery vault.
If you add a group, select a virtual machine and click the Move Virtual Machine action. A mini-menu appears to let you move the virtual machine into a different group.
If you select a group, you can add:
- A virtual machine
- A script that will be bound to the group and run before or after it
- A manual action that will be bound to the group and run before or after it
When you are happy with your engineering, you can test it via a test failover, where your virtual machines will be brought online on a virtual network of your choice, such as the isolate test network.


