Creating a Windows Server 2012 R2 Cluster Shared Volume
In this article I will show you how to create a Cluster Shared Volume (CSV), the cluster active/active file system that is at the heart of Hyper-V clusters with shared block storage and the Scale-Out File Server (SOFS) architectures.
Windows Server Cluster Shared Volume (CSV): Introduction
Cluster Shared Volume was introduced in Windows Server 2008 R2 (W2008 R2). Before W2008 R2 Hyper-V we pretty much had to deploy one LUN on a SAN for each virtual machine. (It wasn’t a Windows requirement, but it was good practice). As you could imagine, this made self-service an impossibility, and it made SAN administration a nightmare. Careful naming was required, and I would sweat bullets when it came to decommissioning virtual machines and LUNs, hoping that I wasn’t about to accidentally delete a customer’s virtual machine that was placed on the wrong volume.
CSV was added to failover clustering in W2008 R2 to provide a file system that could be shared and active across each node in the cluster. This means that you can store lots of virtual machines one a few easily managed volumes (try to have one per cluster node) and run those virtual machines across any or all of the cluster nodes. The W2008 R2 version of CSV was restricted to being used just for storing Hyper-V virtual machines. Windows Server 2012 (WS2012) expanded this to include the SOFS, and Microsoft continues to evaluate other scenarios where CSV can be of use.
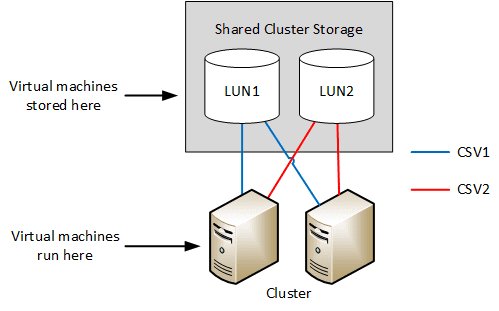
The high level architecture of CSV is as follows:
- One or more LUNs are created in the SAN. There are only a few LUNs, maybe one per node in the cluster that is directly connected to the shared storage.
- The LUNs are zoned/connected to every node in the cluster. At this point, the LUN is only accessible by one of the nodes in the cluster (known as shared-nothing).
- The disks are formatted (one volume per LUN) and added to the cluster’s pool of managed storage in Failover Cluster Manager (FCM).
- Each disk is converted into a CSV (a right-click operation in FCM).

The Windows concept of “shared nothing” still applies: One node remains the owner of volume. However, the CSV is mounted in C:\ClusterStorage\Volume<IncrementalNumber> on each node in the cluster. The CSV owner, also known as the CSV coordinator, delegates rights to the other cluster nodes to read and right to/from files and folders in the CSV. The volume, formatted with NTFS will appear to now run a file system called CSVFS in administration tools. This indicates to administrators and disk management tools that the CSV is a cluster file system and should be treated differently than a non-shared volume.
Don’t worry about the CSV owner role. It is created by Windows for you and managed by Windows. The role is highly available.
Every CSV has an owner. A node can be the owner of one or any number of the volumes. In older versions of Windows Server the placement of the CSV owner role was best effort but you could manipulate it. In WS2012 R2, the CSV owner roles are balanced across the nodes; this is used in conjunction with SMB connection redirection in the SOFS architecture to obtain the best flow of data from host to physical storage.
If you want to dig much deeper on CSV then the best source of information is a blog post by Microsoft’s Elden Christensen.
Create a Cluster Shared Volume (CSV)
There are a number of steps in the process of creating a CSV. By the way, this entire process is much easier if you have deployed System Center Virtual Machine Manager (SCVMM) to manage your hosts and your storage. SCVMM will perform the work with a few clicks, including provisioning the physical storage.
Tip: Create one LUN/CSV at a time so you can track what disk is what volume and name them consistently.
Create and Connect the LUN
- Log into the administration tool of your cluster’s shared storage. Create a LUN and connect the new LUN to each node in the cluster.
Tip: Name the LUN after the cluster and desired CSV name, for example, HVC1-PetriCSV
Create and Format a Volume
- Determine which node on the cluster that the LUN has become active one. Log into that node, open Disk Manager and select the new LUN.
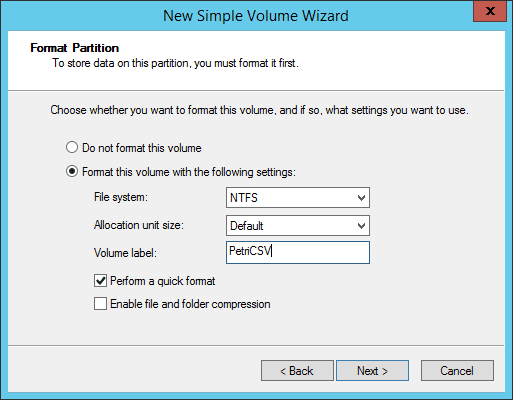
- Create and format a new volume that fills the LUN; you should have one CSV per LUN. Do not assign a drive letter to the volume; the CSV will be mounted in the C:\ClusterStorage folder on each node instead.
Tip: Label the volume with the name of the desired CSV, for example, PetriCSV.
Add the Disk to the Cluster
- Open FCM, browse to Storage, and select the Add Disk option. The new disk should be listed in the pop-up window.
- Check the box beside the disk to add the disk. The new disk will appear in Storage in FCM.
Note: If you are using Storage Spaces as the shared storage, then the disk will be automatically added to the cluster after you create the new virtual disk in the pool.
Tip: Edit the properties of the disk and rename it match the desired CSV name, for example, PetriCSV.
Convert the Disk into a CSV
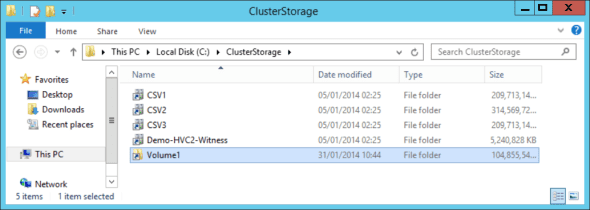
- Right-click the new available disk in FCM and select Add To Cluster Shared Volumes. The disk will go offline for a second and then reappear back online as a new CSV. Note that the volume is now mounted under what looks like a folder (see Volume1 in the below screen shot) in C:\ClusterStorage on each node in the cluster that has access to the disk.
Tip: Rename the mount point from the anonymous Volume1 to match the name of the CSV (for example, PetriCSV).
Use the CSV
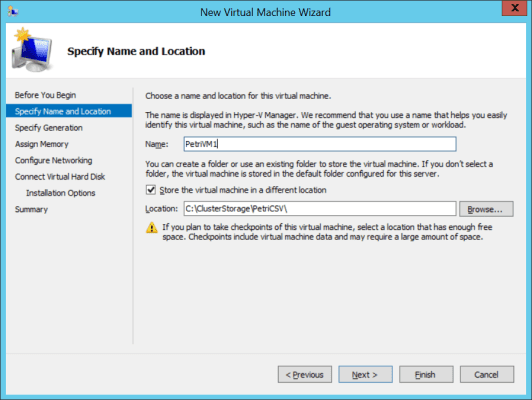
You now can deploy virtual machines to your new CSV by specifying the path of the CSV under C:\ClusterStorage. For example, I could deploy a new VM to C:\ClusterStorage\PetriCSV.
Using a CSV for the virtual machine’s files mean that the files are available to each host in my cluster and the virtual machine can fail over or live migrate within the cluster without:
- Moving the virtual machine’s files
- Any downtime to the disk


