How do I create a Snapshot? How do I use it? And how do I delete a Snapshot?
Recently we blogged about what Hyper-V snapshots are and why to use them. In this post we will describe to use create, manage, and delete Hyper-V snapshots.
Creating a Snapshot
You can create a snapshot of a virtual machine (running or not) very easily: Just select the VM and select Snapshot from the Actions pane in Hyper-V Manager. The status of the virtual machine will change to “Taking Snapshot” and show the progress of the action using a percentage value.
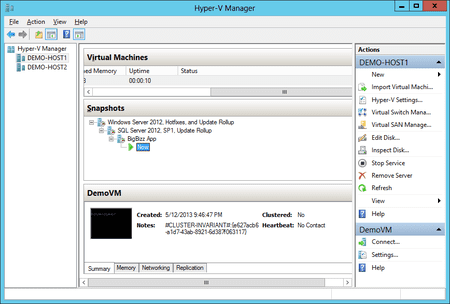
You can view your snapshots in the Snapshots pane (this might require expanding) of a selected virtual machine in the center of Hyper-V Manager. By default, the snapshot is named after the virtual machine and shows the date and timestamp of the snapshot. You can rename the snapshot to something more descriptive. You can also view the settings of a snapshot to observe the specification of the virtual machine at the time of snapshot creation.
Tiered Snapshots
You can create up to 50 snapshots of a single virtual machine. Please remember that 50 is a limit, and not a goal. Creating a snapshot will slow down a virtual machine. Creating more snapshots will increase that degradation. And you should also remember that Hyper-V snapshots are not to be used as a VM backup – that’s why Volume Shadow Copy Service snapshots exist.
Maybe you would like to keep multiple captures of a single virtual machine over time. For example, you could snapshot a virtual machine with just the operating system, service pack, and patches. You could then create a second snapshot with SQL Server, service pack, and update rollup. And then a third snapshot with an application installed in the virtual machine. You can roll back the virtual machine (by applying a snapshot) to any of those three points in time to redo an install for the purposes of demo, testing, documentation, or training.
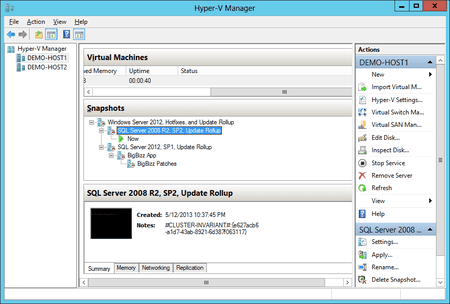
You simply create more snapshots as before. A hierarchy of snapshots will be created for you. It would be a good idea to rename these snapshots with something descriptive.
Note that the current state of the virtual machine is highlighted as Now, a child of a snapshot. The way to interpret this is that the virtual machine has had changes since the parent snapshot of Now was created or applied.
Applying and Navigating Between Snapshots
You apply a snapshot to roll a virtual machine back in time. To do this, select a snapshot and select Apply. A dialog will open to ask you how you want to proceed. You can:
- Cancel the creation of a snapshot
- Apply the snapshot and abandon all changes since the last snapshot
- Create a new snapshot to capture all changes since the last snapshot, and then apply the old snapshot
Using Take Snapshot And Apply, you can create a more complicated hierarchy of snapshots.
Note that applying a snapshot will also revert the specification of a virtual machine if it was changed since the snapshot was created.
Deleting Snapshots
In past versions of Hyper-V, the merge of the snapshot AVHD/X files did not occur until the virtual machine was powered down. Unfortunately, Hyper-V Manager had no indication that the snapshot really was still present and that a power down was required for the merge. Starting with Windows Server 2012 (and Windows 8), Hyper-V will perform a live merge of the snapshot without powering down the virtual machine. This merge might be delayed by a few minutes, but it will happen.
Please remember that any dynamically expanding virtual machines will need to expand before their child AVDH/X file(s) can be merged. This might be an issue if snapshots filled the LUN the virtual machine was stored on – move the virtual machine and perform the merge. Fixed virtual hard disks don’t have this issue.
You can select a snapshot and choose the Delete Snapshot action to delete a snapshot. To delete a collection of snapshots, select the top snapshot that you want to delete, and choose the Delete Snapshot Subtree action.


