How Do I Create My Own Desired State Configuration (DSC) Resource?
After working with Desired State Configuration (DSC) for a little time, you may get to the point where you consider the steps required to create your very own DSC resource. And given that you have already benefited from the community, you may want to share your work as a small thank you? And you never know, someone might actually find some tweaks that would add just a little extra to your efforts, helping you to learn new tricks and meeting new personalities.
Editor’s note: Need to catch up? Check out our previous articles in this series:
- Deploying a Desired State Configuration Web Host Using Powershell
- Deploying a Desired State Configuration Web Host Using DSC
- Desired State Configuration Host Deployment: Local Configuration Manager
- Desired State Configuration and Local Configuration Manager
- What Can I Configure Using Desired State Configuration?
- How Do I Create a Desired State Configuration?
- How to Publish a Desired State Configuration
- Using Community Desired State Configuration Resources
- How to Participate in the Desired State Configuration (DSC) Community
Why Create a Desired State Configuration Resource?
In this post I am going to cover a scenario that I recently had. As I rebuilt my lab, I started to go through a few “what ifs.” What if I could possibly leverage DSC to get all these ever-so-important hotfixs for Hyper-V and clustering (that for some reason never appear in Windows Update) automatically and consistently applied on my hosts?
After a quick look around the web, it did not take long to realize that there were no DSC resources for this job, but I did happen to find quite a lot of different type scripts that set about applying hotfixes with a wide range of approaches. Yet none of them were really “perfect.”
Planning Your First DSC Resource
Before we get into the actual building of our new provider, I first wanted to take a moment and plan what it is I really want to achieve. I started with a little mock-up of what a configuration using my new resource might actually look like.
Hotfix ShortName
{
Ensure = "Present"
Name = "KB12312312"
SourcePath = \\Server\Share\Path\Update.msu
}
Attempting to not stray from the standard configuration templates, this turned out to be very simple. I just require an ensure property to validate whether the hotfix is going to be present or not – a unique identifier for the instance, which was very easy, as every update has a unique KB number, and lastly a path to locate the update binary for the scenarios where we will need to install the update!
Getting Creative
To assist in generating our module, we are going to leverage yet another resource, which Microsoft has kindly shared with us on the Technet Gallery called xDSCResourceDesigner. As the name suggests, this PowerShell module offers us an easy method to get started on our custom resource and will create all the necessary files, including the schema .MOF, our module definition, and the template for our actual module.
In a similar manner to our previous work, we will place our new module in our PS Modules path so that it is ready for us to import. Of course, you can also place the module in any path you wish and import the module by providing the full path to the module. For example:
Import-Module X:\PowerShell\Modules\xDscResourceDesigner\xDscResourceDesigner.psm1
Once the module is loaded, you can use the Get-Command commandlet to enumerate the new commands provided by the module.
Defining the Module
First we will use the command New-xDSCResourceProperty to define each of the parameters we will be using in our new module. Following the rules of DSC Resources, one of the parameters must be defined as a unique key; in this example is the Name, or our Hotfix ID.
$name = New-xDscResourceProperty -Name Name -Type String -Attribute key -Description "Hotfix ID"
$sourcePath = New-xDscResourceProperty -Name SourcePath -Type String -Attribute Write -Description "Source Path"
$ensure = New-xDscResourceProperty -Name Ensure -Type String -Attribute Write -ValidateSet @("Present","Absent") -Description "Ensure"
Next, we are going to use the module to create the actual files that form the template of our new module. As I plan to share this back with the community, and also leverage the features of GIT to help maintain my code versions, I will be creating the resource in my PowerShell.org GIT repo, which we forked in the earlier post.
Starting with GIT, create a new branch in the repository. I am calling this DSCHotfix. This will allow me to track the changes I am applying in the repo, which are specific to this new resource.
git branch DSCHotfix git checkout DSCHotfix
Our next step is to combine the parameters we defined earlier; using the module command New-xDSCResource we will define the name for our resource and the path to which the new resource template files will be created. Adhering to the naming conventions I will create a new module to reference all my resource modules under DSC_DamianFlynn.com and the command will also make a sub-folder specifically for this new DSC Resource.
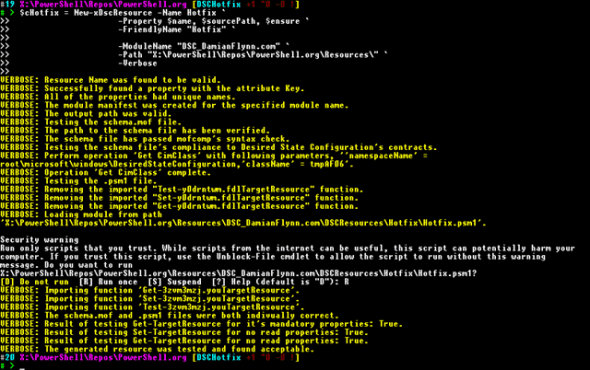
$cHotfix = New-xDscResource -Name Hotfix ` -Property $name, $sourcePath, $ensure ` -FriendlyName "Hotfix" ` -ModuleName "DSC_DamianFlynn.com" ` -Path "X:\PowerShell\Repos\PowerShell.org\Resources\" ` -Verbose
The optional –Verbose switch provides some feedback as the command proceeds to create the template for our new module.
Switching back to GIT, I can now add the new files to my repository branch and commit them with a comment explaining what I have just completed with the following commands.
git add . -A git commit –m "Initial Commit of the newly generated template code for my new Hotfix DSC Module"
Next Steps
Be sure to check back for the next post in this series, in which we will take a closer look at the new files created, and fill out the necessary code to make our new module functional.


