How to Create a Bootable USB Drive for Windows Server 2019 Installation

Before you can install Windows Server 2019 on physical hardware, you’ll need boot media that contains all the files necessary to install Windows Server. Boot media generally comes in two forms: as a DVD or USB drive. As most modern server hardware comes without a DVD drive, in this article, I’ll show you how to create a bootable USB drive containing the Windows Server 2019 media.
Get the Windows Server 2019 .iso file
If you don’t have access to the Windows Server 2019 .iso directly from Microsoft or a partner, you can download an evaluation version from Microsoft’s website here. Regardless of where you obtain your installation media, save the .iso file to C:UsersPublicDownloads.
Create a bootable USB drive
Before starting, you will need a USB drive with a capacity of at least 8GB. We will wipe the entire contents of the USB drive during the creation process, so make sure any valuable data is backed up. Because most modern server hardware uses UEFI instead of BIOS, we’ll create a bootable USB drive using a GUID Partition Table (GPT). UEFI-based systems cannot be booted from Master Boot Record (MBR) drives.
We’ll use Windows 10 to create the bootable USB drive. Connect the USB drive to your system and then follow the instructions below.
- Type powershell in the Search box in the bottom left of the taskbar. Make sure that Windows PowerShell is highlighted in the search results, and in the pane on the right of the Search panel, click Run as Administrator.
- Give consent or enter an administrator username and password as prompted.
- Find your downloaded Windows Server .iso file in C:UsersPublicDownloads and rename it WindowsServer2019. To rename a file, select it in File Explorer (WIN+E) and then press F2. Make sure the file is called ‘windowsserver2019.iso’ and not ‘windowsserver2019.iso.iso’.
Now let’s put the full path of the downloaded file into a variable ($isopath):
$isopath = 'C:UsersPublicDownloadsWindowsServer2019.iso'
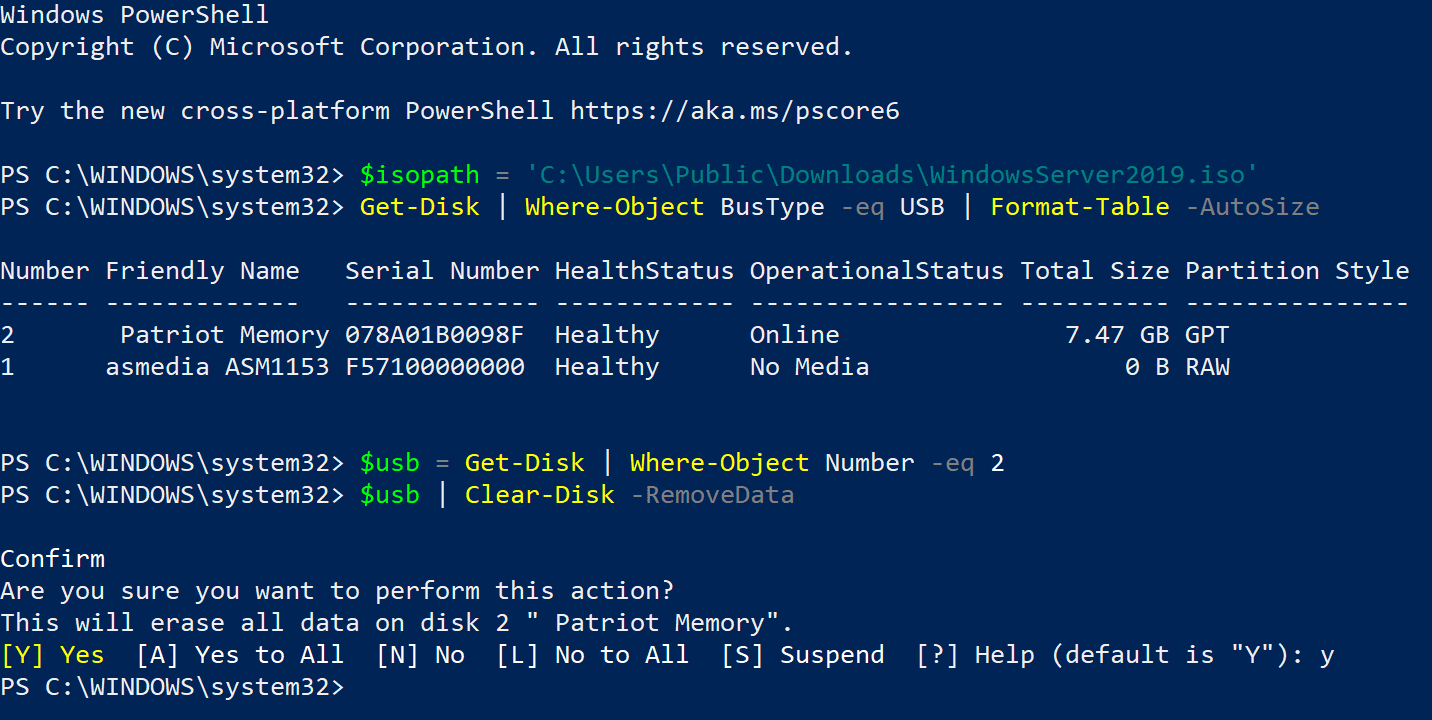
Before we can format the USB drive, we need to establish the disk number Windows has assigned it. Run the command below to list all the USB drives attached to your device:
Get-Disk | Where-Object BusType -eq USB | Format-Table -AutoSize
I know that my USB drive is called ‘Patriot Memory’, so it is disk number ‘2’. Let’s create an object ($usb) for disk ‘2’. You should replace -eq 2 with the number of your USB drive.
$usb = Get-Disk | Where-Object Number -eq 2
Now, we’re going to delete all the data on the USB drive using Clear-Disk. Type y and press ENTER to confirm you want to delete all data on the drive. This is a good time to double-check that you have the correct disk number!
$usb | Clear-Disk -RemoveData
Format the USB drive
Now let’s make sure the disk is configured with a GUID Partition Table so that we can use it to boot UEFI systems from a Windows Server bootable USB.
$usb | Set-Disk -PartitionStyle GPT
Create a new volume on the drive using New-Partition. When prompted in the Format USB Drive dialog, format the volume using FAT32. You must use FAT32. Optionally, give the drive a volume name in the Volume label field. Click Start to format the USB drive. Click OK in the warning dialog to confirm that formatting the drive will erase all data.
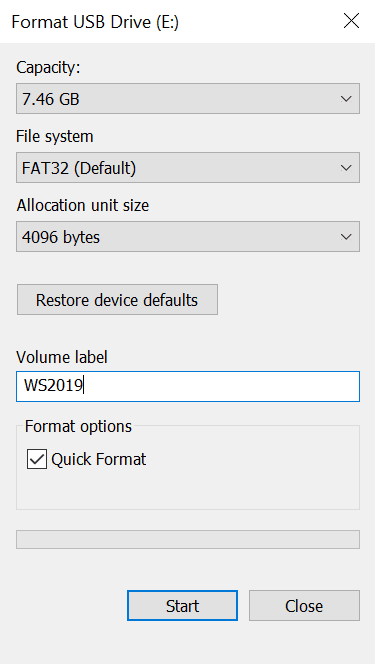
$volume = $usb | New-Partition -UseMaximumSize -AssignDriveLetter
Close the Format USB Drive dialog once formatting is complete.
Copy the Windows Server 2019 media files to the USB drive
Now that we have configured the USB drive so that it can be used to boot our server hardware, all that’s left to do is copy the Windows Server media files to the USB drive. Let’s start by mounting the downloaded Windows Server .iso file to a drive in Windows 10.
$mount = Mount-DiskImage -ImagePath $isopath -StorageType ISO
Windows will assign the new mounted drive a letter. We can use Get-Volume to get the assigned drive letter:
$drive = ($mount | Get-Volume).DriveLetter
Now, let’s copy the entire contents of the mounted .iso file to the UBB disk using Copy-Item:
Copy-Item -Path ($drive +":*") -Destination ($volume.DriveLetter + ":") -Recurse
If Copy-Item exits with an error, it’s because it failed to copy the largest file, install.wim, to the USB drive. FAT32 has a file limit of 4GB and install.wim might be larger than the limit. To solve the problem, we can use the Windows 10 DISM tool to split the install.wim file into two smaller files: install.swm and install2.swm.

First, we’ll need to create the two new files on our local disk. In this example, I’ve chosen to create them in C:UsersPublicDownloads. Note that you may need to replace ‘f’ in ‘f:sourcesinstall.wim’ with a different drive letter. Windows might have assigned a different drive letter to your mounted .iso file. You can check the drive letter Windows assigned by opening File Explorer (WIN+E).
dism /Split-Image /ImageFile:f:sourcesinstall.wim /SWMFile:C:UsersPublicDownloadsinstall.swm /FileSize:4096

Now, let’s copy the two new files, install.swm and install2.swm, to our USB drive:
Copy-Item -Path C:UsersPublicDownloadsinstall.swm -Destination ($volume.DriveLetter + ":sourcesinstall.swm")
Copy-Item -Path C:UsersPublicDownloadsinstall2.swm -Destination ($volume.DriveLetter + ":sourcesinstall2.swm")
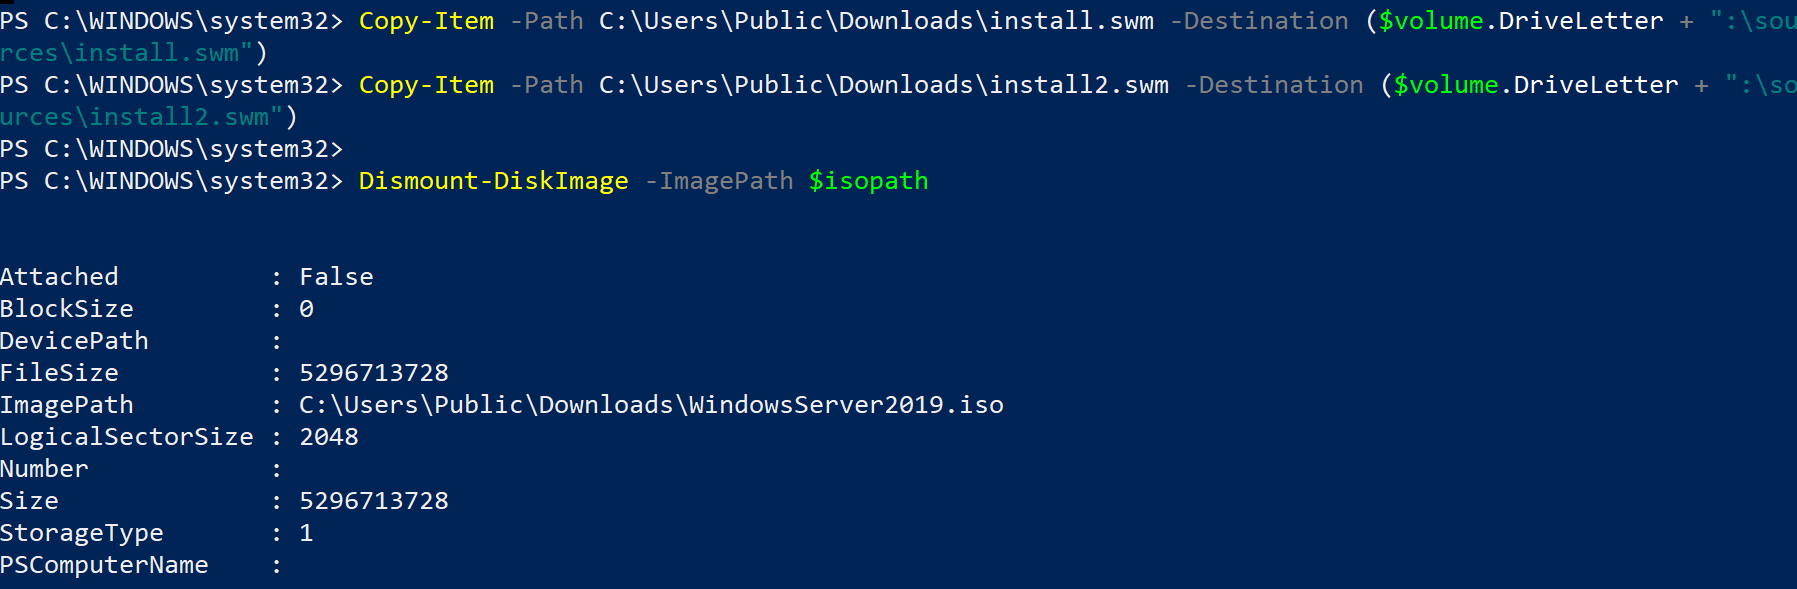
Finally, all that’s left to do is to unmount the Windows Server .iso file from our local device using Dismount-DiskImage:
Dismount-DiskImage -ImagePath $isopath
And that is it! Now you have a bootable USB drive that you can use to install Windows Server 2019 on modern server hardware.
FAQs
Can I use the Windows server bootable USB drive to install multiple server versions simultaneously?
While a single Windows server bootable USB can contain multiple Windows Server editions (Standard, Datacenter, etc.), you can only perform one installation at a time. For concurrent installations, you’ll need separate bootable USB drives for each server.
What’s the recommended USB speed for creating a Windows server bootable USB?
For optimal performance when creating and using a Windows server bootable USB, it’s recommended to use USB 3.0 drives with read/write speeds of at least 100MB/s. This ensures faster installation times and better reliability during the process.
Can I use a Windows server bootable USB to perform system recovery operations?
Yes, a Windows server bootable USB can be used for various recovery tasks, including system repair, command prompt access, and running diagnostic tools. You can also use it to access Windows Recovery Environment (WinRE) for advanced troubleshooting.
Is it possible to update a Windows server bootable USB with the latest patches before installation?
Yes, you can integrate Windows Server updates into your bootable USB using Microsoft’s DISM tool or third-party tools. This creates a slipstreamed installation media that includes the latest patches, reducing post-installation update time.
How many times can I reuse a Windows server bootable USB for different installations?
A Windows server bootable USB can be used unlimited times for installations as long as the drive remains physically intact and uncorrupted. However, it’s recommended to periodically verify the integrity of the installation files and refresh the media if needed.
Russell Smith, the Editorial Director at Petri IT Knowledgebase, has over two decades of hands-on experience in IT, in both small business settings and government IT infrastructure projects. Russell started writing for Windows IT Pro Magazine in t...