Configuring the Lightweight Directory Services, Part 2
In my first article in this series on creating lightweight directory services, I explained that the Lightweight Directory Service (AD LDS) had replaced Active Directory Application Mode in Windows Server 2008. I talk about some real world examples of how AD LDS is used. In this article, I want to finish off the series by showing you how to install AD LDS, and by talking about some of the differences between AD LDS and ADAM.
Installing the Lightweight Directory Service
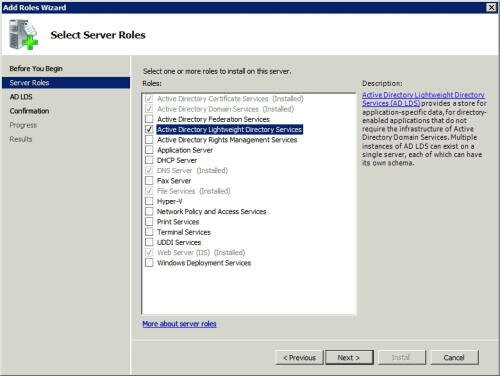
The process of installing AD LDS is pretty simple. Begin by opening the Server Manager console. When the console opens, click the Roles container to go to the Roles Summary section. Now, click the Add Roles link. Windows will now launch the Add Roles Wizard. Click Next to bypass the wizard’s Welcome screen, and you will see a screen that allows you to select the roles that you want to install. Choose the Active Directory Lightweight Directory Services option, as shown in Figure A.
Figure A Select the Active Directory Lightweight Directory Services option.
Click Next, and you will see a screen introducing you to the AD LDS. Go ahead and click Next again, and you will see a message telling you that the server will need to be restarted once the installation process completes. Now, click the Install button, and Windows will begin copying the necessary files. When the file copy process completes, click Close.
Configuring AD LDS
Now that you have installed AD LDS, it is time to configure it. To do so, close the Server Manager, and then select the Active Directory Lightweight Directory Services Setup Wizard command from the Administrative Tools menu. When the wizard starts, click Next to bypass the wizard’s Welcome screen.
You will now see a screen asking you if you want to install a unique instance of AD LDS or if you want to create a replica of an existing instance. Choose the option to create a new instance, and click Next.
You should now be prompted to enter a name for the new instance that you are creating. After doing so, click Next. Windows will now confirm that you want to use port 50000 for LDAP communications and port 50001 for SSL communications with the application partition that you are creating. Unless you have a compelling reason to change these port numbers, click Next to accept the defaults.
The next screen that you will encounter asks you if you want to create an application directory partition. The way that you will have to answer this question depends on whether or not the application that will be using the partition creates its own directory partition or not. For the sake of this article, go ahead and click No, followed by Next.
You will now be asked to enter the path where you want the data files and the recovery files stored. I recommend using separate volumes for the data files and for the data recovery files. Click Next to continue.
The next screen that you will encounter asks you to provide a service account. You can either use a network service account or you can designate a domain service account. Click Next, and you will be allowed the opportunity to provide either a group or an individual user administrative permissions over the partition that you are configuring.
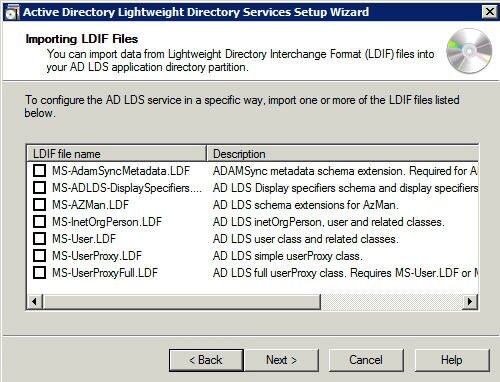
When you are done, click Next and you will see a screen similar to the one shown in Figure B. This screen gives you the chance to import one or more LDIF files into the partition. This allows you to define the partition’s structure. The options that you choose here will vary depending on the needs of the application that will be using the partition.
Figure B You can use an LDIF file to define the structure of the partition.
Click Next and you will see a screen containing a summary of the configuration options that you have chosen. Take a moment to make sure that all of these options are correct, and then click Next to begin the installation process. When the installation process completes, click Finish.
AD LDS vs. ADAM
I want to wrap things up by talking for a moment about what makes AD LDS different from ADAM. There are several major differences, but one big difference is ease of management. You now have the option of using Active Directory Sites and Services to manage partition replication.
Another key difference is that it is now possible to audit changes to the directory service. Finally, AD LDS supports server core installations.
Conclusion
As you can see, installing AD LDS is not difficult to do. Even so, it is an essential skill if you plan on deploying an Exchange 2007 edge transport server or another directory enabled type of application server on Windows Server 2008.
Got a question? Post it on our Exchange Server Forums!


