Using Microsoft Azure Forced Tunneling
Microsoft announced a number of new features in Azure infrastructure-as-a-service (IaaS) networking during TechEd Europe 2014. One of these was forced tunneling, a new feature that allows you to control the flow of traffic from your Azure virtual networks (VNets). In this post, I will explain the role of force tunneling and show you how to implement it.
What is Microsoft Azure Forced Tunneling?
Imagine you have a scenario where you have deployed a site-to-site VPN connection to an Azure VNet. In this VNet you have multiple virtual subnets, each with a different role. One subnet might contain publicly visible web servers. A second might contain mid-tier application servers, and a third might contain database servers.
Your organization might dictate that all private servers must never route to the Internet without passing through policy enforcement services that run on-premises. If this is the case, then you have an issue because any virtual machine in the Azure VNet has a route to the Internet via Azure’s fabric without passing through your on-premises network(s).
The solution is to implement forced tunneling. This allows you to sensibly enforce routing via your on-premises network:
- The front-end subnet (web servers) will route directly to the Internet. It makes no sense for them to bypass the cloud-scale bandwidth and optimization services of Azure.
- The mid-tier (application server) and back-end (database servers) subnets will route via the VNet’s VPN gateway to a selected Local Network (your on-premises network – configured in Azure).
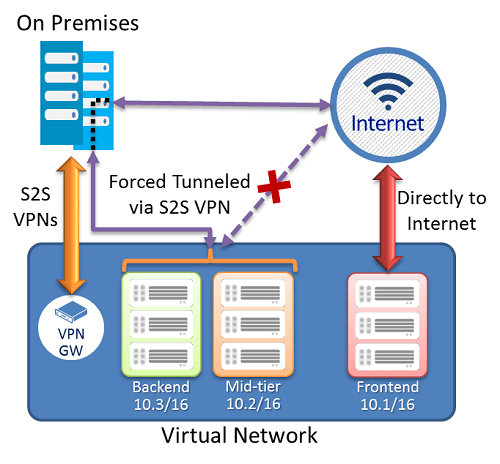
With this solution, you satisfy the need to balance performance for public-facing services and compliance for private virtual machines.
Implementing Force Tunneling
Forced tunnelling is based on creating a routing table with a default route via the VNet’s VPN gateway. This routing table is assigned to selected subnets in the VNet. And then the VNet is assigned with a default site to route to, which is the Local Network that your site-to-site VPN is connected to. All of this is done using PowerShell – make sure you have the latest edition of the Azure PowerShell module to be able to use the below cmdlets.
The first cmdlet will create a routing table in the same region as the VNet:
New-AzureRouteTable –Name “WebFarmRouteTable” –Label “Routing Table for Forced Tunneling” –Location "East US"
We then configure a route for all traffic (0.0.0.0/0) to route via the VNet’s VPN gateway:
Set-AzureRoute –RouteTableName “WebFarmRouteTable” –RouteName “DefaultRoute” –AddressPrefix “0.0.0.0/0” –NextHopType VPNGateway
In the above scenario we want to route two subnets to the on-premises network, and leave the front-end network with the default direct route to the Internet. Therefore, we will assign the new routing table to the back-end and mid-tier subnets:
Set-AzureSubnetRouteTable -VNetName “WebFarmVNet” -SubnetName “Mid-Tier” -RouteTableName “WebFarmRouteTable”
Set-AzureSubnetRouteTable -VNetName “WebFarmVNet” -SubnetName “Backend” -RouteTableName “WebFarmRouteTable”
The last step in the process is to assign the default site for tunnelling. This is the name of Local Network that is used in the site-to-site VPN configuration:
Set-AzureVNetGatewayDefaultSite –VNetName “WebFarmVNet” –DefaultSite “HQ Network”
A word of warning: Forced tunneling requires that you have created a dynamic routing gateway in Azure for your site-to-site VPN. If you have a static routing gateway, then you will get this rather confusing error message when assigning the local network:
Set-AzureVNetGatewayDefaultSite : BadRequest: This operation is enabled only for the following gateway mode(s): BrooklynLite.
Unfortunately, some on-premises network appliances require static routing VPN gateways, and this prevents you from using forced tunneling. If this is an issue, then give feedback to the manufacturer of your firewall device to get them to support dynamic routing VPN gateways.
If you want to remove the routing table, then make sure that you first un-assign it from the VNets:
Remove-AzureSubnetRouteTable –VNetName “WebFarmVNet” -SubnetName “Mid-Tier”
Remove-AzureSubnetRouteTable –VNetName “WebFarmVNet” -SubnetName “Backend”
Then you can remove the routing table:
Remove-AzureRouteTable -Name "WebFarmRouteTable"

Aidan Finn, Microsoft Most Valuable Professional (MVP), has been working in IT since 1996. He has worked as a consultant and administrator for the likes of Innofactor Norway, Amdahl DMR, Fujitsu, Barclays and Hypo Real Estate Bank International where...

