How to Disable BitLocker in Windows 11 (And When You Shouldn’t)
Disabling BitLocker permanently decrypts the drive, so it is usually the wrong response to a firmware update or short-term troubleshooting task. Suspend protection instead unless you intentionally need to remove encryption, because a forgotten re-enablement leaves the device’s data exposed if the drive is lost or removed.

Quick answer. To disable BitLocker in Windows 11:
- Open Settings and then click on Privacy and Security, followed by Windows Security.
- Click the Open Windows Security button and then click Device Security and Manage BitLocker Drive Encryption.
- Finally, click on Turn Off BitLocker.
Sometimes, suspending BitLocker may be a better option. Disabling BitLocker causes the drive to be fully decrypted, while suspension temporarily unlocks access to the encryption keys.
Do you need to disable BitLocker or suspend BitLocker?
Although disabling BitLocker is an option, it might not always be the best way forward. Sometimes suspending BitLocker is the better choice. The reason for this is that disabling BitLocker results in the drive being completely decrypted, which can be a time-consuming process.
In contrast, suspending BitLocker does not actually decrypt the drive, but rather provides the illusion that the drive has been decrypted. It accomplishes this by pausing certain security checks and exposing the encryption key by way of an unencrypted “clear key” that is stored on your disk.
| Situation | Recommended action | Why |
| BIOS or firmware maintenance | Suspend | Keeps the volume encrypted and avoids permanent decryption |
| Upgrade troubleshooting | Suspend first | Easier to reverse after testing |
| Permanent removal of encryption | Disable | The desired outcome is a decrypted volume |
| Device repurposing or disposal | Depends on destination policy | Depends on whether the device will be re-encrypted, wiped, or leave organisational control |
While there is no reason why you can’t disable BitLocker when performing maintenance, there are several reasons why it is usually better to simply suspend it instead. First, disabling BitLocker tends to be a time consuming process since the entire drive must be decrypted. This can cause the maintenance process to take longer than it needs to.
Suspending BitLocker is useful to do before performing tasks that modify your computer’s hardware, motherboard, BIOS/UEFI firmware, or Secure Boot settings. If you don’t suspend BitLocker first, these updates can change the hardware signature your TPM (Trusted Platform Module) relies on, causing Windows to panic and lock you out.
Also, many admins disable BitLocker unnecessarily during troubleshooting and forget to re-enable it, creating unmanaged devices with no disk protection.
How to disable BitLocker from Windows Settings
The primary option for disabling BitLocker involves using Windows Settings. To do so:
- Open Settings
- Click on Privacy & Security
- Click on Windows Security
- Click Open Windows Security
- Select the Device Security tab.
- Click on Manage Device Encryption.
- Click on BitLocker Drive Encryption
- Click Turn Off BitLocker
It is worth noting that when you turn off BitLocker, the decryption process begins immediately.
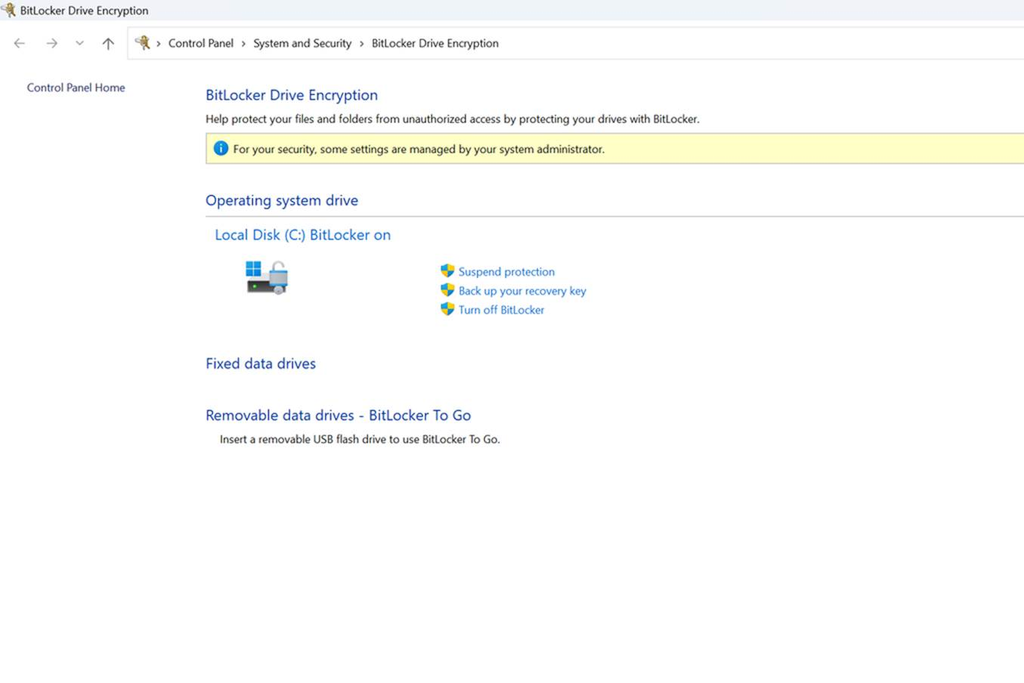
How to disable BitLocker from Control Panel
Although Windows Settings is generally the preferred option for disabling BitLocker, the legacy Control Panel can be used as an alternative option on Windows 10/11 machines.
To disable BitLocker using the Control Panel:
- Enter the word Control at the Windows Run prompt to launch the legacy Control Panel.
- When the Control Panel opens, click on System and Security.
Figure 2
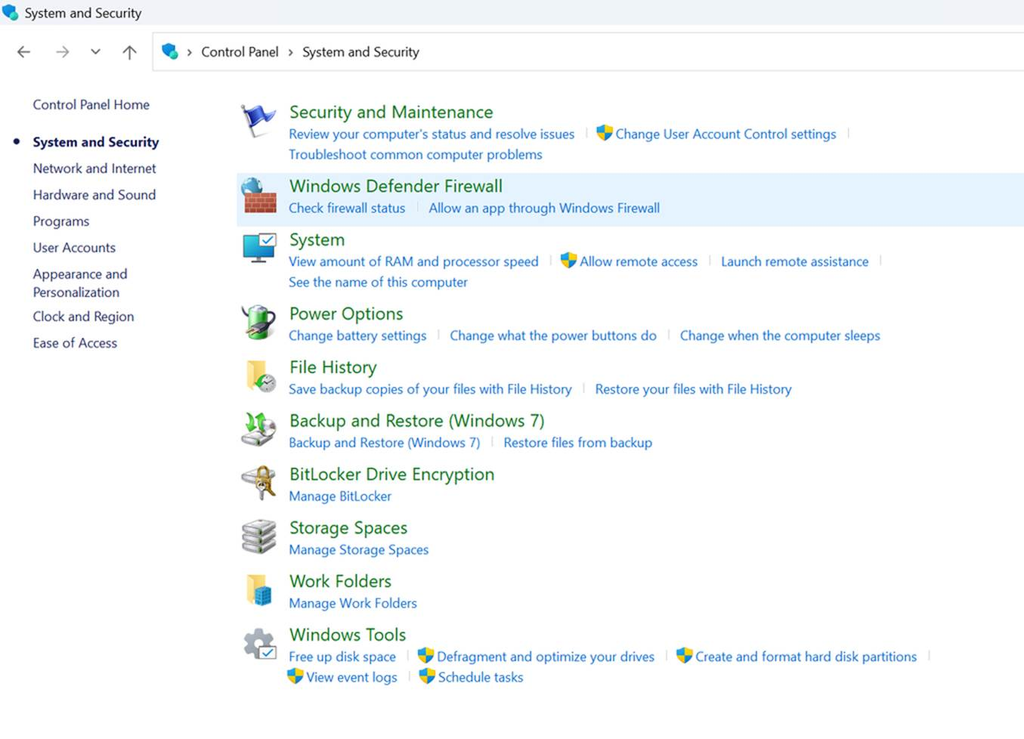
- Click BitLocker Drive Encryption.
- Click Turn Off BitLocker.
How to disable BitLocker with PowerShell
While there are various options for disabling BitLocker through the GUI interface, you also have the option of disabling BitLocker through PowerShell. This technique can be useful if you need to disable BitLocker across multiple machines, because the action can be scripted.
It is worth noting however, that disabling BitLocker encryption through PowerShell requires using an elevated PowerShell session.
Disable-BitLocker -MountPoint "C:"Another useful PowerShell cmdlet is:
Get-BitLockerVolumeThis cmdlet displays the current BitLocker status. Using this command, you can tell whether or not a volume is encrypted. This cmdlet can also be useful for monitoring the encryption process since it shows the protection status and the encryption percentage.
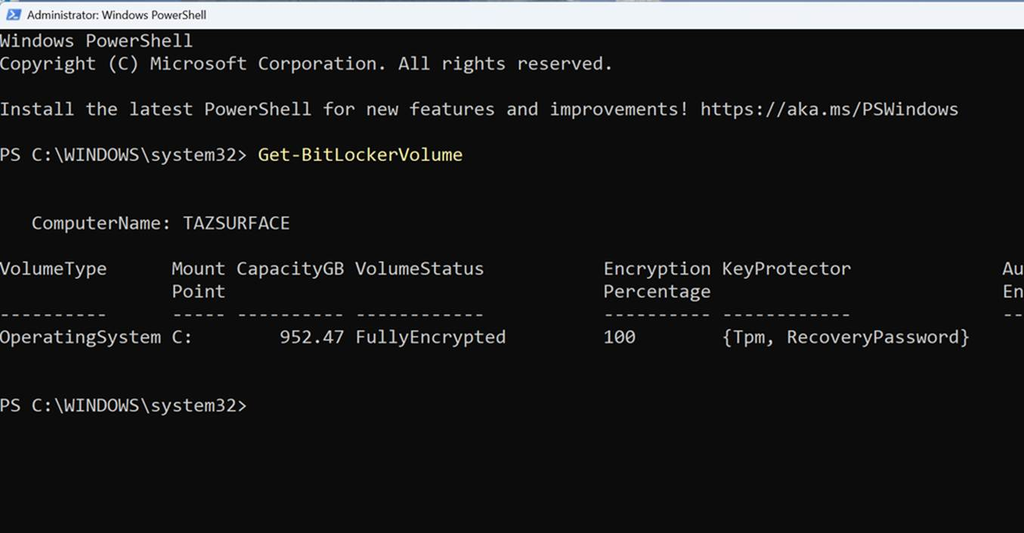
How to disable BitLocker with the Command Prompt
Just as BitLocker can be disabled from PowerShell, it can also be disabled by using the Windows command prompt by using the command below (be sure to run as administrator):
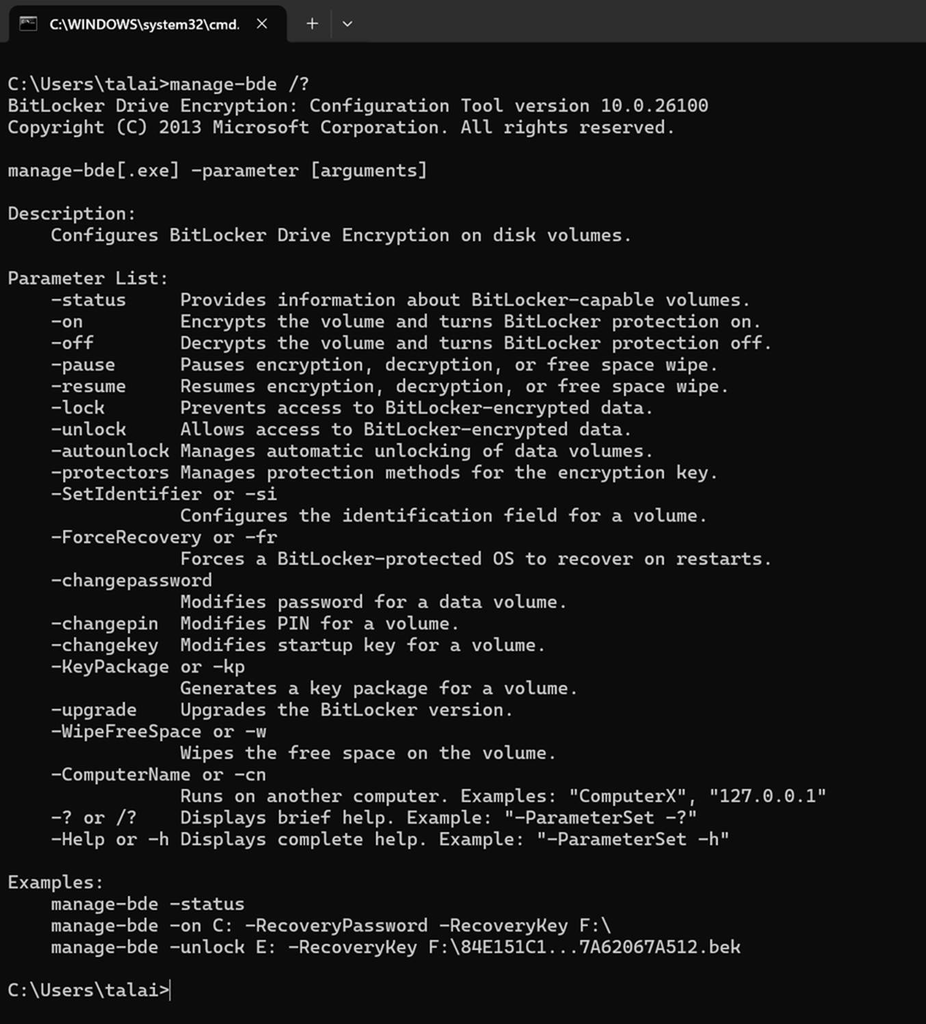
manage-bde -off C:While the manage-bde command is most often used for enabling or disabling BitLocker, it supports numerous command line switches that can be used to view the BitLocker status, pause or resume encryption, or even to view the BitLocker version. You can see the available command line switches in the figure below.
What happens after BitLocker is disabled?
When BitLocker is disabled, the drive is immediately decrypted. Decryption is a lengthy process that can take minutes or hours, depending on the speed of the hardware, the size of the disk, and the amount of data that is present. You can continue to use Windows while the drive is being decrypted.
Permanent decryption removes protection against offline access
There are several risks associated with disabling BitLocker. The most significant of these risks is that if an unprotected laptop were to be lost, its data could be exposed. While it is true that the laptop’s authentication mechanism (password, Windows Hello, etc.) protects against unauthorized logins, anyone who is in possession of the laptop could simply remove the SSD, install the SSD into another machine as a secondary drive, and gain access to the SSD’s contents.
Needless to say, this could very quickly become a compliance issue. Even if a laptop is never stolen, disabling BitLocker creates the potential for audit failures and permanent security gaps.
Frequently asked questions
Does disabling BitLocker delete data?
No, the process of disabling BitLocker does not cause data to be deleted. The drive is simply unencrypted and the data is left in an unencrypted state. As a best practice however, it is a good idea to create a backup prior to decrypting a drive, just in case anything were to go wrong.
How long does BitLocker decryption take?
The BitLocker decryption process varies in length based on factors such as the size of the disk, the amount of data on the disk, and the speed of the machine. As a general rule, decrypting a disk is a time consuming process.
Can I re-enable BitLocker later?
If you have disabled BitLocker, you can choose to re-enable it later on. The one caveat however, is that your previously used recovery key may no longer work, so you will likely need to create a new recovery key.
Is BitLocker available on Windows 11 Home?
Windows 11 Home does not include the full BitLocker feature. It does however, contain a similar feature called Device Encryption. The Device Encryption feature uses the same core technology as BitLocker and is enabled automatically when installing Windows 11 Home, so long as a Microsoft account is used and other hardware and device conditions are met. The recovery key is stored within the Microsoft account.
Should I suspend or disable BitLocker?
In most cases, it is better to suspend BitLocker than to fully disable it. Suspending BitLocker allows you to perform system maintenance while files remain encrypted. You can then resume protection when you are done, thereby putting everything back to normal without the hassle of disabling and re-enabling BitLocker.

As an internationally bestselling tech author and a former 22-time Microsoft MVP, Brien Posey has written or contributed to dozens of books and created a variety of full-length video training courses on all sorts of IT and space-related topics. He’...