Windows Server Update Services 2012: Reporting and PowerShell
Welcome back to our series on Windows Server Update Services 2012 (WSUS) in Windows Server 2012! In part one, I went over the installation of WSUS 2012 and its prerequisites. In part two, I looked at how to configure computers to use WSUS, create WSUS groups to target updates and how to approve updates for distribution. In this third article, I’ll cover how to get WSUS reporting working. I’ll also cover how manage WSUS using PowerShell cmdlets.
Install WSUS Reporting
There are a few additional steps you need to take to get reporting working after installing the WSUS role in Windows Server 2012. If you try to run a report from the WSUS management console after installing the WSUS role, you’ll get a message saying that you must install the Microsoft Report Viewer 2008 Redistributable.
- Log on to Windows Server 2012 WSUS as a local administrator.
- Download Microsoft Report Viewer 2008 SP1 Redistributable (using the link) and save it.
- Start Server Manager from the icon on the desktop Taskbar or Start screen.
- On the Server Manager Dashboard, click Add roles and features under Welcome to Server Manager.
- In the left pane of the Add Roles and Features Wizard, click Server Selection.
- Again in the left pane, click Features.
- Under Features in the right pane, check .NET Framework 3.5 Features and click Next.
- On the Confirmation screen, click Specify an alternate source path.
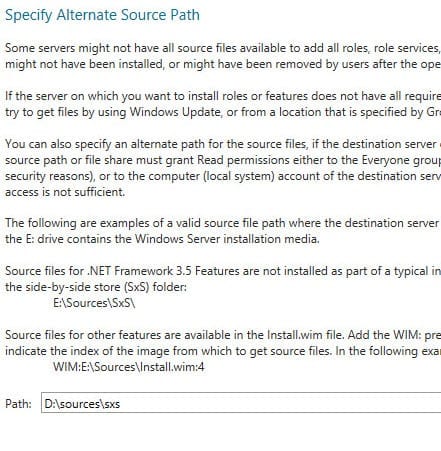
On a standard installation of Windows Server 2012, the binaries for .NET Framework 3.5 (and 2.0) are not present by default, so you will need to point the Add Roles and Features Wizard to your original installation media. In this example, I’ve simply inserted the Windows Server 2012 media into the local DVD drive (D:).
- In the pop-up dialog, enter the source path (d:\sources\sxs) for the .NET Framework 3.5 installation files in the Path: box and click OK.
- Back on the Confirmation screen, click Install.
- Once installation has completed successfully, click Close in the Add Roles and Features Wizard.
- Now run and install the Report Viewer executable downloaded earlier.
Running WSUS Reports
Once Report Viewer is installed, you will be able to run the built-in reports from the WSUS management console (MMC).
- Open Server Manager from the icon on the desktop Taskbar or Start screen.
- Select Windows Update Server Services from the Tools menu.
- In the WSUS MMC, select Reports in the left pane.
In the central pane of the WSUS MMC, you’ll see there are a variety of built-in reports that can be run, divided into update, computer and synchronization reports.
- Click on Update Status Summary in the center pane.
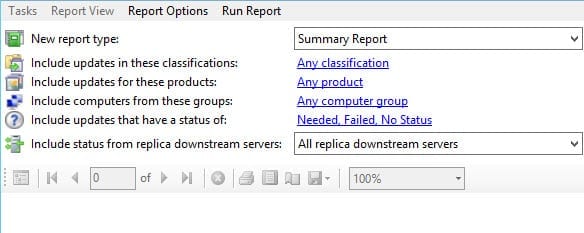
- A new window will open giving you the option to customize the report. Let’s leave the default settings and click Run Report on the menu.
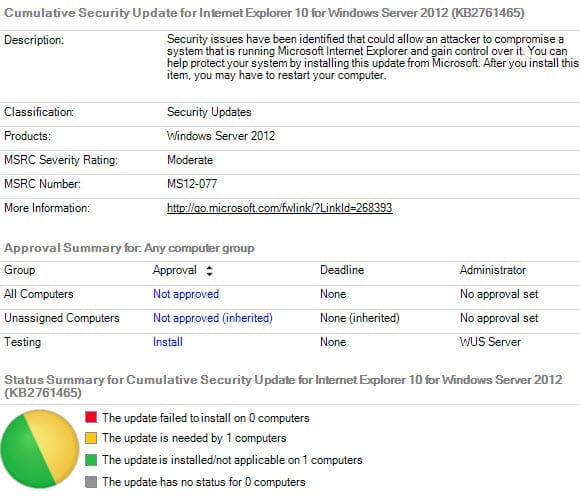
After a few moments, the first page of the report will be displayed. You can scroll through the report using the arrows at the top of the report window or by expanding the report navigation in the left pane to jump directly to any page. Notice that you are also able to approve updates by clicking the links in the report window. For example, if I wanted to approve an update for the All Computers group, I would click the Not approved link and approve the update in the pop-up dialog.
Manage WSUS Using PowerShell
The most common task that administrators carry out with Windows Server Update Services is the approval of updates. Open the PowerShell window from the icon on the desktop Taskbar and let’s try out some of the new PowerShell commands.
Display Approve Updates
To display all unapproved WSUS updates, run the following command in the PowerShell window:
Get-WsusUpdate -Classification All -Approval Unapproved -Status Any
The command could generate quite a big list. We can filter the results by changing the value of the –Classification parameter to Critical and –Status to FailedOrNeeded.
Get-WsusUpdate -Classification Critical -Approval Unapproved -Status FailedOrNeeded
The Approve-WsusUpdate command can be used to approve updates. However, you need to pipe the results of the Get-WsusUpdate cmdlet to Approve-WsusUpdate. For example, if I wanted to approve all critical updates for the WSUS Testing group, I would use the following command:
Get-WsusUpdate -Classification Critical -Approval Unapproved -Status FailedOrNeeded | Approve-WsusUpdate -Action Install -TargetGroupName “Testing”
Add a Product to WSUS
Adding a product category to WSUS using PowerShell requires a couple of cmdlets. The Get-WsusProduct cmdlet lists all the WSUS product categories and their relevant GUIDs. To add a product category to WSUS for synchronization, you filter the results of the Get-WsusProduct cmdlet and pipe the results to Set-WsusProduct. For example, to set WSUS to synchronize updates for Windows XP, run the command below:
Get-WsusProduct | Where-Object –FilterScript {$_.product.title -Eq “Windows XP”} | Set-WsusProduct
Click here to see a list of all available WSUS PowerShell cmdlets in Windows Server 2012.


