We’re back with our multi-part series on VMware’s vSphere PowerCLI, a free snapin you can use to manage your VMware infrastructure. Today we’ll go over PowerCLI and PSDrives. But if you need to back up: In part one, we took a look at downloading and installing PowerCLI. In part two, we went through the steps of setting up and configuring PowerCLI. Later, in part five I’ll create a new VM. And finally, in part six I show you how to use PowerCLI to manage your ISO files.)
The PSDrives that you get with PowerCLI are perhaps the most compelling feature. You can use the same file system commands to manage and manipulate the files related to your VMware infrastructure. I hope you are beginning to see, if you haven’t already, that PowerShell is becoming the only management tool you need to learn.
Installing PowerCLI: Providers
When you install PowerCLI, one of the new goodies you get is a provider. Actually, you get two providers.
PS C:\> get-psprovider vim*
Name Capabilities Drives
---- ------------ ------
VimDatastore ShouldProcess {vmstores, vmstore}
VimInventory Filter {vis, vi}
These providers are what make all of the PowerCLI magic possible. You can read more about the VimDatastore provider.
PS C:\> help vimdatastore
Sadly, there is no corresponding help topic on the VimInventory provider. Nevertheless, what this means for you is that you can navigate your VMware infrastructure as if it were a file system.
vSphere PowerCLI PSDrives
When you first add the snapin, PowerShell will automatically add several PSDrives.
PS C:\> gdr vi*,vm* | Select Name,Provider,Root Name Provider Root ---- -------- ---- vi vmware.vimautomation.core\VimInventory \LastConnectedVCenterServer vis vmware.vimautomation.core\VimInventory \ vmstore vmware.vimautomation.core\VimDatastore \LastConnectedVCenterServer vmstores vmware.vimautomation.core\VimDatastore \
However, they aren’t really connected to anything until you connect to a server.
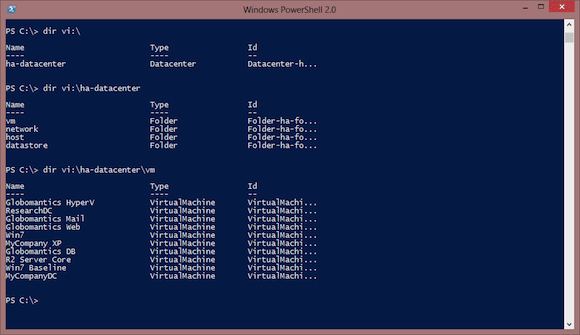
PS C:\> connect-viserver esx.jdhitsolutions.local Name Port User ---- ---- ---- esx.jdhitsolutions.local 443 root PS C:\> dir vi:\ Name Type Id ---- ---- -- ha-datacenter Datacenter Datacenter-h...
The inventory drive gives you access to different infrastructure elements, as shown below in Figure 1.
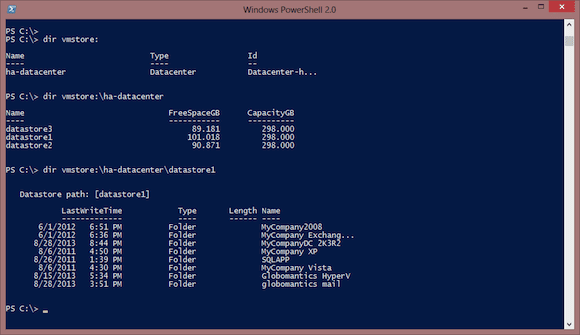
The vmstore: PSDrive lets you browse your infrastructure from the virtual machine side, as you can see in Figure 2.
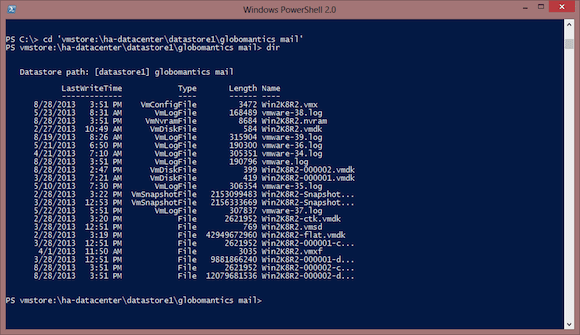
What this means to you is that you can navigate all of the files associated with a virtual machine like a file system.
PS C:\> cd 'vmstore:\ha-datacenter\datastore1\globomantics mail' PS vmstore:\ha-datacenter\datastore1\globomantics mail> dir
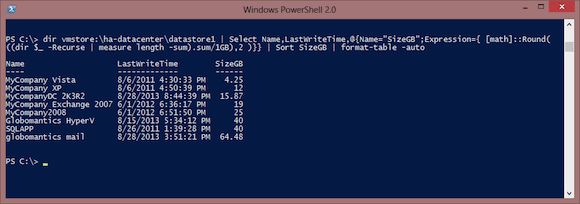
If I wanted to, I could copy, move or delete files. Or perhaps I’d like to know how much space each virtual machine is consuming.
PS C:\> dir vmstore:\ha-datacenter\datastore1 | Select Name,LastWriteTime,@{Name="SizeGB";Expression={ [math]::Round(
((dir $_ -Recurse | measure length -sum).sum/1GB),2 )}} | Sort SizeGB | format-table –auto
The image below displays my results.
The virtual machines seen here may nor not be added to the inventory you would see in the vSphere client.
One thing to remember is that names in these PSdrives are case-sensitive. If I try a command like this it will fail with an error about an invalid path.
PS C:\> dir vmstore:\ha-datacenter\DATASTORE2
Your best bet is to take advantage of tab completion to discover the proper case. But once I know that I can easily delete obsolete files from the server.
PS C:\> remove-item vmstore:\ha-datacenter\datastore3\XPBase -Recurse
One thing you can’t do is copy or move files between the file system and the VMware server. These types of operations only work within the same provider. At least using the native PowerShell commands. Fortunately, PowerCLI includes some cmdlets that will cross providers. The benefit is that you can copy items between the file system and the VMware PSDrive.
PS C:\> Copy-DatastoreItem -Item D:\iso\SpinRite.iso -Destination vmstore:\ha-datacenter\datastore3\ISO -PassThru Datastore path: [datastore3] ISO LastWriteTime Type Length Name ------------- ---- ------ ---- 8/29/2013 3:29 PM IsoImageFile 1529856 SpinRite.iso
This one line command copied an ISO file from my computer to the ISO folder in datastore3 on my VMware server.
While the PSDrives are fun to work with, I encourage you to use cmdlets wherever possible, especially those that ship with PowerCLI.


