


Understanding the Azure Resource Manager Load Balancer

In this article, I’ll explain how Azure Resource Manager (ARM) uses a load balancer instead of cloud services to implement NAT rules and internal/external network load balancing for virtual machines.
Azure V1 and Endpoints
The old ways of doing networking in Azure V1 or Service Management in the classic Management Portal were well understood by Azure administrators. Typically, a cloud-based virtual machine application or deployment was wrapped up in an abstraction called a cloud service. This cloud service has a public IP address that can be accessed by clients on the Internet. When you wanted to make a service available in a virtual machine, you edited the settings of the virtual machine and could do one of two things:
- Create a NAT rule, using an endpoint, that revealed a UDP or TCP port to the Internet via the cloud service’s public IP address.
- Create a load balanced set by effectively duplicating an endpoint across two or more virtual machines.
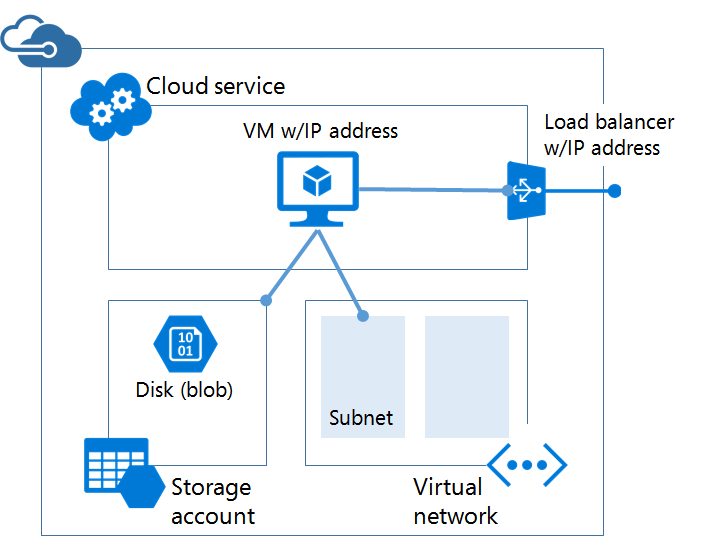
For example:
- An endpoint might be created for a virtual machine that NATs TCP 13890 on the cloud service public IP address to TCP 3389 in the virtual machine; this allows remote desktop access to the virtual machine from the Internet.
- A load balanced set might be created on TCP 80 across three virtual machines via the cloud service public IP address; this creates a load balanced web server farm.
Service Management virtual machines also allowed virtual machines to be directly connected to the Internet with a public IP address, but these machines could not be load balanced by the Azure network fabric.
Azure V2 Load Balancer
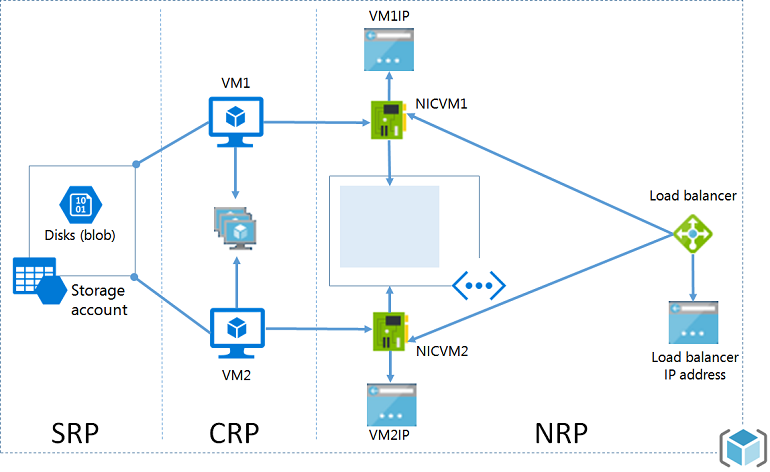
You’ll notice that things have changed a lot when you start to use ARM. The concept of a cloud service is gone and endpoints are nowhere to be found. The diagram below gives you a simplified view of the pieces involved in revealing a virtual machine to the Internet.
Let’s start with some of the basics:
- A virtual network is created with one or more subnets.
- A NIC is created and connected to a subnet in a virtual network and assigned an IP address for that subnet.
- The NIC or the subnet can optionally be assigned with a network security group to block or allow traffic.
- A virtual machine is created and assigned a NIC, and this is how a virtual machine is connected to a network.
That’s all great for the virtual machine being on a LAN, but how do we connect to virtual machines from the Internet?
If you create a single virtual machine, it will be assigned a public IP address. You can use that single public IP address to remote into the machine and manage it. But there’s no options for load balancing it or creating NAT rules. ARM expects that you go one step further and create the above infrastructure with a load balancer.
Note: The Basic A-Series virtual machine sizes do not support load balancing; therefore, you cannot connect an ARM load balancer to a Basic A-Series virtual machine and, in turn, cannot create NAT or load balancing rules to it.
External Load Balancing
The ARM load balancer is not a virtual machine or network appliance that you manage; instead, it is a function of the Network Resource Provider in the Azure fabric — you will see similar in the Network Controller role in Windows Server 2016 and Microsoft Azure Stack. The diagram below depicts the pieces you have to create and connect either manually or via a template to set up ARM virtual machines with a load balancer:
- Virtual machines: The virtual machines are assigned NICs with private IP addresses and a virtual network subnet connection.
- Availability Set: The virtual machine(s) that you want to run behind the load balancer are assigned to an availability set. Note that this must be done at the time of creating the machine(s).
- External load balancer: An external load balancer is created with a single public IP address.
- Backend pool: In the load balancer, you configure a backend pool; this associates some or all virtual machines in an availability set with the load balancer.
Note that the load balancer will work with only one availability set, and therefore you will have one external load balancer and one public IP address for every availability set that must be accessible from the Internet. You can create more than one backend pool from a single availability set, and a virtual machine can reside in more than one backend pool.
Now you have something that you can create load balancing and NAT rules with. For example:
- You can NAT TCP 13891 from the load balancer’s public IP address to TCP 3389 on a Windows individual virtual machine. This allows remote desktop access from outside of Azure.
- You can create a load balancing rule to connect TCP via the load balancer public IP address to all machines in the backend pool.
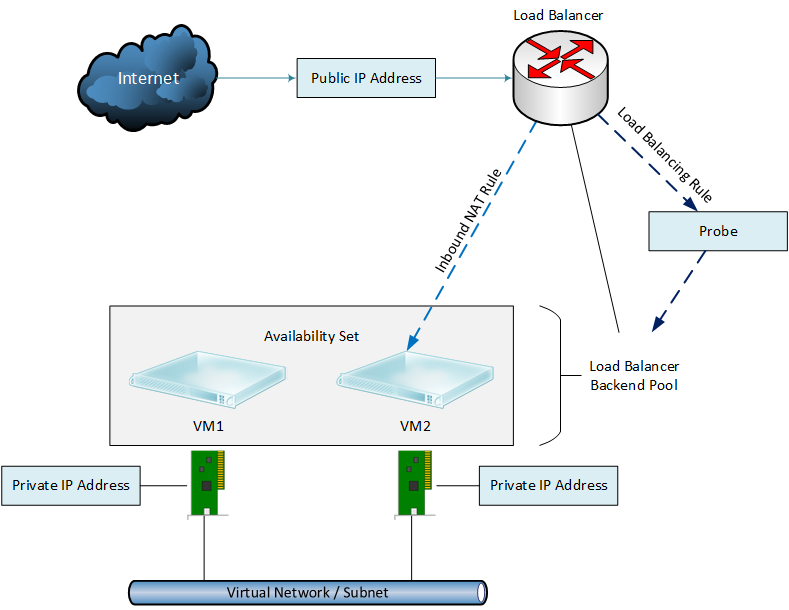
Creating a load balancing rule requires that you create:
- Probe: A probe will test if each member of the backend pool is operational. You should test the service that is being load balanced, for example TCP 443 for a secure website.
- Inbound NAT Rule: A definition that creates a load balanced NAT rule from a TCP/UDP port on the external interface of the load balancer (the public IP address) to each member of the targeted backend pool. For example, you might create a load balanced rule for TCP 443 for a backend pool of 10 secure web servers.
Note that an inbound NAT rule:
- Is associated with a probe.
- Supports TCP or UDP.
- Can use different internal and external ports.
- Offers session persistence for client transactions.
- Supports a session idle timeout.
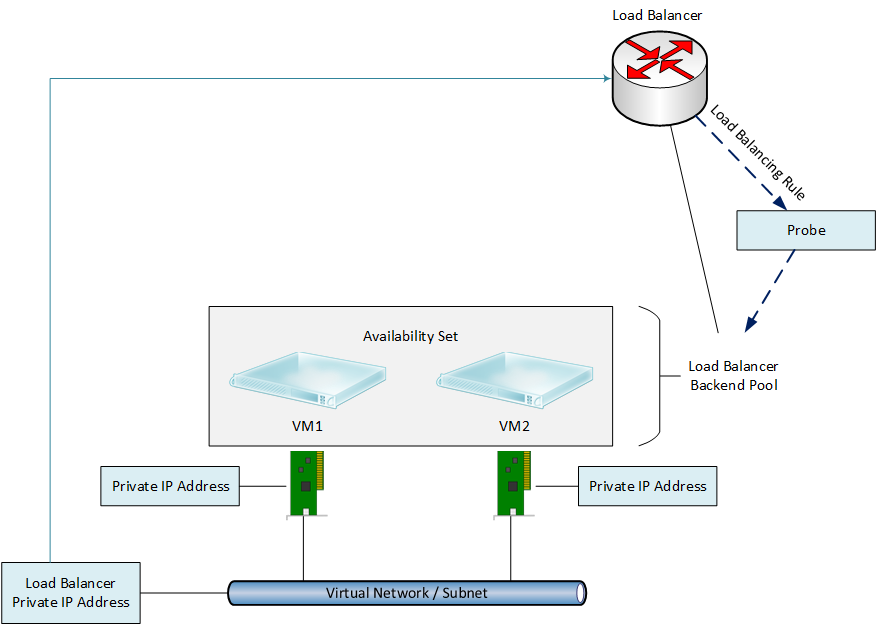
Internal Load Balancer
Not all applications or tiers of applications will be public facing, but they might still require load balancing. For example, a web application might have a backend tier of load balanced transaction and application servers. This sort of workload requires an internal load balancer.
The design is pretty similar to that of an external load balancer; the major difference is that an internal load balancer doesn’t have a public IP address. Instead, we associate an internal load balancer with a virtual network subnet and it gets either a static or dynamic private IP address. All traffic will be routed to an internally load balanced service via this private IP address.
There is no need to create NAT rules because we are dealing with an internally routed service where every virtual machine is accessible by the private IP address on the subnet.
Opinion
There’s a bit of a re-learning curve for anyone coming from Service Management to ARM, including switching from endpoints to a load balancer. But once you have a go at creating machines, deploying a load balancer, and creating NAT or load balancing rules, then the pieces all start to fall into place.
In my case, I deployed an Azure ARM template that included load balanced virtual machines so I could trace the components and see how they worked in concert. I think that those folks who have only ever used ARM might find understanding the ARM load balancer a little easier than Azure veterans.
To be honest, ARM templates will abstract much of this deployment work from you. It is important that you understand what the templates have deployed so you can continue to manage the network and troubleshoot it in the future.