Setup a Virtual Network in Windows Azure
How do I set up a virtual network in Windows Azure that doesn’t use computer resources when idle?
To be fair, Windows Azure isn’t designed to be used by IT professionals for the purposes of setting up lab environments, but there are advantages to using Azure over other cloud services designed specifically for the purposes of creating test environments. In this Ask the Admin, I’ll show you how to set up a virtual network in Windows Azure so that VMs receive the same IP address every time they are started after deallocation.
No Support for Static IP Addresses
The biggest immediate drawback with Azure is that there is no support for static IP addresses. That is, setting a static IP address in the network configuration on Windows Server is not supported, and DHCP must be used for IPv4 address configuration. This is a problem for Active Directory domain controllers, which must be configured with the same IP address every time they are started.
To resolve this issue, Azure introduces the concept of persistent IP addresses, in which VMs are guaranteed to receive the same IP address each time they start, provided that the VM is stopped and not shut down (deallocated). While in a production environment this minor restriction is not likely to be a problem, for IT professionals wishing to set up a lab environment, VMs that are allocated fabric resources generate compute costs.
Virtual Network for a Lab Environment
In the following instructions, we’ll create a virtual network that allows us to create two domain controllers (DCs) that will be assigned the same IP address each time they are started, even after being deallocated from the Azure fabric.
The VMs don’t need to be created with persistent IP addresses. The trick is to create a unique subnet for each VM requiring a constant IP address. IP addresses are always assigned in order, starting from the lowest available address in the pool.
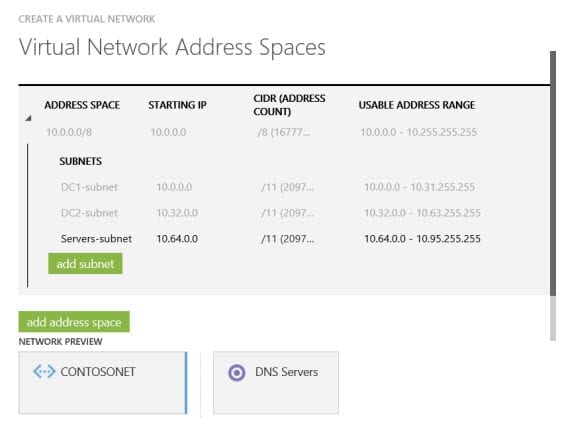
For simplicity, let’s use the default 10.0.0.0/8 address space that Azure assigns to virtual networks. I’ll start by configuring a DNS server address (10.0.0.4) for the space and then divide it into three subnets: 10.0.0.0/11 for the first DC and DNS server, 10.32.0.0/11 for the second optional DC, and 10.64.0.0/11 for all other servers in my lab.
- Log in to the Azure management portal.
- Click Networks in the blue pane on the left of the portal.
- In the main window under Networks, click DNS Servers.
- Click +New in the bar at the bottom of the screen.
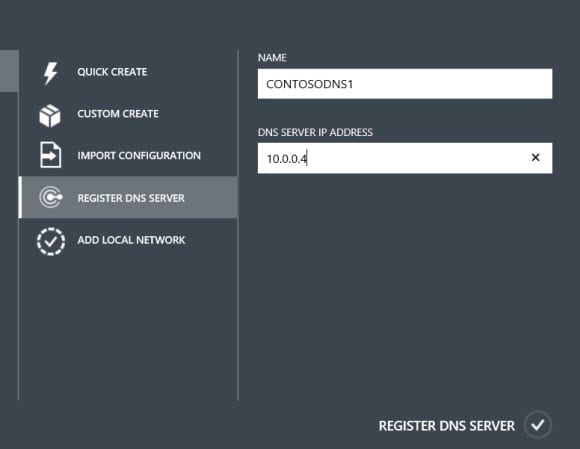
- Click Register DNS Server in the pop-up dialog.
- Give the DNS server a name, in my case I’m going to call it CONTOSODNS1, set 10.0.0.4 as the IP address and then click Register DNS Server in the bottom right of the pop-up dialog.
- Back in the main portal window under Networks, click Virtual Networks.
- Click +New in the bar at the bottom of the screen.
- Click Custom Create in the pop-up dialog.
- In the Create a Virtual Network window, give the new network a name, and either create or select an existing affinity group. Click the arrow in the bottom right of the window to continue.
- On the DNS Servers and VPN Connectivity screen, select the DNS server we just created and click the forward arrow in the bottom right to continue.
- On the Virtual Network Address Spaces screen, click Subnet-1 and rename it DC1-subnet.
- Click Add subnet and call the new subnet DC2-subnet. Make sure the starting IP address is set to 10.32.0.0 and CIDR set to /11.
- Click Add subnet again, this time calling the new subnet Servers-subnet, making sure the starting IP address is set to 10.64.0.0 and CIDR set to /11.
- To complete the process, click the tick in the bottom right of the window.
When you add a new virtual machine in Azure, select the CONTOSONET virtual network and select the appropriate subnet: DC1-subnet for your first DC and DNS server (10.0.0.4), DC2-subnet if you choose to add a second DC (10.32.0.4), and Servers-subnet for all other servers. Don’t forget that the subnets created for the two DCs should only ever contain one VM. Once the DCs are assigned to the appropriate subnets, you can shut them down (deallocate) using PowerShell or the Azure management console and be sure they will receive the same address when restarted.
Be sure to check out my two-part series for more information on setting up Active Directory on Azure for use in a production environment, and how to create VMs with persistent IP addresses.


