VMware vCloud Director Essentials: Provider vDC and Deployment Templates
Welcome back to this mini-series on VMware vCloud Director Essentials. Part one was an introduction to the vCloud Director web interface. I also demonstrated how to connect to vCenter and vShield. Now we’re ready to talk about creating two important entities: a Provider Virtual Datacenter and a VM Deployment Template.
Creating a Provider Virtual Datacenter
According to the VMware knowledgebase, a provider virtual datacenter (provider vDC) “combines the compute and memory resources of a single vCenter Server resource pool with the storage resources of one or more datastores connected to that resource pool,” and that it is the “source for organization vDCs.”
First, you need to create a provider vDC, which is going to serve as the source for all organizational vDCs underneath.
Think of it like this. Assuming you were a private cloud provider and you have three different tiers of service: Gold, Silver, and Bronze. You could, for example, create provider vDCs called “Gold,” “Silver,” and “Bronze,” and then you could create customer organization virtual datacenters inside each one.
As a result, the organizations could have those three different tiers of service. Alternatively, they could subscribe to just one tier of service, e.g. they just have an organizational vDC inside of the Bronze provider vDC.
You need to first create at least one provider vDC, which is going to link to a single resource pool from a single vCenter server. In other words, you’ve got this resource pool, which is part of DRS cluster.
In that Distributed Resource Scheduler (DRS) cluster, you typically will have at least two hosts so you can take advantage of High Availability (HA) and DRS. The provider vDC would connect to that resource pool inside the DRS cluster. That’s typically how it’s done.
Let’s say you have one management DRS cluster where you run DNS, vCenter, and the vShield Manager. Then you’ve got these other resource DRS clusters, and each of those resource clusters may have different qualities of servers.
You might have some really powerful servers in the Gold resource pool or the Gold DRS cluster. And then down the line to the Bronze DRS cluster, you might have some older servers with some local SAS storage.
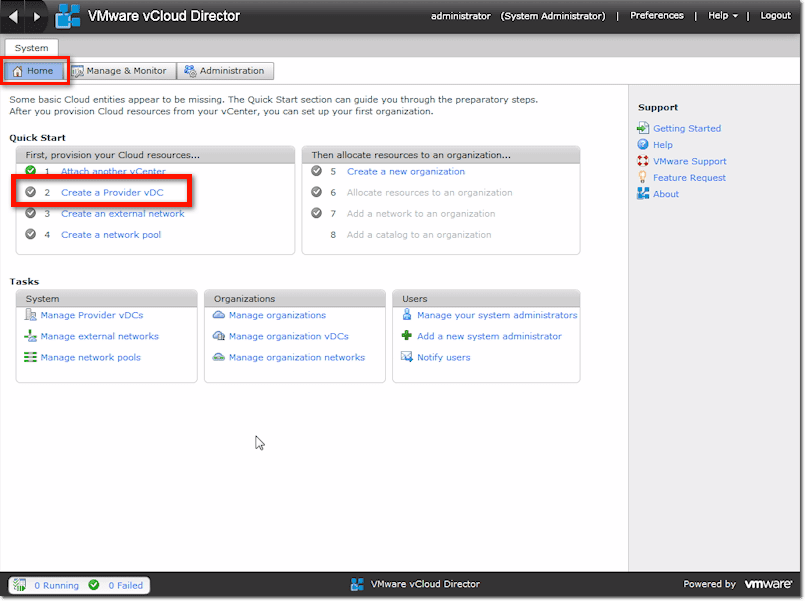
You can create a new provider vDC in the VMware vCloud Director by going to the Manage & Monitor tab, click Provider vDC, and then New Provider vDC. Alternatively, you can go to Quick Start and then click on Create a Provider vDC. That’s what is being shown in the screenshot below:
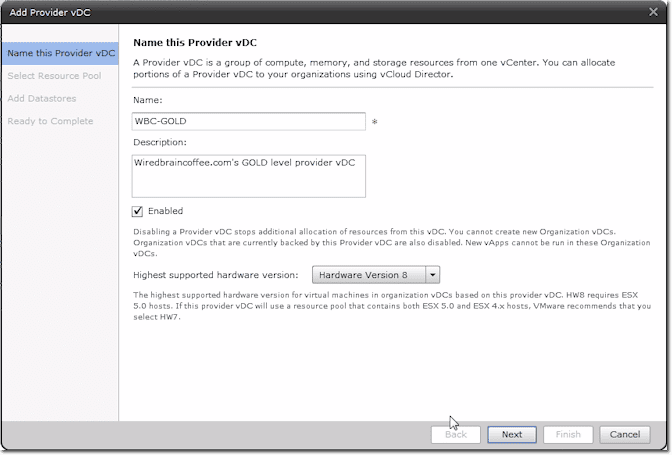
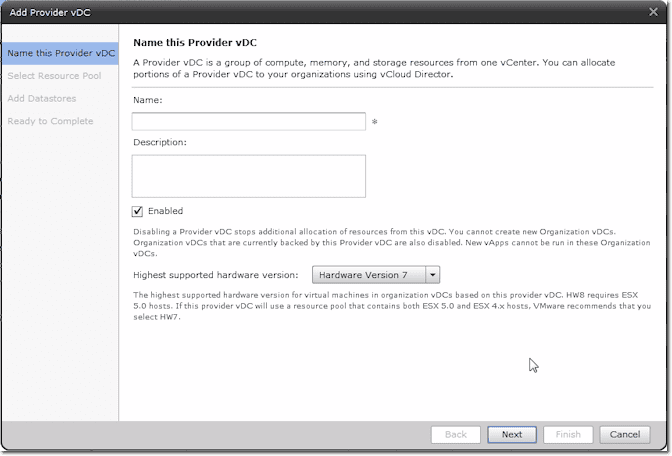
You need to give that new Provider vDC a Name and a short Description. You might want to Enable it by default. If you have brand new ESXi 5 servers, then you can select Hardware Version 8 from the drop-down list. When you’re done with that, click Next.
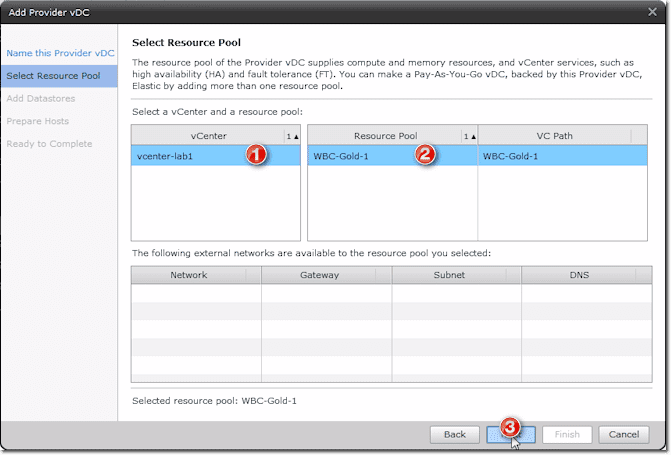
Your next task would be to select a resource pool. You start by selecting a vCenter server. After that, you select a resource pool that you created earlier in the vSphere virtual infrastructure. Click Next when you’re done.
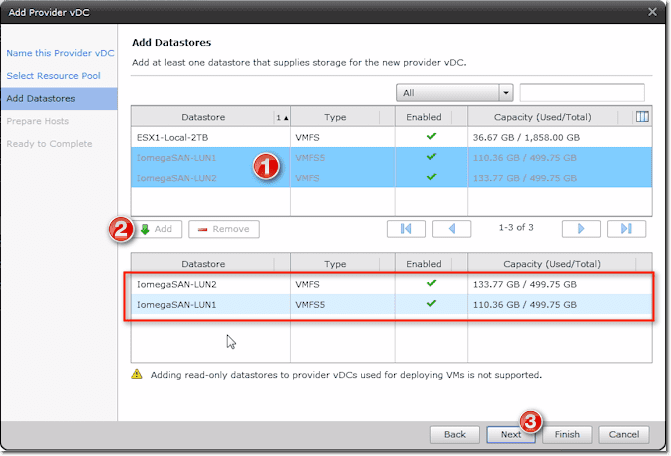
Next, you need to add some storage. From the top panel, select a bunch of datastores that you want to be responsible for supplying storage to the new provider vDC. In our screenshot below, we opted not to select the local storage option. Instead, we went with the available shared SAN storage.
After selecting datastores, click the Add button. That will populate the lower panel with the names and details of the datastores you selected. Once you’re done, click Next.
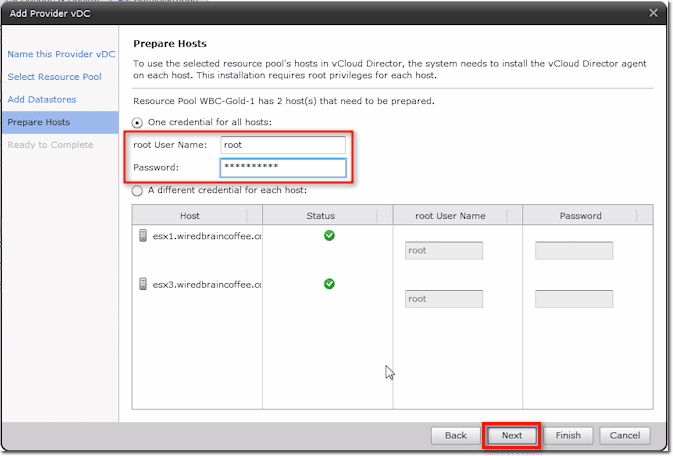
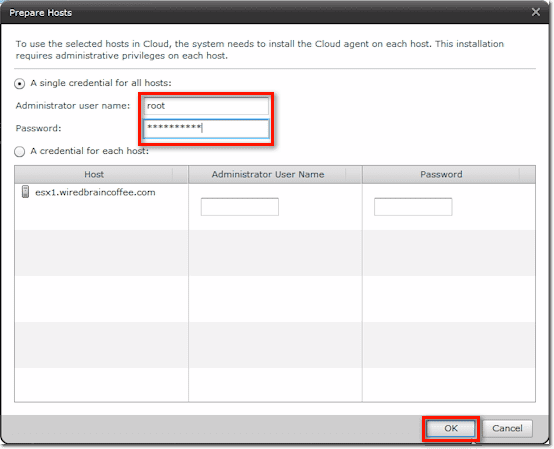
At this point, you need to have the ESXi hosts in that DRS Cluster prepared for vCloud Director. That means the vCloud Director agent needs to be loaded on them. To do that, just enter the root username and password into the boxes provided for them and then click Next.
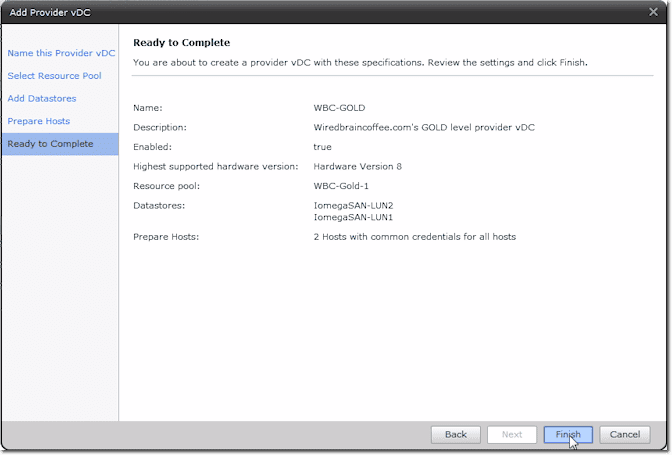
After reviewing the settings and finding everything alright, you can go ahead and click Finish.
You’ll then notice that, under the Quick Start menu, step number two will already be entitled “Create another Provider vDC” instead of “Create a Provider vDC,” which indicates that a provider vDC already exists.
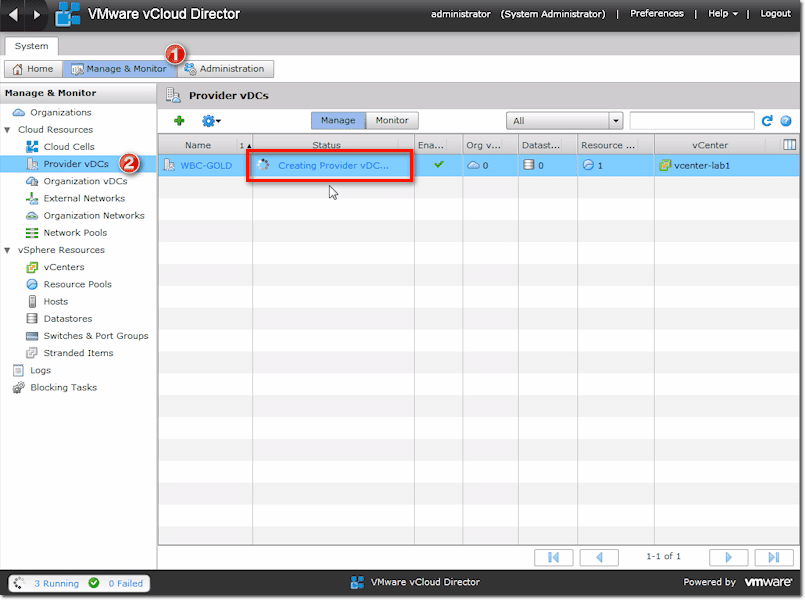
You can check out your newly created provider vDC by going to Manage & Monitor and then to Provider vDCs. If the system is not yet done creating the provider vDC, you’ll see the provider vDC’s Status marked as “Creating Provider vDC.”
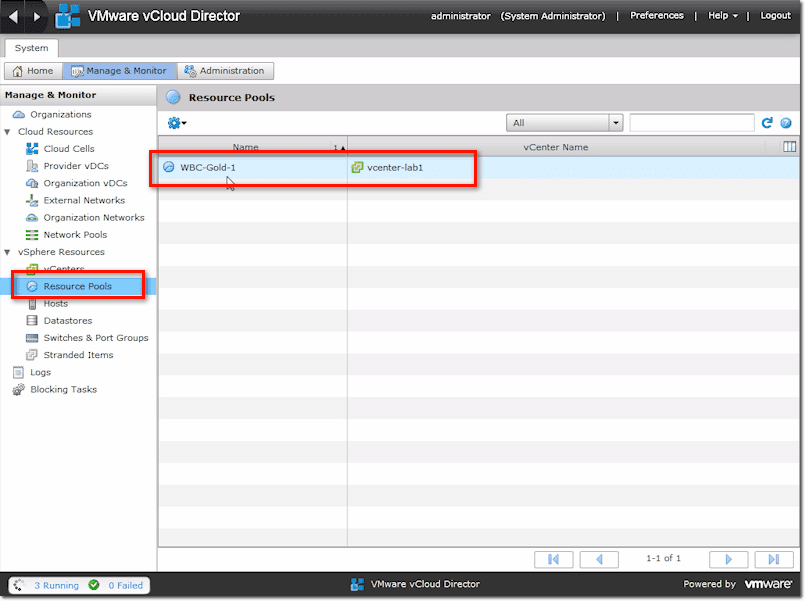
Now, if you go down and click Resource Pools, you’ll be able to see your resource pools as well as be able to access them from there.
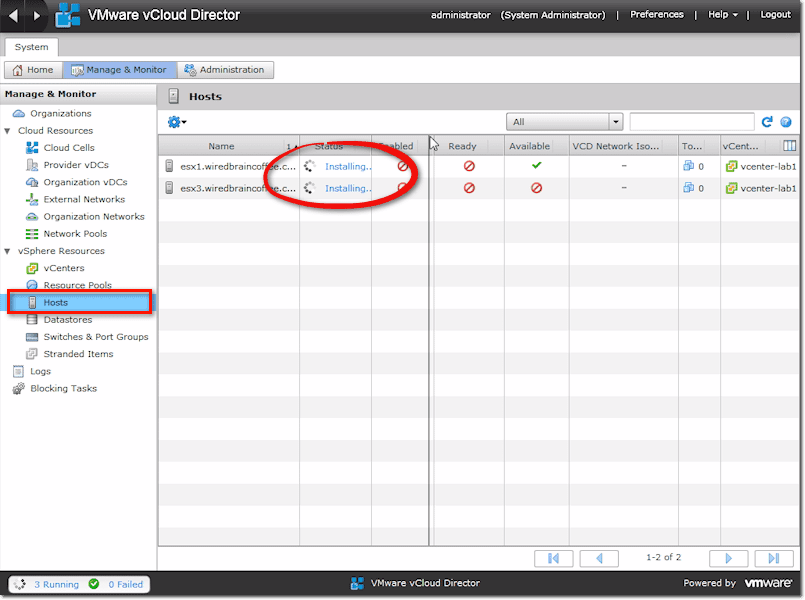
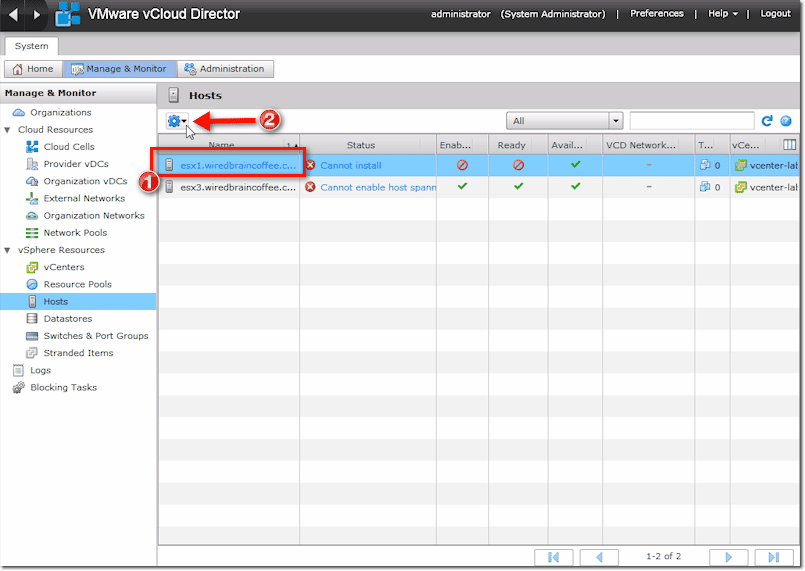
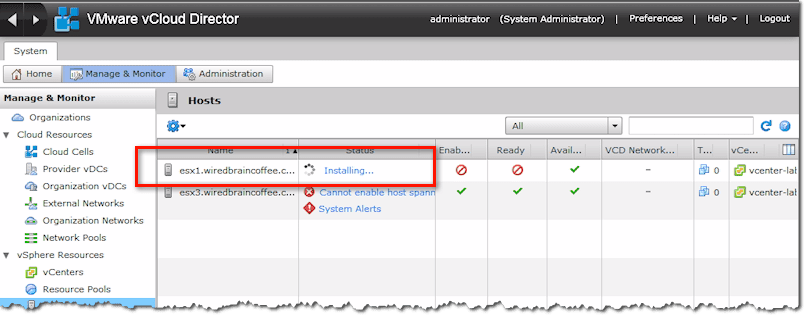
Similarly, if you click on Hosts, you’ll see your hosts. In the screenshot, they’re shown with Status “Installing.” That’s because, at this stage, the Agent is still being installed on these hosts, an activity which could take a couple of minutes.
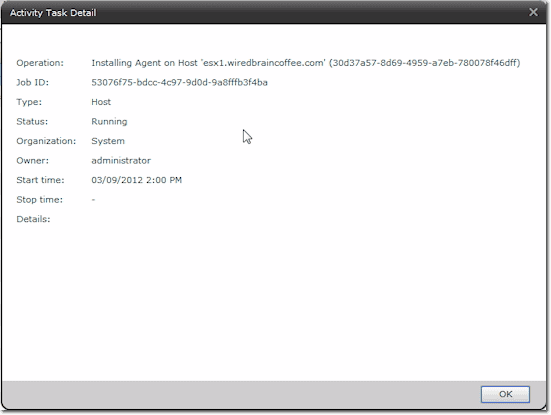
You can verify that by clicking on the status themselves (i.e. “Installing”).
After a few minutes, the Agent installation should complete.
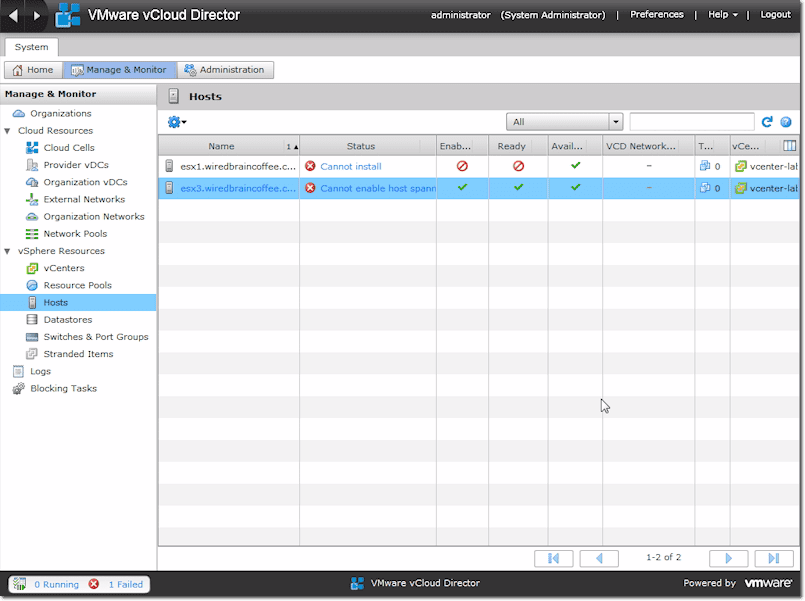
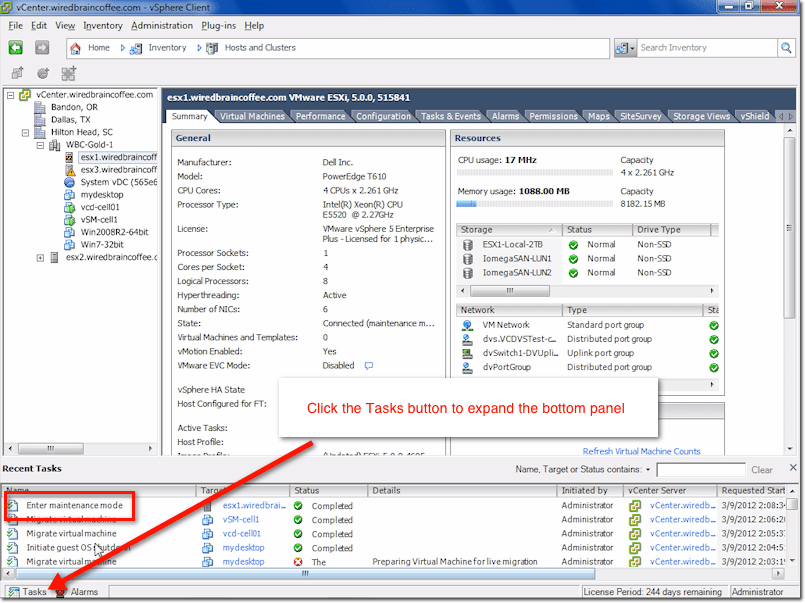
Now, in case your vCloud Director Agent fails to load, like in the scenario shown above, one of the things you can check when troubleshooting is whether the hosts could be placed into maintenance mode. That way, the Agent can be loaded.
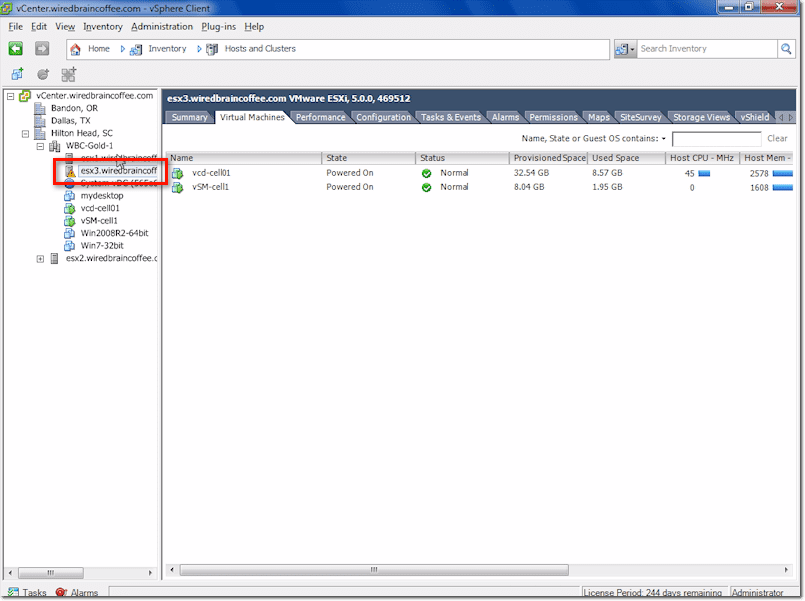
You can go to your vSphere Client and check on the status of those hosts; see what virtual machines are running on them. If they can’t be moved to another host in the cluster using VMotion, then the host can’t be put into maintenance mode, and the agent won’t be able to be loaded.
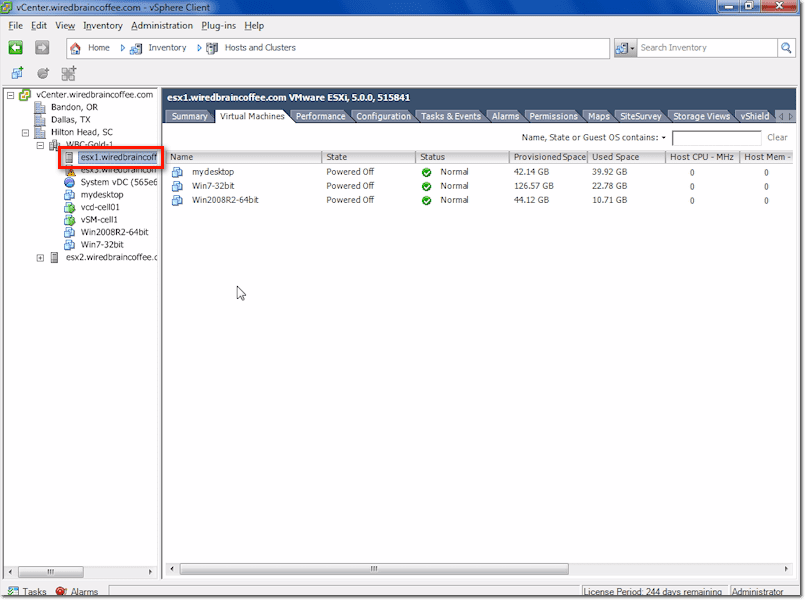
Looking at the two hosts in our setup, this host has two virtual machines running.
This host, on the other hand, has no virtual machine running on it, so we decide to check back on the agent on this host first.
After inspecting the status of your hosts on the vSphere Client, you can go back to the vCloud Director and continue your troubleshooting there. To proceed installing the Cloud Agent on a host, select that host and then click the little gear at the top of the panel.
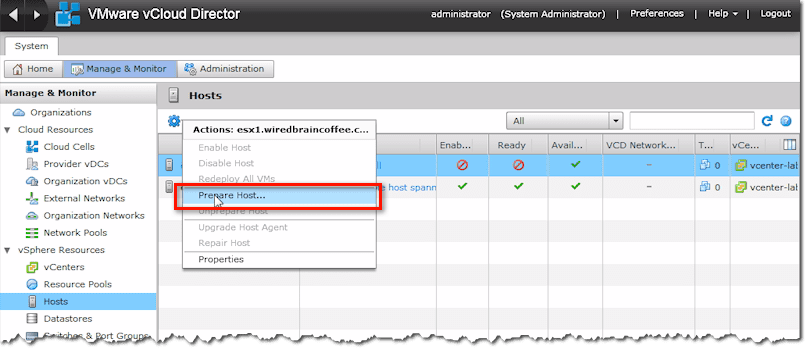
When the context menu appears, click Prepare Host…
Enter your root username and password, and then click OK.
The agent should start installing on your host. Wait until the agent installs successfully on that host before proceeding to the next problematic host.
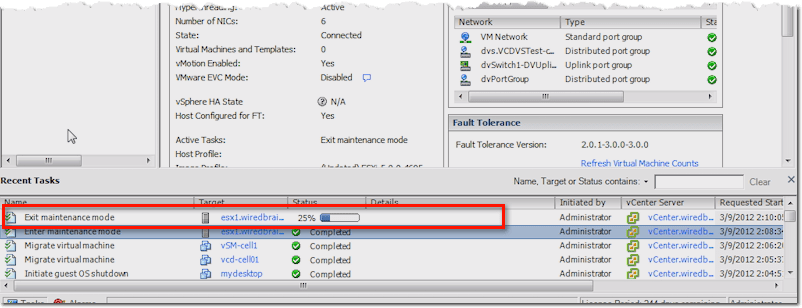
If you go back to your vSphere Client with installation going on, you will see that the host has entered maintenance mode.
Once the agent is finished installing, the host will automatically get out of maintenance mode.
After that, you can shift back to your vCloud Director.
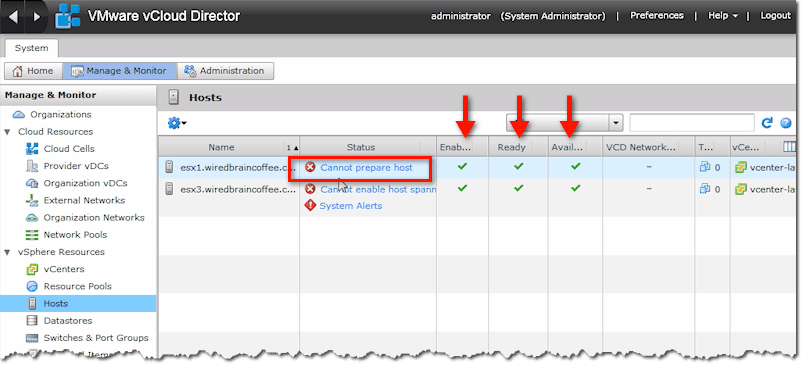
Assuming you encounter yet another problem, you can simply click the Status to view what the problem is all about. One thing I’d like to point out is that, once you have green check marks on all three columns: Enabled, Ready, and Available, that’s usually a good sign and means the remaining issues can be resolved easily.
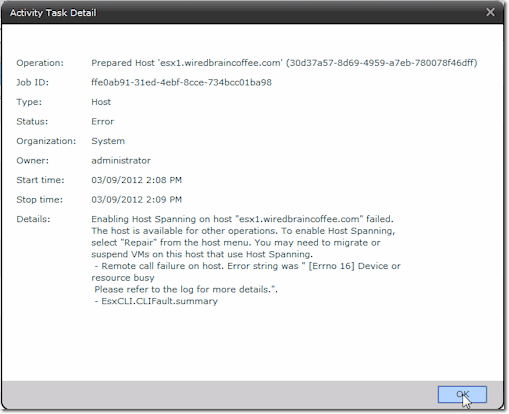
The reason why the system wasn’t able to prepare the host in our case was because Host Spanning on our host failed to enable.
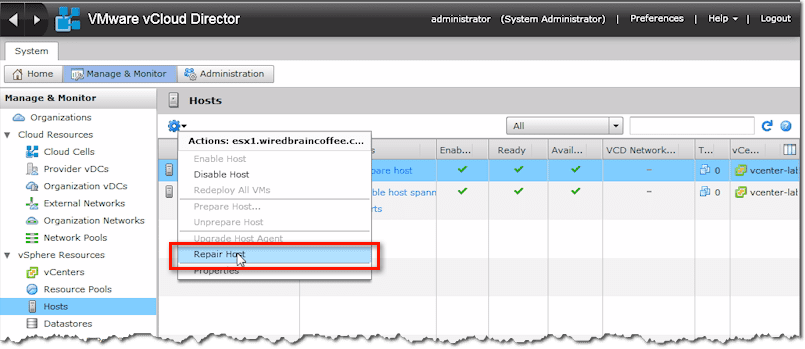
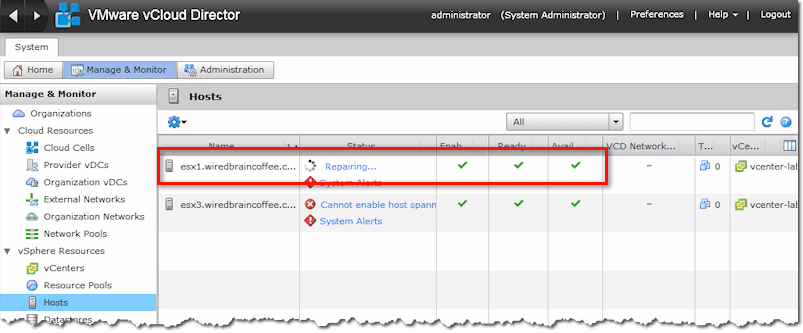
The recommended solution was to select “Repair” from the host menu, so we did just that.
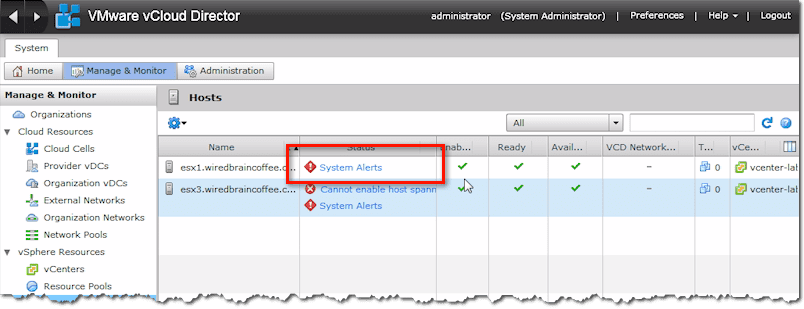
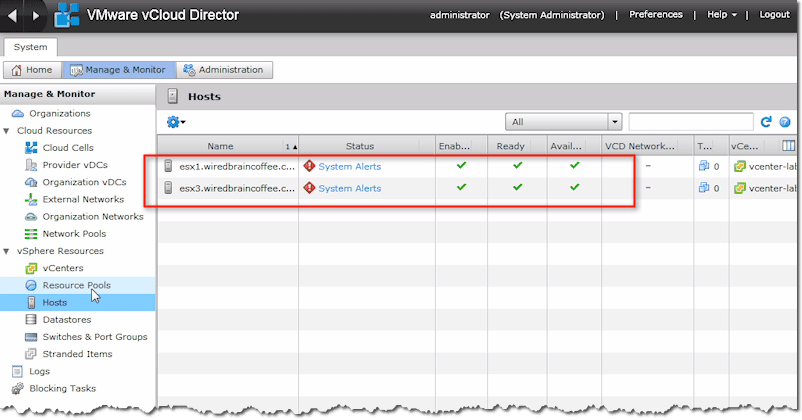
Now, even after repairing, you might still receive a couple of system alerts. They’re mostly stuff that can be remedied, so don’t freak out.
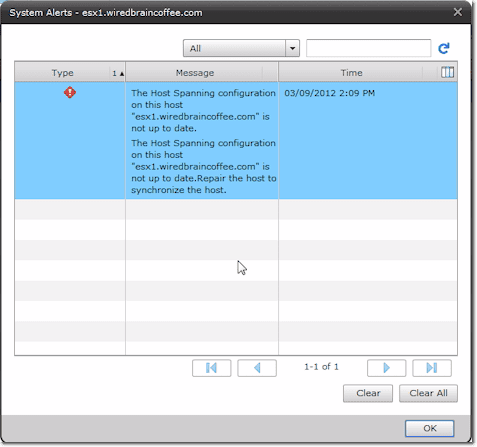
For instance, when we clicked on that particular system alert in the screenshot above, we were told that the Host Spanning configuration on our host was not up to date. After reading the FAQs, we learned that the issue normally clears out after a few minutes.
Here’s what we got after also repairing the second host. Like the first host, it displayed a System Alert simply because its Host Spanning configuration was not yet up to date.
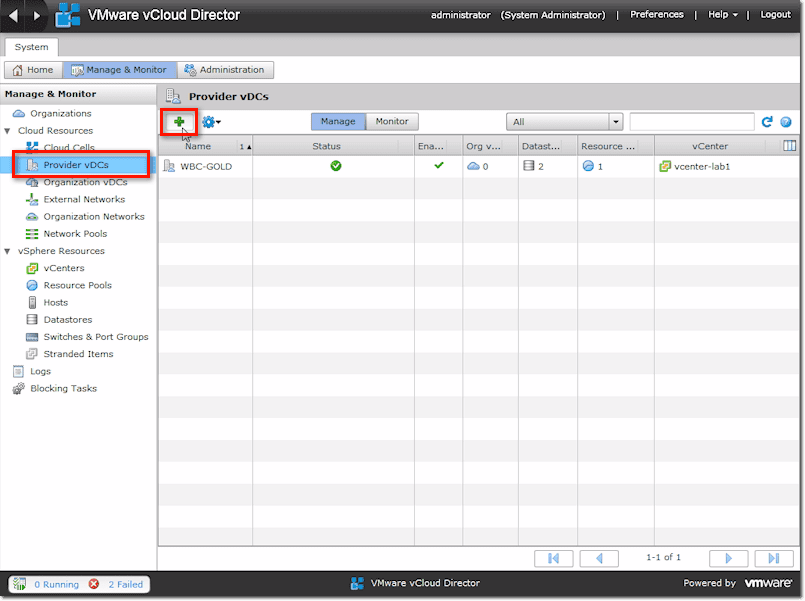
If you’re a service provider, you can go in and add more Provider VDCs by navigating to the Provider VDCs menu and clicking the green (+) button.
The reason you might want to do that is because you might want to add other tiers of service like Silver and Bronze. If you have different clusters, you can add a cluster for Human Resources, another one for Finance, and still another for Development. If your company has different divisions, like East, West, European, or Asian divisions, you can create clusters for those and manage them as different Provider Virtual DataCenters.
Creating a VM Deployment Template
Before we wrap up this post, let’s talk about creating a virtual machine deployment template.
Just like with vCenter and vSphere, when you want vCloud Director to perform guest customizations on virtual machines of older Windows guest operating systems like Windows Server 2000, 2003, or Windows XP, you must create Microsoft system deployment templates or Sysprep deployment packages on each cloud cell in your installation.
Now, if all you’re running in your vCloud infrastructure are Windows Server 2008 and Windows 7, then you don’t have to read this part anymore. Just remember that if you ever have to deal with older versions of Windows in the future, you know where to find the information you need.
To begin, you will have to download, extract, and copy the sysprep binary files into a location of your choosing on your vCloud Director server host. That location is usually known as the SysprepBinariesDirectory.
For more information about where you can obtain the binary files and how you’re going to copy them to your server host, refer to VMware KB 1005593. Actually, the information you’ll find in that knowledgebase article pertains to VCenter, but they’re practically the same.
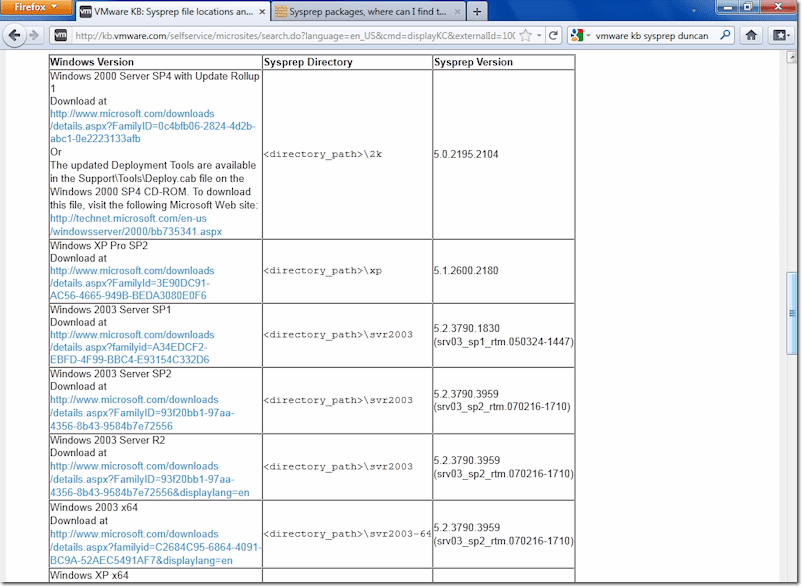
If you scroll down that article, you’ll see a table that shows you where exactly you need to place the sysprep files. Files for different Windows versions should be placed in different folders.
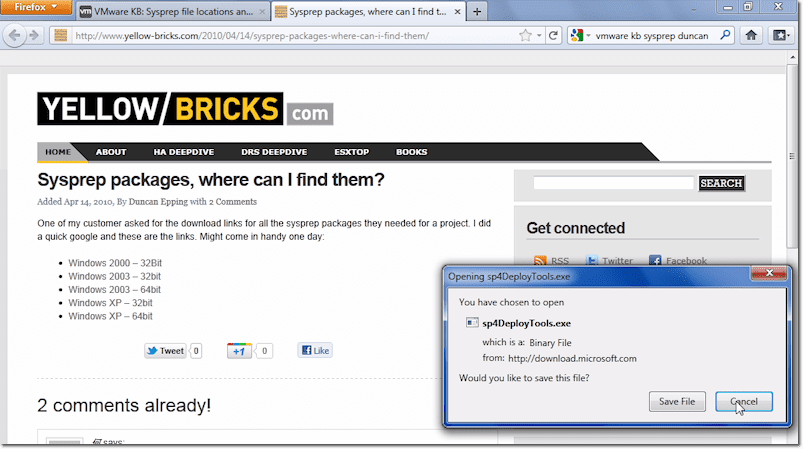
Another good source of information is Duncan Epping’s article at yellow-bricks.com, where you’ll find links to the sysprep files for specific operating systems/service packs of Windows.
Those are actually .exe files, which, when opened, will allow you to extract a bunch of files. Just copy those files to the SysprepBinariesDirectory folder we talked about earlier, i.e., in your vCloud Director server.
During installation, vCloud Director is going to place some files in the sysprep folder on the vCloud Director server host. More specifically, those files are going to be placed in:
/opt/vmware/cloud-director/deploymentPackageCreator for vCloud Director v.1
or
/opt/vmware/vcloud-director/deploymentPackageCreator for vCloud Director v.1.5
In there, you’ll find a script named createSysprepPackage.sh. Run that file in the SysprepBinariesDirectory. If your SysprepBinariesDirectory is /root/yoursysprep, then you would run it this way in vCloud Director v1.5:
/opt/vmware/vcloud-director/deploymentPackageCreator/createSysprepPackage.sh /root/yoursysprep
Lastly, run vmware-vcd restart. You would need to run this on each cloud cell on which you copied the files to.
That ends this article series! We hope what you’ve learned here will help you in setting up your installation of vCloud Director.


