Desired State Configuration Host Deployment: Local Configuration Manager
Now that you have your DSC web host deployed, the next point is to figure out how we are going to actually use this new web service. In this post we will take a look at a new service that has been delivered with Windows Management Framework 4.0 / PowerShell 4.0 known as the Local Configuration Manager (LCM). It is the responsibility of this service to determine what actions should be taken based on the configuration request it receives.
If you do not have these already deployed, then please take a few moments to refer to my earlier posts to assist in getting the service online.
- Deploying a Desired State Configuration Web Host Using Powershell
- Deploying a Desired State Configuration Web Host Using DSC
DSC and Local Configuration Manager (LCM)
As we described our DSC web hosts, we used the term “pull” servers to indicate that these services would be utilized by clients to pull their configuration locally from the service. The pulling action is the responsibility of the Local Configuration Manager on each machine; its default configuration is actually in push mode, which indicates that it will do nothing until a configuration is dropped in its lap.
To configure the Local Configuration Manager we create a special PowerShell DSC configuration, quite similar to the approached used as we deployed a DSC web host using DSC. The main difference this time, however, is that the configuration is targeted specifically as the LocalConfigurationManager. Using the following example, we can review the configuration options available to use as we define our settings.
configuration LocalConfigurationManager
{
param(
[Parameter(Mandatory)]
[ValidateNotNullOrEmpty()]
[string]$ComputerName
)
Node $computerName {
LocalConfigurationManager
{
AllowModuleOverwrite = 'True'
ConfigurationID = (Get-ComputerGuid $ComputerName)
ConfigurationModeFrequencyMins = 45
ConfigurationMode = 'ApplyAndAutoCorrect'
RebootNodeIfNeeded = $True
RefreshFrequencyMins = 15
RefreshMode = 'PULL'
DownloadManagerName = 'WebDownloadManager'
DownloadManagerCustomData = @{
ServerUrl = "http://PSDSCPullServer.diginerve.net/PSDSCPullServer.svc";
AllowUnsecureConnection = "true";
}
}
}
}
Let’s begin by taking a closer look at what we are defining here.
- Line 1: Defines that we are declaring a new DSC configuration with the purpose of configuring our LocalConfigurationManager
- Lines 3-7: Is the Standard PowerShell parameter block; in this case, we will provide the name of the computer on which the configuration is to be implemented
- Line 8: Start of the configuration block for the named computer node
- Line 9: Start of the actual DSC resource configuration for our LocalConfigurationManager
- Line 10 to End: This defines the heart of the definition which implements the actual configuration setting for our LCM.
The settings we define in this section are explained a little better in the following table.
| Property | Sample | Description |
| AllowModuleOverwrite | TRUE | In new modules are downloaded from the PULL server, do we overwrite the old versions |
| CertificateID | GUID of the certificate. | |
| ConfigurationID | Get-ComputerGuid $ComputerName | GUID to identify the computer configuration required from the PULL Server |
| ConfigurationMode | ApplyAndAutoCorrect | ApplyOnly – Configuration is applied once only. ApplyAndMonitor – Configuration is applied only Once, and then LCM monitors for changes which are then reported to the logs ApplyAndAutoCorrect – Configuration is applied, and then LCM monitors for changes and replies configuration if necessary |
| ConfigurationModeFrequencyMins | 45 | Duration in minutes between LCM checks. |
| Credential | Credentials to access remote resources. | |
| DownloadManagerCustomData | ServerUrl = “http://PSDSCPullServer/PSDSCPullServer.svc”; AllowUnsecureConnection = “true”; |
Specifies additional data to send to the download manager. |
| DownloadManagerName | WebDownloadManager | WebDownloadManager – Specifies to use our Web Pull Server DscFileDownloadManager – Specifices to use a SMB Share to pull from |
| RebootNodeIfNeeded | $True | Should the node reboot automatically if a configuration change requires this action |
| RefreshFrequencyMins | 15 | Duration in minutes the LCM should wait before checking the PULL server for possibly new configurations |
| RefreshMode | PULL | PUSH – The LCM is configured by push using the Start-DscConfiguration commandlet. PULL – The LCM is configured to PULL configuations, based on the DownloadManagerName and DownloadManagerCustomData |
Almost of of the configuration is quite easy to understand. Possibly the only real challenge to understand why we need to use a configuration ID, as essentially we will be configuring all our computers to contact the Pull server to get their configuration.
Configuration ID
If we consider this for a moment, the answer is quite logical: The ultimate objective we have with Desired State Configuration is to define a single policy to deploy to all of our servers. Then each server will implement the configuration which is appropriate to it. On the other hand, if we simply pointed our servers to the pull server and instructed the LCM to pull the configuration, it really would not know what to do, potentially configuring a big mess!
As an example, let’s consider that I have a node called PDC-AD-DC01. I can quickly determine from its name that the configuration that I am likely to deploy on this node will be that of an Active Directory Domain Controller. Based on this simple extrapolation, we will define our configuration files using friendly computer names to make the details easier to read by us mortal humans. But for the purpose of configuration with DSC, we will replace these computer names with a unique GUID, ensuring that the LCM identifies itself to the pull server with its GUID (configuration ID), which will then instruct the pull server to send back the associated configuration file to the LCM specific to this node.
All we need to now worry about is maintaining a map of our friendly computer names as they match their respective GUID. We will define these to be used for the configuration IDs. Like everything in computing, there are many ways to do this, from spreadsheets to databases, but in this example, why not use the GUID of the computer as it appears in Active Directory? I am going to leverage a smart piece of PowerShell code created by Johan Åkerström which will retrieve the GUID of the computer directly from Active Directory for us: Get-ComputerGUID.
# Define Get Computer GUID Function
# Credit: Johan Åkerström
# http://blog.cosmoskey.com/powershell/desired-state-configuration-in-pull-mode-over-smb/
Function Get-ComputerGuid {
param(
[Parameter(Mandatory=$true)]
[string]$ComputerName
)
process {
([guid]([adsisearcher]"(samaccountname=$ComputerName`$)").FindOne().Properties["objectguid"][0]).Guid
}
}
Wrapping Up
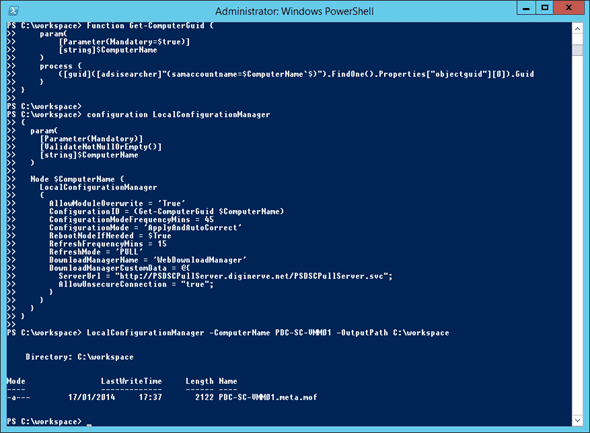
To pull this together, I finally launch a PowerShell 4.0 session and define both my function and my configuration, which will ensure that they are ready to be executed.
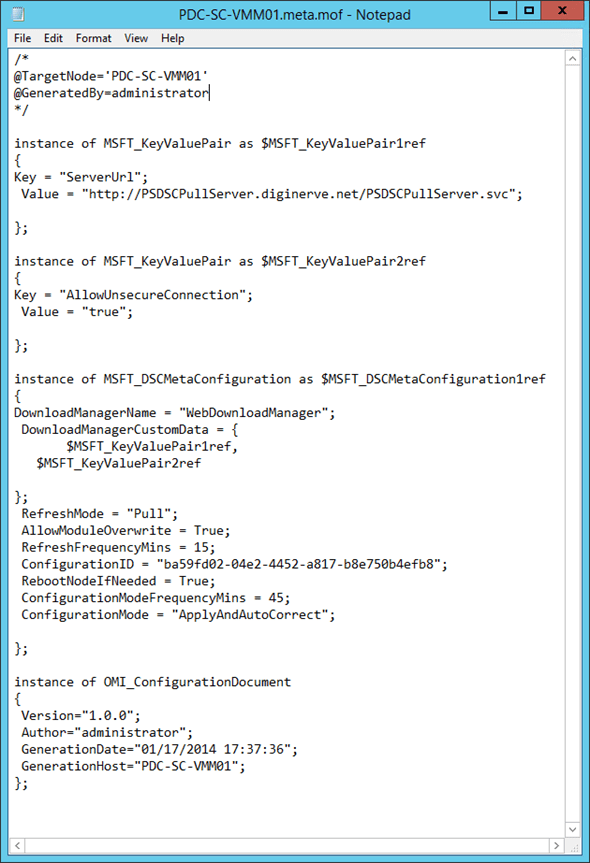
Next, I can execute my new configuration, passing in the parameter that defines the name of my computer, in addition to the path to where I would like the output to be stored. In this example, the computer is PDC-SC-VMM01, and the output folder c:\workspace. The result of this command will be created in the output folder delivering a new meta.mof file. This meta.mof file is all that is required to configure our server. Using Notepad we can see how this looks.
In the center of the file, we will see the instance of MSFT_DSCMetaConfiguration configuration, which contains all the options we defined in our configuration file. However, we can now also see that the ConfigurationID has now been replaced with the computers GUID as retrieved from Active Directory.
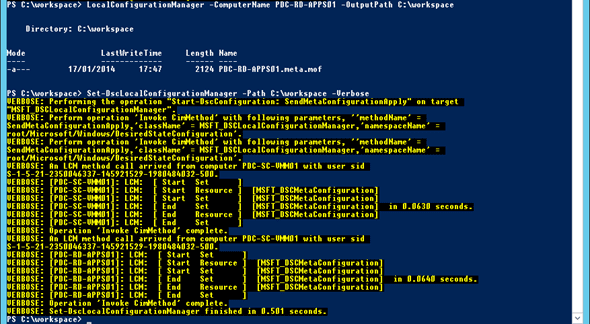
All that remains now is to apply this new setting to our server, which again is quite simply implemented with the following command.
Set-DscLocalConfigurationManager -Path c:\workspace –Verbose
I have enabled the –verbose option so we can observe this magic. To add a little excitement, I have multiple servers which I am going to configure the LCM for our pull server, so I also created a profile for PDC-RD-APPS01 and store it in the same folder C:\Workspace.
If you look at the screen capture, you can see that after running the command to start the LCM configuration, the two meta.mof files in my working folder were read. Then the command made a remote CIM connection to both servers and pushed the new configuration directly to them.
NICE!


