Using Microsoft Azure: Virtual Machines and RDP
You may have heard a lot about Microsoft Azure, which was (until recently) formally known as Windows Azure. But you might not know exactly how the Azure service can fit into your plans. Microsoft Azure has come a long way from its initial introduction in the fall of 2008 and really has something for most businesses and organizations. Microsoft Azure can effectively function as:
- A complete datacenter for microbusinesses and small business
- A disaster recovery solution for organizations of all sizes
- A scalable way to host web sites outside of your existing infrastructure
- A way to run lab and test scenarios using virtual machines nearly identical to the ones you can create in your office
If you’re new to Azure, it can be difficult to know where to begin. The idea behind this new series of articles is to take you, as someone brand new to Microsoft Azure, through the options and show you exactly how you can get set up and running, and how you can enable some of the cooler scenarios that Azure makes possible.
What Can You Set Up in Microsoft Azure?
Once you have established your Microsoft Azure account you can set up the following:
- Websites, which are basically managed Internet Information Services (IIS) accounts that run specific web applications in either free mode, which operates at no cost to you but has significant limitations on capacity, or paid mode, which assigns specific resources at a cost.
- Virtual machines, which we’ll talk about in the next section.
- SQL databases, which can be used by websites or other cloud services.
- Storage, including virtual hard disks of any size, depending on what kind of budget you have.
- Media services like streaming audio and video, with probably better availability metrics than you would be able to achieve on your own.
- Visual Studio Online, which is essential hosted source code control for your development teams based on the well regarded Team Foundation Service.
The console (shown below in Figure 1) is easy to use and shows all of these options in the left menu area.

Related: Give Microsoft Azure a try with this [this_link_has_been_removed]!
Set Up a Virtual Machine
One of the best ways to use Microsoft Azure is as a test bed. In just a few clicks, you can spin up any number of virtual machines, customize their networking, and use them just as if you unboxed physical hardware and plugged it into your local switch. It’s great for testing scenarios, getting to know new software, working on certification exercises, and more. Let’s look at how to get started creating virtual machines.
- On the manage.windowsazure.com control panel, click Virtual Machines.
- In the middle pane, click the Create a Virtual Machine link.
- The UI experience will bring up a gray box in four columns, as shown below in Figure 2. You can choose Quick create, which lets you input all of the options needed to spin up a VM on one screen to get you started as quickly as possible. Or you can choose the From Gallery option, which lets you browse a library of virtual machine options with all manner of operating systems including Windows Server 2008 R2, Windows Server 2012, Windows Server 2012 R2, various flavors of Linux, Oracle, and prebuilt application suites like SharePoint, BizTalk, and Dynamics NAV, and GP. For the purposes of our example, we’ll just set up a quick Windows Server 2012 R2 virtual machine using the Quick Create option.
- In the rightmost column, enter the following:
– The name for the virtual machine (between 3 and 15 characters, and no funky symbols as it is a DNS name)
– The base OS image to use. If you’re in doubt, for now create a Windows Server 2012 R2 machine to check things out.
– The size, which is basically how many processor cores your VM will use and how much RAM will be dedicated to the machine. More cores and more memory costs money, of course.
– The administrator’s username and password
– Which datacenter this virtual machine should run in. Pick the closes one to your current location.
– Click Create Virtual Machine.

At that point, the console will redirect you to the Virtual Machines page, and you will see the provisioning process take place under the status column, which you will see in Figure 3. After five minutes or so, your machine should have a green check mark and the text “Running” listed, which means it is ready to go. Congratulations, you have an instance of Windows Server running in the cloud.

Virtual machines are accessible from the Internet using a *.cloudapp.net address, where the asterisk is the name of the virtual machine you entered during setup. You do need to enable Remote Desktop in order to get an RDP session going to your new virtual machine, which we will cover in the next section.
Use Remote Desktop to Administer Azure Virtual Machine
As you might suspect, to manage virtual machines in Microsoft Azure, you use Remote Desktop Protocol. Advantages? The client is built directly into Windows, so there is no need to download any additional software. Disadvantages? Not many, unless you’re on a Linux or Mac machine, where the clients are less full featured.
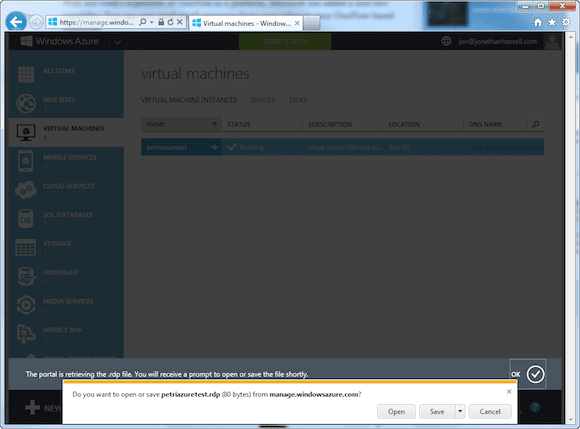
To log in via remote desktop, go over to the Virtual Machines page, click on the virtual machine you want, and then on the bottom control panel, click Connect. Your browser will prompt you whether to open or save an RDP file with the name of your virtual machine, as shown in Figure 4. Save this to your desktop or other location.
Then, open up the RDP file which will launch the Remote Desktop Connection client. Accept the security warning (this is simply because the certificate being presented by your new virtual machine is not trusted by your current machine), enter the username and password you configured when creating the machine, and then you are in.
In my next post, I’ll show you how to make your Azure virtual machines a natural extension of your own on-premises network.
