Installing Microsoft Anti-Malware in Azure VMs
Microsoft made antivirus software generally available to Azure virtual machines last year, including Microsoft Anti-Malware (free — but remember that scanning causes storage transactions that are not free) and third-party paid-for solutions. I briefly discussed how one could deploy anti-malware via the Ibiza preview portal in that post. While that deployment solution is great for small or one-off deployments, it will not scale. In this post, I’ll show you how you can use PowerShell to deploy Microsoft Anti-Malware to your Azure virtual machines.
Microsoft Anti-Malware Scan Types
When you add the Microsoft Anti-Malware extension, you are prompted to configure the scan settings. This includes:
- Scan exceptions: Most server applications have some files, folders or processes that must not be scanned by antivirus. Microsoft has a large collection of such scan exceptions.
- Real-time scanning: Do you want real-time protection? This offers the best protection, but for any admin where IPS is critical, real-time scanning can be a bad thing.
- Schedule scan: You can perform a quick or full scan on a regular basis on the day and time of your choosing.
The UI for installing and configuring these settings is pretty simple. The one odd bit is the scan time is based on the minute of the day. For example:
- 120 is 2 AM
- 180 is 3 AM

While the UI is simple to use, it does not scale well. What if you have 10, 20, or 200 virtual machines to configure? Are you going to browse to this blade and configure each virtual machine, one at a time? If so, you better hire an intern, and hope that the intern is careful about configuring these critical anti-virus settings.
Or you could use PowerShell.
Deploying Microsoft Anti-Malware using PowerShell
We will be using a cmdlet called Set-AzureVMMicrosoftAntimalwareExtension to deploy the Microsoft anti-virus extension into Azure virtual machines. This cmdlet requires a configuration file to set up the scanning exceptions, protection, and scheduled scan. This file is in the JSON format — yes, another format to go along with XML and freak us IT pros out — or XML. I will go with JSON format in this example; the file format is pretty simple and is well explained in the help for the cmdlet.
In my example, I will be configuring scanning for a virtual machine that has SQL Server 2012 installed. SQL Server 2012 has very specific scan exception requirements:
{
"AntimalwareEnabled": true,
"RealtimeProtectionEnabled": true,
"ScheduledScanSettings": {
"isEnabled": true,
"day": 1,
"time": 180,
"scanType": "Full"
},
"Exclusions": {
"Extensions": ".mdf;.ldf;.ndf;.bak;.trn;",
"Paths": "D:\Logs;E:\Databases;C:\Program Files\Microsoft SQL Server\MSSQL\FTDATA",
"Processes": "SQLServr.exe;ReportingServicesService.exe;MSMDSrv.exe"
}
}
The configuration breaks down as follows. Note that some settings, such as true or false, are case sensitive:
- AntimalwareEnabled: This field must be set to true to enable the Microsoft Anti-Malware extension in the select virtual machine.
- RealtimeProtectionEnabled: This can be true or false, enabling or disabling real-time protection in the guest OS.
- isEnabled: Setting this to true or false enables or disables a scheduled scan.
- day: 0 is daily, 1 is Sunday, 2 is Monday, 7 is Saturday, and 8 is disabled.
- time: The value ranges from 0 to 1440 representing the minute of the day. The default is 120, which is 2 AM.
- Extensions: This is a semi-colon (;) separated list of file extensions that will not be scanned.
- Paths: This is a semi-colon (;) separated list of paths that will not be scanned. Note the use of double backslashes ().
- Processes: This is a semi-colon (;) separated list of executable files that will not be scanned when they run.
Save this .JSON file in a location that’s safe. My tip is to have a JSON file for each application that you deploy. For example, if you deploy a SQL virtual machine, then run Set-AzureVMMicrosoftAntimalwareExtension with a JSON file that has exceptions for SQL Server. If you’re deploying a machine that will be a domain controller, then use a different JSON file. Eventually you will have a small library of JSON files that you can quickly reuse to configure best-practice antivirus scanning.
You will use a piped PowerShell snippet to install the Microsoft Anti-Malware extension with the JSON configuration file into your virtual machine:
Get-AzureVM -ServiceName <Cloud Service Name> -Name <Virtual Machine Name> | Set-AzureVMMicrosoftAntimalwareExtension -AntimalwareConfigFile <Path to JSON file> | Update-AzureVM
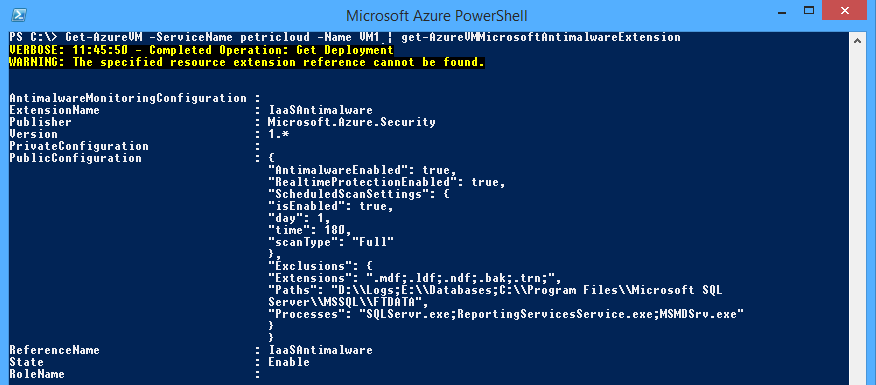
Here is how a virtual machine called VM1 in a cloud service called petricloud was configured:
Get-AzureVM -ServiceName petricloud -Name VM1 | Set-AzureVMMicrosoftAntimalwareExtension -AntimalwareConfigFile "D:AVScanFilesSQLMSAV.json" | Update-AzureVM

It takes a few minutes for the extension to be completely installed.
If you log into the Azure virtual machine, you will find that System Center Endpoint protection is installed. But you cannot configure the scanning because it is centrally controlled via the JSON file that you used to install the extension. You can override this UI lockdown.
![Viewing Microsoft Anti-Malware in the Azure virtual machine [Image Credit: Aidan Finn]](https://petri.com/wp-content/uploads/petri-imported-images/MSFTAntiMalwareInAzureVM-e1428667499341.png)
Microsoft Anti-Malware Reading Resources
Microsoft released a whitepaper that discusses the deployment, management and removal of Microsoft Anti-Malware using PowerShell and XML configuration files. The appendix also has code for retrieving Anti-Malware events from Azure storage for your analysis.
Monitoring is the weak point of this antivirus solution. However, it does appear that Microsoft is working on it.
Extending the Process with Automation
Larger Azure deployments will rarely just deploy a standard Windows Server 2012 R2 template and customize it. Instead, most administrators will opt for more flexibile licensing by deploying from the Azure Marketplace. For example, you can deploy a virtual machine that has Windows Server and SQL Server installed, includes the licensing for both in the per-minute costs of the machine, and has no need for user/device CALs for either piece of Microsoft software. If you are in a position where you will deploy these machines frequently, then it makes sense to use PowerShell scripts to get your work done, as you can do the following:
- You can make customizations more quickly
- There is less “progress bar engineering”
- It’s less prone to human error
- You will get more done quickly
If you have a script for deploying SQL virtual machines, then why not add one more line to install Microsoft Anti-Malware with a JSON file that will also install anti-virus protection for the virtual machine? Those who are paranoid about security might even create a scheduled Azure Automation runbook to check for virtual machines that do not have any protection and automatically installs Microsoft Anti-Malware with some default scanning — make sure someone is alerted of this install so that scan exceptions can be added.

Aidan Finn, Microsoft Most Valuable Professional (MVP), has been working in IT since 1996. He has worked as a consultant and administrator for the likes of Innofactor Norway, Amdahl DMR, Fujitsu, Barclays and Hypo Real Estate Bank International where...