How to Install Windows Server 2012 R2
How do I install Windows Server 2012 R2?
In this Ask the Admin, I’ll walk you through the process of installing Windows Server 2012 R2. The good news is that with every version of Windows, installing the OS becomes easier and faster, and Windows Server 2012 R2 is no exception. Before you start, you’ll either need the Windows Server 2012 R2 DVD media from Microsoft, or create your own bootable DVD or USB drive. Go ahead and download the Windows Server 2012 R2 evaluation ISO.
You can use Windows 8 to burn the ISO image to DVD, or download the Windows 7 USB/DVD Download tool to create a bootable USB drive from the ISO file.
Once you have your media prepared, insert the disk or USB drive into the server and make sure that either the BIOS is configured to boot from DVD or USB drive, or that you know how to interrupt the boot process to force the server to boot from the DVD or USB drive. Once booted from the media, you should see Windows loading the necessary setup files.
- In the Windows Setup dialog, set the language, time and currency format, and keyboard layout, and then press Next.
- On the next screen, click Install now.
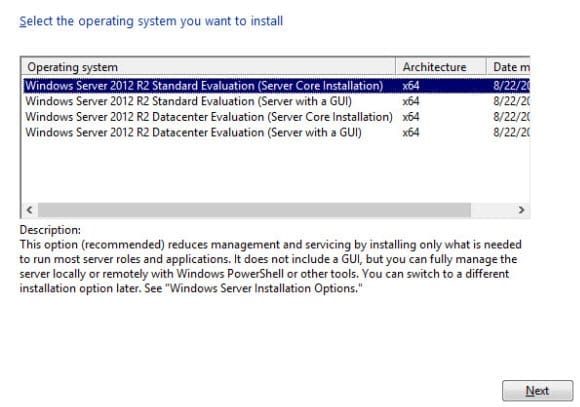
- On the Select the operating system you want to install screen, select the edition of Windows Server 2012 R2 that you want to install and click Next. You can choose to install with or without a GUI, and between the Standard and Datacenter editions.
- Under License terms, check I accept the license terms and click Next.
- On the Which type of installation do you want? screen, click Custom: Install Windows only (advanced).
- Finally, below Where do you want to install Windows?, select the drive you want to use for Windows Server and click Next. On this screen you can also create, delete and format partitions if required.

Now wait for Windows setup to copy and expand the files to disk, and the server will restart automatically and installation will continue. The final part of the procedure is to enter a password for the local administrator account.
- On the Settings screen, enter and confirm a password for the Administrator account and click Finish.
You’ll then be presented with the logon screen, where you can press Ctrl+Alt+Delete to sign on using the local administrator account and password configured in the previous step.
Russell Smith, the Editorial Director at Petri IT Knowledgebase, has over two decades of hands-on experience in IT, in both small business settings and government IT infrastructure projects. Russell started writing for Windows IT Pro Magazine in t...