Installing the Desktop Experience on Windows Server 2012
How do I install the Desktop Experience on Windows Server 2012?
Although it might seem counterintuitive to install desktop features on a server, there may be certain scenarios where it is desirable. One case is where users have access to a remote server desktop via Remote Desktop Services. The Desktop Experience installs features on Windows Server 2012 that are present in Windows 8 but are not part of the standard install of Windows Server.
Desktop Experience Install Components
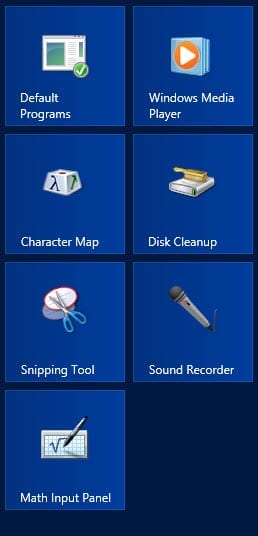
The Desktop Experience feature installs the following components on Windows Server 2012:
- Windows Media Player
- Desktop themes
- Video for Windows (AVI support)
- Disk Cleanup
- Sync Center
- Sound Recorder
- Character Map
- Snipping Tool
How to Install Desktop Experience
Desktop Experience is an all-or-nothing feature, so you can’t choose which components to install. Before adding the Desktop Experience feature on Windows Server, I recommend that you test in a preproduction lab environment to ensure that Desktop Experience doesn’t conflict with any important server functions.
- Log on to Windows Server 2012 with an account that has local administrator permissions.
- Open Server Manager from the Start screen or the icon on the desktop taskbar.
- In Server Manager Dashboard, click Add roles and features under Welcome to Server Manager.
- In the Add Roles and Features Wizard, click Server Selection in the left pane.
- Now click Features in the left pane.
- Scroll down the list of features and expand User Interfaces and Infrastructure.
- Check Desktop Experience.
In Windows Server 2012, Desktop Experience is no longer listed as a separate feature; instead, it’s under User Interfaces and Infrastructure.
- In the pop-up dialog, click Add Features to add Ink and Handwriting Services and Media Foundation.
- In the Add Roles and Features Wizard, click Next.
- Click Install on the confirmation page.
- When Desktop Experience has finished installing, click Close in the Add Roles and Features Wizard and restart the server.
Once the server has rebooted, you will have access to the desktop features from the Start screen.
Russell Smith, the Editorial Director at Petri IT Knowledgebase, has over two decades of hands-on experience in IT, in both small business settings and government IT infrastructure projects. Russell started writing for Windows IT Pro Magazine in t...