How to Virtualize a Microsoft Exchange Server
Just about any application can be virtualized today, and we all know you can virtualize Microsoft Exchange servers. In fact, given the right deployment with proper sizing and enough disks, a virtualized Exchange environment can run great.
Ideally these deployments consist of new virtual machines (VMs) with a fresh install of Exchange Server followed by some sort of data migration to the new server.
If you have an existing physical Exchange environment that you’re looking to virtualize, this is where things get a little grey. A physical to virtual (P2V) conversion — the process of converting a physical to virtual machine — is typically what is used to virtualize existing servers, but this should be treated with caution when dealing with Exchange.
Virtualizing a Microsoft Exchange Server? Use a fresh VM
In an ideal world, I would not recommend doing a P2V conversion on an Exchange mailbox server but instead deploy a new VM and reinstall Exchange on that VM, which gives you a clean build to work with. I have seen issues where the P2V conversion fails, is extremely slow, or corrupts the Exchange database.
That is why I always advise caution when P2V is being considered. Sometimes circumstances arise, however, such as failing hardware, and you may be forced to do something quickly to keep your server running. In that situation, a P2V conversion may be your only option.
Microsoft Guidance on Virtualizing Exchange
Microsoft does support virtualizing Microsoft Exchange servers, and they’ve written some guidelines for virtualizing Exchange that are considered best practices. The support statement does not mention P2V or any process that converts a physical server to a virtual machine, so proceed with caution and at your own risk.
If you’re considering a P2V conversion of an Exchange server, I’ve compiled some tips and tricks for the P2V process, but you may want to check out my article on “Virtualizing Microsoft Exchange Tips and Tricks” if you’re new to virtualizing Exchange.
Some of these tips are lessons I have learned — sometimes the hard way — that can help make the virtualization process smoother. Depending on the roles that are held by the Exchange server, the process may differ form your typical P2V conversion. The following are guidelines to follow depending on your server environment:
- If the server is running only the front end, Client Access Server (CAS) or Hub role, then the process is pretty straight forward, and you can follow your typical P2V process.
- If the server is a mailbox server, I do not recommend converting the drives that contain the Exchange databases for risk of corruption during the conversion. Instead only convert the OS drive.
- Prior to the start of a P2V conversion, I recommend stopping all Exchange services and making a backup of the .edb file. Do not store the backup on the Exchange Server.
- I do not recommend a P2V conversion of any DAG member server. In this case, deploy a new VM, install Exchange, add the server to the DAG, and start replicating database copies onto the new server.
The following steps are high level and can be applied to use with most of the conversion tools that are available today. I’ve used VMware Converter Standalone 5.5 for the purpose of this demonstration.
Convert an Exchange CAS/HUB server
- Perform a backup of your Exchange server (if you do one for this role server).
- Stop and disable all Exchange Services.
- Stop and disable all antivirus services and any third-party services, such as backup software, that maybe running on the server.
- Disable any backup jobs that you may have scheduled to run.
- Take note of all existing IP addresses of your physical server. Screenshots are an easy way to quickly document settings like these!
- Start your P2V tool.
- Once your conversion has completed, disable the NICs on the physical servers. I don’t recommend turning them off yet, because you may need to go back to the server to perform troubleshooting.
- Power on the newly converted VM to verify that the server runs as expected. Make sure that Exchange services are still disabled.
- Configure the network on the VM using the same IP addresses as the physical server.
- Start the Exchange services.
- Once you verify that this server is working, you can power down the physical server.
Convert an Existing Exchange Server Mailbox Server
- Perform a full backup of your Exchange server and databases.
- Perform a clean shutdown of all of your Exchange databases.
- Stop and disable all Exchange Services.
- Stop and disable all antivirus services and any third-party services, such as any backup software, that maybe running on the server.
- Disable any backup jobs that you may have scheduled to run.
- Take note of all existing IP addresses of your physical server. Screenshots are an easy way to quickly document settings like these!
- You will need to make a full back up or copy the Exchange Database .edb file to a location that can be accessed by the VM before starting the P2V conversion.
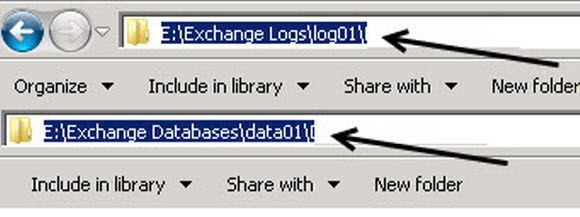
- Make note of the file paths of your database and logs (see below). You will need to make sure these are the same on the VM.
Exchange log and data file paths. (Image: Phoummala Schmitt)
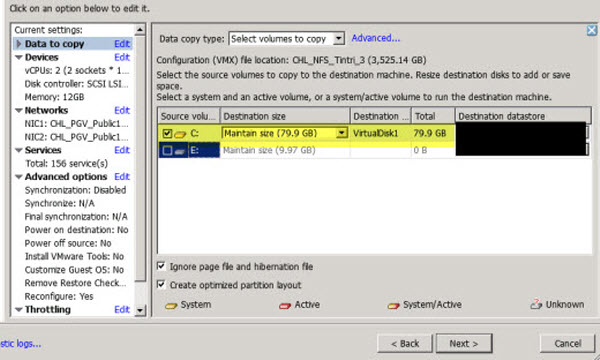
- Start your P2V tool. Run through the wizard settings until you’ve reached the section that asks which drives you want to convert. At this point, you will only convert the OS drive. Do not convert any drives that contain the Exchange databases. I also do not recommend changing the disk size of the OS drive. Keep things the same as much as possible so Exchange doesn’t get too upset.
Maintaining drive sizes during an Exchange P2V conversion process (Image: Phoummala Schmitt)
- Depending on the size of your server, the conversion can take up to several hours to complete.
- Once your conversion has completed, disable the NICs on the physical servers. I don’t recommend turning them off yet, because you may need to go back to the server to perform troubleshooting.
- Power on the newly converted VM to verify that the server runs as expected. Make sure that Exchange services are still disabled.
- Configure networking on the VM using the same IP addresses as the physical server.
- After verifying the server is running, you will want to add new disks to the server that will hold your Exchange databases.
- Keep in mind that the disk drive letters for the Exchange database LUNs should be identical to the LUNs on the physical server. For example, if your physical server used an E drive for the Exchange databases, then the VM should use an E drive as well. The file paths of your database and logs need to be identical to what they were on the physical server.
- At this point you will need to copy or restore the Exchange databases to the newly created disks using the exact same file path as on the physical server.
- Once the database copy has been completed, start the Exchange services on your VM.
- Open the Exchange console and mount your databases.
Remember, these steps are not endorsed by Microsoft but come form lessons I’ve learned. Hopefully you find these steps helpful if you choose to P2V an Exchange Server. Good Luck!
Resources for Virtualizing Exchange
For more resources on virtualizing Exchange check out these sites.
- Microsoft Support Policies and Recommendations for Exchange Servers in Hardware Virtualization Environments
- Exchange 2013 Virtualization
- Best Practices for Virtualizing Exchange Server 2010 with Windows Server 2008 R2 Hyper V
- Understanding Exchange 2010 Virtualization
- Virtualizing Exchange with VMware


 Maintaining drive sizes during an Exchange P2V conversion process (Image: Phoummala Schmitt)