How to Set Up Windows 365
Learn how to set up and configure Microsoft’s new Cloud-PC solution, Windows 365. In this article, you will learn how to get started with Windows 365, how to set it up for your organization, and how to choose between Hybrid Azure AD and Azure AD native join.
The high-level steps required to set up or configure Windows 365 are:
- Purchase a Windows 365 Business or Windows 365 Enterprise license
- Decide between Hybrid Azure AD Join and Native Azure AD Join
- Create an on-premises network connection (if required)
- Configure and deploy a Provisioning Policy
- Assign licenses to users
- Tell users how to access their Cloud PC
Plan For Windows 365
Windows 365 vs Azure Virtual Desktop
Windows 365 is as close to a “Desktop as a Service” (DaaS) as you can probably get. It’s literally a Windows computer in the public cloud, provided as a service. Windows 365’s “Cloud PCs” don’t reside in your organization’s Azure subscription: They’re hosted in Microsoft’s subscription and provided as a service to organizations that have the appropriate license.
Azure Virtual Desktop, in comparison, is much more customizable and configurable from an infrastructure perspective. Azure Virtual Desktop’s “hosts” sit within an organization’s tenant, and are the full responsibility of the organization to manage and maintain.
If you want to dive deeper, I wrote a separate article on the main differences between Windows 365 and Azure Virtual Desktop.
Windows 365 vs Windows 10
Is Windows 10 the same as Windows 365? I was asked this question recently, and the confusion around this is completely understandable, given that Windows 365 could just be thought to be a new version of Windows 10, like Windows 11 is.
Microsoft uses the word “Windows” to describe their operating system, and “365” to describe their cloud services such as Microsoft 365, Office 365, etc. Given this, Windows 365 actually does make some sense from a naming perspective.
In fact, a Windows 365 Cloud PC can run Windows 10 or Windows 11, depending on the configuration set by the administrator for the base image.
Windows 365 Business vs. Enterprise
Windows 365 comes in two editions – Business and Enterprise. Windows 365 Business is aimed at organizations with fewer than 300 employees, with a number of architectural, licensing, and administrative limitations. For example, Windows 365 Business only supports Azure AD Join, and does not permit access to a customer’s Azure Virtual Network (VNet).
Similarly, Device Management capability is much reduced with Windows 365 Business, permitting only basic operations such as assigning and unassigning Cloud PC licenses. With Windows 365 Enterprise, it’s possible to use Microsoft Endpoint Manager admin center to perform image management, connect and access on-premises resources, configure granular targeting of policies, resize Cloud PCs, as well as all the policy-based management options available to physical devices.
A full comparison of the capabilities between the two editions is available on the Microsoft Docs website.
Install And Configure Windows 365
Until the release of native Azure AD Join support (February 9th, 2022), Windows 365 Enterprise has required Cloud PCs to be joined to an Active Directory Domain Services (traditionally known as “on-premises”) domain. As the Cloud PCs themselves reside in Microsoft’s central Azure subscription, rather than in the customer’s subscription, there were some specific configurations required to allow computers to contact the on-premises domain controller to complete the Domain Join process. This configuration is known as the on-premises network connection.
Configure the on-premises network connection
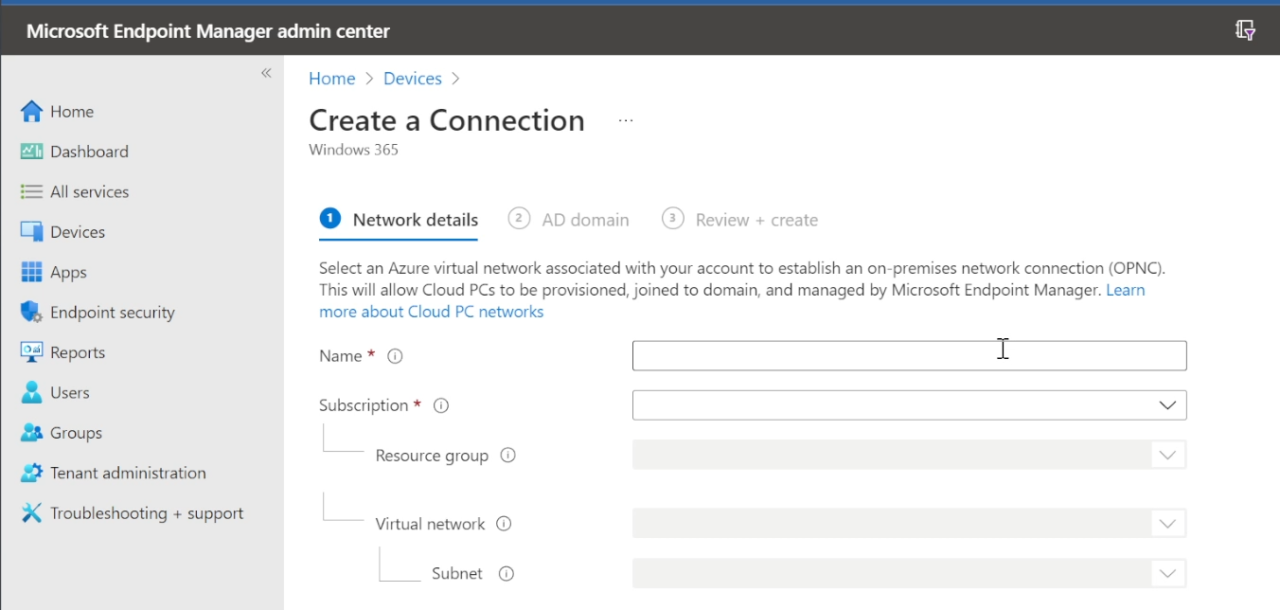
From the Microsoft Endpoint Manager admin center, choose Devices > Windows 365 > On-Premises Network Connection. From the new pane, simply enter the required details such as a Name, and choose the subscription that holds your resources and Virtual network.
Once the Network section is complete, you’ll need to complete some details around the Active Directory domain that is being connected. It’s just a case of entering the Domain Name System (DNS) name, Organizational Unit (in distinguished name format), and some credentials for a Global Administrator.
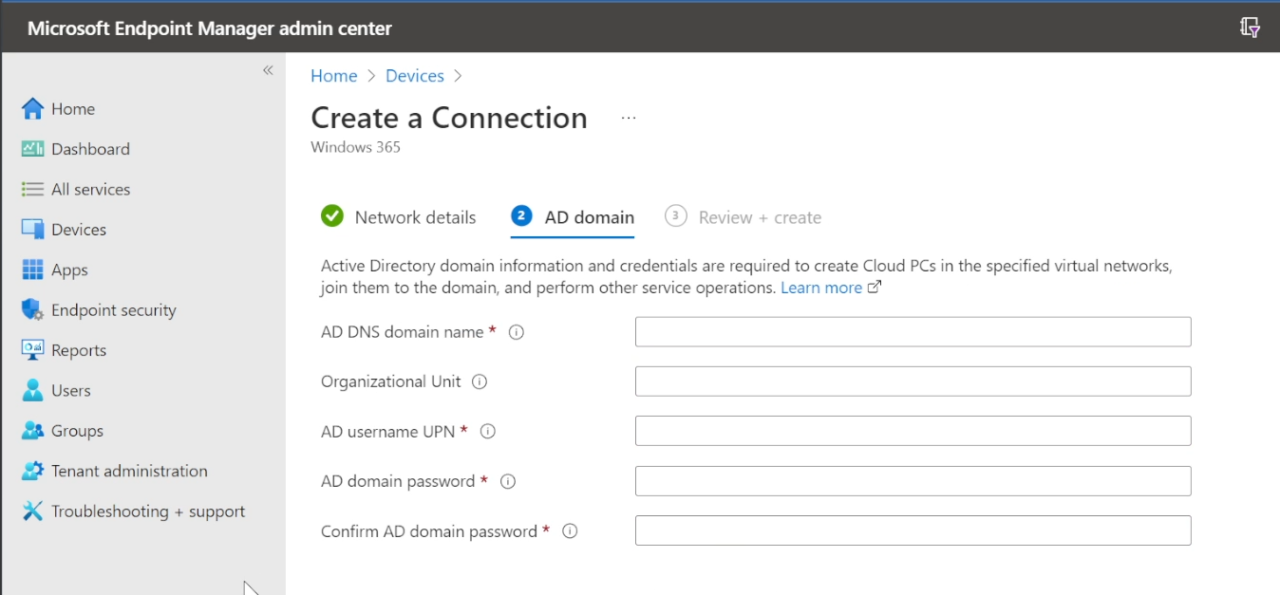
Once complete, the on-premises network connection (OPNC) will begin provisioning and will soon be available to your Cloud PCs. The next step is to assign a Cloud PC license to your users, create a Provisioning Profile for your Cloud PCs, and assign it to users.
Assign a Cloud PC license to your users
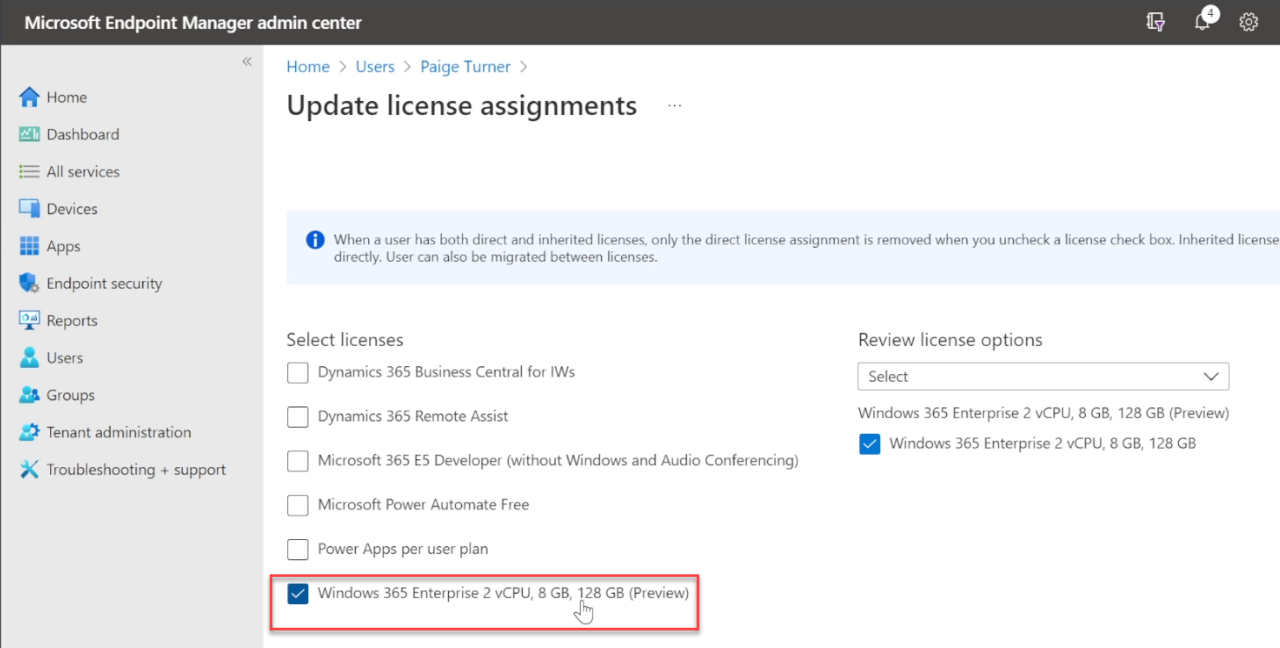
Licenses in Windows 365 determine the type of Virtual Machine (VM) created for a particular user. For example assigning Windows 365 Enterprise 2 vCPU, 8GB, 128GB will create a persistent VM for that user of the chosen specification.
Windows 365 licenses are assigned like any other Microsoft 365 license: From the Microsoft Endpoint Manager admin center, choose Users > Select a user > Licenses and then select the Windows 365 license you want to assign.
Create a Provisioning Policy
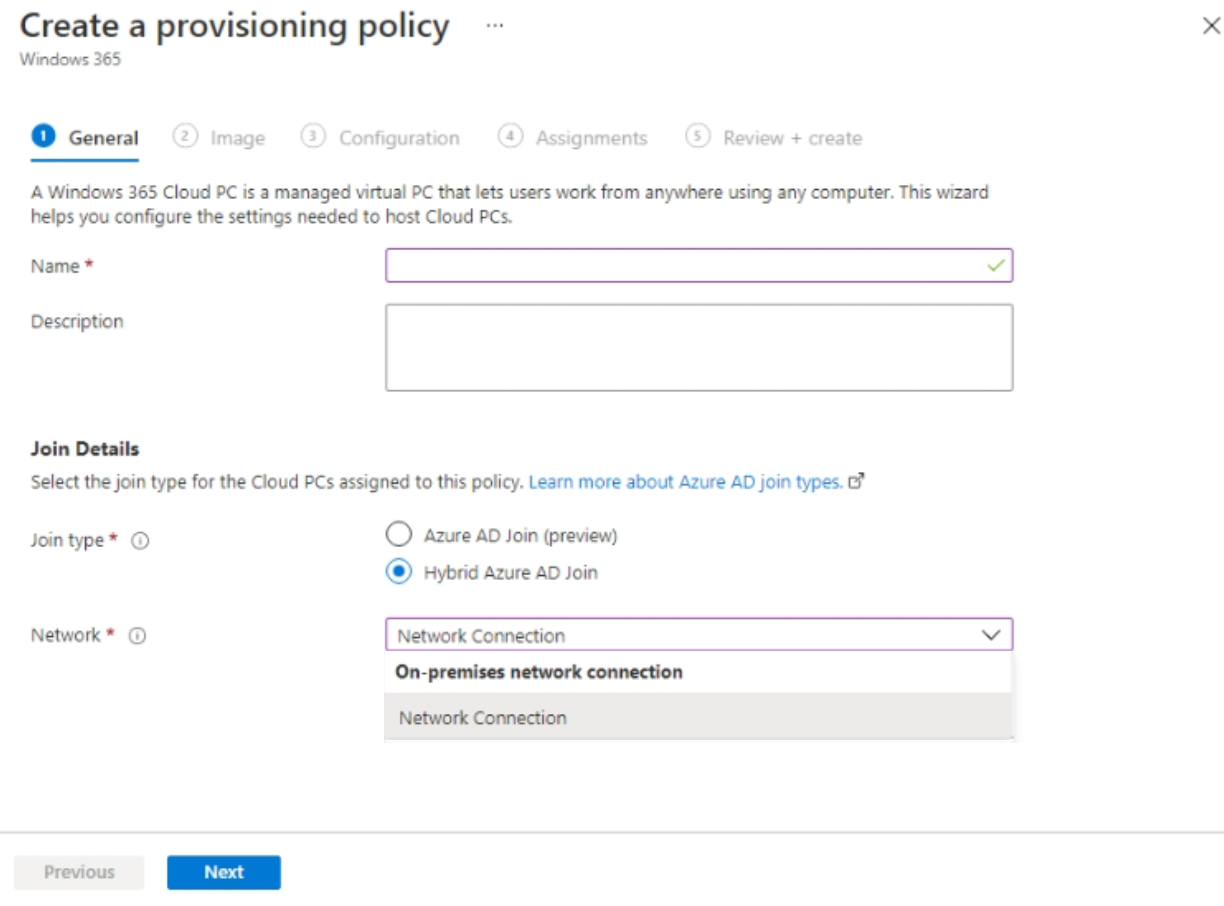
The next step is to create a Windows 365 Cloud PC Provisioning Policy. Provisioning Policies determine what type of Network Connection and Image a Cloud PC uses.
From the Microsoft Endpoint Manager admin center, choose Devices > Windows 365 > Provisioning Policies and then select the Windows 365 license you want to assign.
Hybrid Azure AD Join
Some organizations require all computers to be joined to their on-premises Active Directory domain, so Microsoft has maintained support for joining devices using Hybrid Azure AD Join.
Native Azure AD Join
Released to Public Preview on February 9th 2022, Windows 365 Enterprise supports Native Azure AD Join for customers who would like to join their Windows Cloud PCs directly from their Azure AD, without the need for an on-premises network connection, or even an on-premises Active Directory Domain Services.

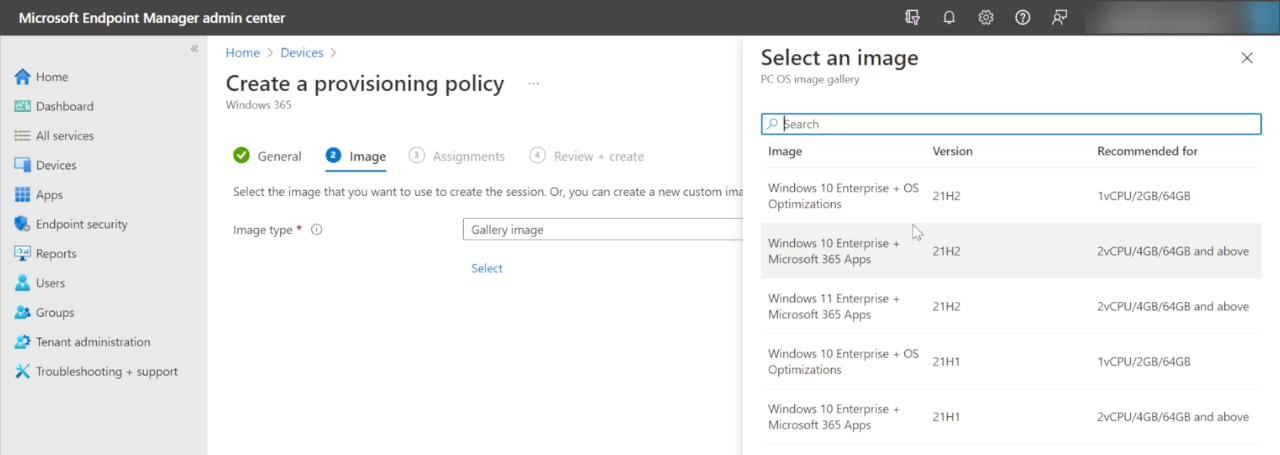
Assign an image
Microsoft allows organizations to choose from a “Gallery Image” – an Azure-optimized Windows 10 or Windows 11 image that has performance improvements within Windows 365 – or a Custom Image that has been captured by the customer.
Once the Provisioning Policy has been created and assigned, Cloud PCs will begin provisioning, or “deploying”.
For Hybrid Azure AD Joined devices that must connect through to the on-premises environment to perform a Domain Join, it’s necessary to wait for the Azure AD Connect server to perform a synchronization, and this process can take up to 1hr 15 minutes.
For Azure AD Join devices, the provisioning process is significantly quicker, and we expect to see between 15 and 30 minutes for the process.
Enable and configure updates for Windows 365
Windows 365 Enterprise Cloud PCs are managed by Intune, and optionally Endpoint Configuration Manager (ConfigMgr). The process and requirements for enabling and configuring Quality and Feature Updates for Windows 10 and Windows 11 Cloud PCs are exactly the same as the process for managing updates on physical computers.
Access a Windows 365 Cloud PC
There are a couple of different ways end users can access their Cloud PCs:
- By browsing to windows365.microsoft.com on their device
- Via the Microsoft Remote Desktop app
If users opt to access their Cloud PC via the Windows 365 website, there are some limitations around the features that are available within that experience. Similarly, depending on the Remote Desktop app that’s chosen, users will notice that some features are unavailable. We invite you to read the Client features chart for more details. Where a user opts to use the Remote Desktop App, the device running the app should also meet the End-user hardware requirements.
In summary, it’s possible to access a Windows 365 Cloud PC from any of the following device types:
- Windows
- macOS
- iOS/iPadOS
- Android
- Linux


