How to Enable IMAP Access to Exchange Mailboxes
Why use IMAP?
At first glance enabling IMAP on your Exchange Server might seem like a backwards step since much of the advanced client functionality that Exchange supports requires a MAPI enabled PIM application, usually Outlook.
However, there are a number of scenarios when using an MS Exchange compatible client is not an option, or cannot provide the functionality you require, e.g.:
- Users with non-Windows systems, such as Macs or Linux based desktops – Although Microsoft’s official advice when using Outlook is not an option is to use Outlook Web Access instead, this is not always possible or practical. One obvious drawback of OWA is that it requires a constant connection to the server, which may not be available for a remote Macbook user. Ideally, you want your Mac users to use Entourage, but if this isn’t an option then you should consider IMAP.
- Outlook 2011 on Mac with Exchange 2003 – The new Outlook For Mac 2011 cannot connect to Exchange 2003 as it uses Exchange Web Services, only introduced in Exchange 2007. The only option is to enable IMAP and synchronise the mailbox that way instead.
- Mobile devices without Exchange Activesync support – Whilst Exchange support is virtually a prerequisite for any “business class” smartphone nowadays, there are still many devices which don’t support it but do offer IMAP access.
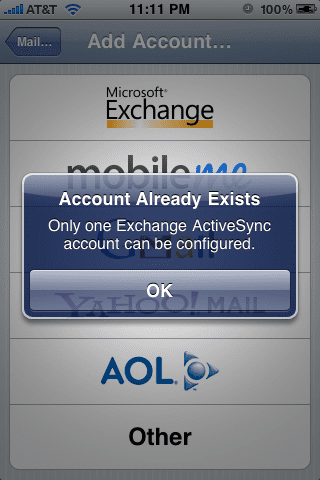
- Mobile access to multiple Exchange mailboxes – Virtually all mobile clients (with the notable exception of Apple’s IOS4) will only sync with one mailbox, so users cannot check other shared mailboxes without reconfiguring their device each time.
What is IMAP?
Internet Message Access Protocol has been around since 1986, but has rapidly increased in popularity in recent years with the spread of “always-on” broadband Internet connections, replacing POP3 as the preferred protocol for email applications. The main reason for this is that it supports both online and offline modes, unlike POP3 which is purely offline, making IMAP much better for keeping a local client synchronised with a server mailbox. It also supports multiple clients accessing a single shared mailbox, whereas POP3 only allows one connection at any one time.
By default IMAP uses port 143, unless you wish to use SSL encryption in which case it uses port 993. Exchange does allow you to set a custom port of your own choosing if you require. Either way, you need to make sure you open the necessary ports on your firewall so that remote clients can connect to your Exchange Server.
IMAP over SSL
As has just been mentioned, you can use SSL encryption with IMAP to increase security, and you should seriously consider this option if you are supporting mobile clients. IMAP by itself is not a secure protocol so the username and password are transmitted across the network in plain text, making it possible to detect them using a packet sniffer – a particular risk if you have users who may connect from public access points. Chances are that you will have already setup SSL for OWA on your Exchange Server, in which case you can use the same certificate, but if not you will have to obtain one. This isn’t the place to discuss SSL in depth, but if you are supporting remote users I would strongly recommend you purchase a proper signed certificate, as it will save you a lot of trouble later on.
Configuring IMAP on Exchange 2003
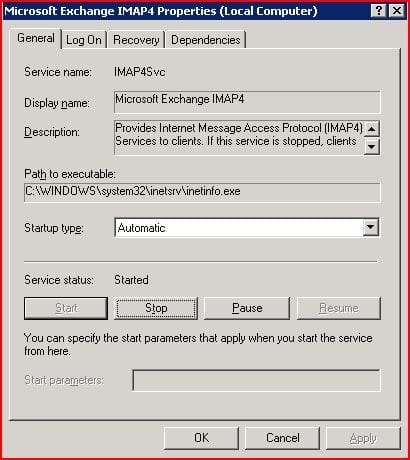
By default on Exchange 2003, IMAP support is installed but not enabled, so the first thing you need to do is find the service and start it. To do this, open the Services management console on your Exchange Server (Start – Run – services.msc). Scroll down to the “Microsoft Exchange IMAP4” service and double-click it to view the properties.
If you don’t have the service listed, the most likely reason is that IMAP support was not installed with Exchange. In this case you will need to rerun the Exchange setup wizard and add the feature. Once you have found it, change the “Startup Type” to “Automatic“, so that it will run every time the server is rebooted, and then manually start the service for the first time by clicking “Start“. Once it is started you can close the window by clicking “Ok“, then confirm that the MS Exchange IMAP4 service is “Started” and set to “Automatic” in the Services console before closing it. Its unlikely that you will encounter any problems at this point, but if you do, the place to start investigating is in the Event Viewer to see why the service failed to start.
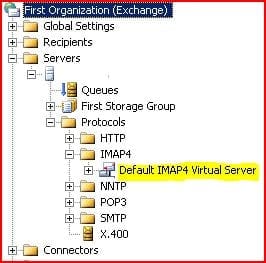
Next you need to open your Exchange System Manager application, expand the “Servers” container and select your server. Drill down to the “Default IMAP4 Virtual Server” as shown on the left. Notice that the console will show you “Current Sessions“, which can be helpful when checking client connectivity later on.
At this point, if you don’t intend to use SSL or change any of the IMAP defaults then you’ve actually completed the setup and it should just work. By default all mailboxes will have IMAP access enabled (you may disable it via the “Exchange Features” tab on the user properties in the AD). However, we will make things more secure and insist that our users only connect using SSL, so right-click the IMAP4 Virtual Server and select “Properties“. Change to the “Access” tab, and under Secure Communication click the “Certificate” button to open the “Web Server Certificate Wizard” – click “Next” on the welcome page.
Here we will assume that you have already installed an SSL certificate on your Exchange Server in order to secure your Outlook Web Access. If you haven’t, now would be a good time to do it and come back to this afterwards. Another article on this website, “Configure SSL on OWA” explains how to do it.
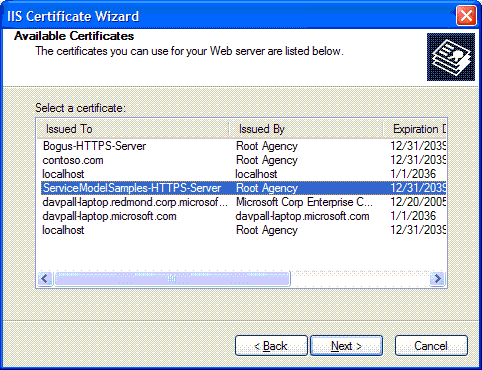
The IIS Certificate wizard gives you several options at this point. You should select “Assign an existing certificate“, then click Next to see the list of certificates installed on your server.
You should see something like screen shot above, although you are unlikely to have so many certificates installed on your server unless you were previously having trouble getting SSL to work. As mentioned before, it is strongly recommended that you invest in a properly signed certificate from a root provider such as Verisign or Digicert, in which case the correct certificate should be easy to identify from the “Issued By” column. See related Petri article on SSL Certificates for Exchange Server 2007/2010. Select the certificate to install by clicking on it, then click “Next” to continue the wizard. Check that the certificate details are correct on the next page, then click “Next” to confirm, and finally “Finish” the wizard to complete the installation.
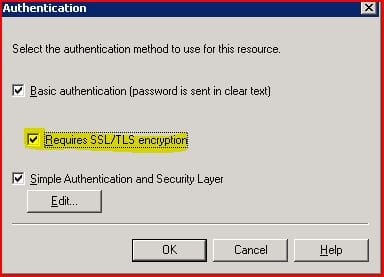
You have now enabled IMAP over SSL but you are not yet requiring it on connections to your server, which we will set next. You should still be on the Access tab of the IMAP4 Virtual Server properties, so this time click the “Authentication” button under “Access Control” to open this window.
Make sure the “Requires SSL/TLS encryption” box is checked, then click Ok to return to the previous window and click the “Communication” button. In the window that opens, check the “Require secure channel” box to force all client connections to use SSL encryption.
Don’t forget to make sure you’ve opened the required ports in your firewall (143 for IMAP, 993 for IMAP over SSL), at which point your server should be ready to accept IMAP connections. Users will just need to know the server address and the credentials for the mailbox they wish to access.
Configuring IMAP on Exchange 2007
For the sake of this guide we will assume that you have at least Service Pack 1 on your Exchange 2007 Server, as it adds the IMAP options to the Exchange Management Console. Otherwise, all IMAP configuration has to be done using the Exchange Management Shell commands.
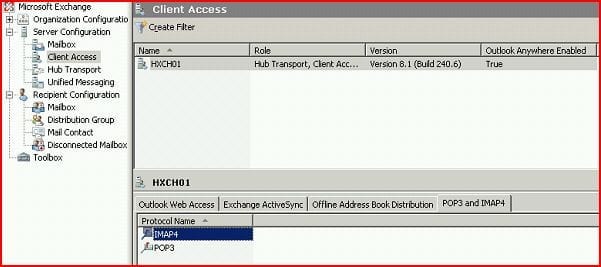
The implementation of IMAP in Exchange 2007 has changed slightly from 2003, the main difference being that the default settings now require a secure connection. IMAP support is installed as part of the Client Access Server role (if you only have one Exchange 2007 server it will have the CAS role), but like with Exchange 2003, the IMAP4 service will be disabled. See the procedure in the previous section for how to enable it. You can access your server’s IMAP settings in the EMC by expanding the Server Configuration branch and selecting “Client Access“, then the “POP3 and IMAP” tab.
By default IMAP on Exchange 2007 is configured to require secure logins with SSL, and provided you already have your OWA setup to use SSL successfully, you shouldn’t need to do anything else. Although it’s not recommended, you may disable the SSL requirement by selecting the IMAP4 protocol as above, then clicking “Properties” in the righthand pane. Under the “Authentication” tab you can change the logon security.
As in Exchange 2003 you can also enable IMAP access on a per-mailbox level. Open the mailbox properties under Recipient Configuration – Mailbox, then select the “Mailbox Features” tab to see the option. Again, by default IMAP access is enabled for all mailboxes unless you explicitly disable it.
Sending email when using IMAP
Although technically the IMAP4 protocol can be used for sending emails as well as retrieving them (by placing them in the “Outbox” folder”), most clients do not support this, and instead expect to use SMTP for outbound email. SMTP is a tried and tested protocol which you will probably be familiar with already if you have set up a mail server before, however, there are some difficulties when using it with mobile clients. The main problem is that in order to prevent spam, relaying publicly accessible SMTP servers always restrict access, either by requiring authentication or by only allowing connections from clients on their local network. For domestic email clients, this isn’t usually a problem as the ISP will allow its own users to relay email through its own SMTP server, but mobile clients may find themselves using many different ISPs in their travels.
The solution is to find a SMTP server which allows you to make an authenticated connection to it from anywhere, and then send your outbound email through it. Some ISPs include authenticated SMTP as part of their standard package, and there are also subscription services available, but there’s no reason why you can’t use your own Exchange Server. See related Petri article Configuring Exchange 2007 as an Authenticated or Anonymous SMTP Relay.
Conclusion
You should now have IMAP access working on your Exchange Server, and quite possibly authenticated SMTP as well, making it accessible by virtually all modern email clients. Bear in mind though that different email clients implement IMAP in subtly different ways, so it may still take a little experimentation to get them connected. I’d recommend testing with a Microsoft client like Outlook Express or Windows Mail first in order to verify your configuration before trying with third party clients. Should you then encounter problems, you can at least be pretty certain the problem is with the client and not your server, and troubleshoot accordingly.


