How to Create and Validate a Microsoft Azure Active Directory Domain
I’m by no means an expert on Azure Active Directory (AAD), but I thought I would share the little I know because I am aware that confusion about AAD is causing issue with the deployment of other components of Azure IaaS. AAD was something that I ignored until recently, but more and more, AAD is becoming central to Microsoft’s hybrid cloud IaaS solutions:
- RemoteApp uses AAD for user authentication
- Possible single sign-on integration with other Microsoft cloud services such as Office 365
- Windows 10 devices can register with AAD
- You can enable single-sign on with over 2700 third party cloud services, including Salesforce, Amazon, and Google!
In this post, I’m going to show you how to set up the pre-requisite for linking AAD with your legacy on-premises Active Directory domain: creating and validating your domain in Azure.
The Default Directory
When you set up your Azure subscription, a default directory will be created. This is where your Azure subscription will create and use accounts by default. The default directory will pull its default domain name from your subscription. For example, if my subscription was “joeelway” then my default domain would be joeelway.onmicrosoft.com, and if I created a user called User1 then that user’s UPN (logon name) would be [email protected].
Let’s assume that I create an on-premises domain called joeelway.com. There are two issues that could possibly arise:
- Confusion: User1 is used to signing in as [email protected]. They’d be confused if I told them that sometimes they would be called [email protected].
- Out-of-sync domains: If I try to federate or sync the legacy on-premises AD with AAD then they are out of sync; the domain names are different.
Note: In a lab scenario I have solved the out-of-sync domain issue by adding the AAD domain suffix (joeelway.onmicrosoft.com) as an additional suffix in my on-premises AD. Then I change the UPNs of the users from @joeelway.com to @joeelway.on.microsoft.com. This is not a good production solution because it still causes confusion. However, this method can be tweaked (using joeelway.com) when the company has used a domain that cannot be verified, e.g. joeelway.internal, for their on-premises AD.
What I want to do here is set up my AAD to use my on-prem AD domain of joeelway.com.
Create the Domain
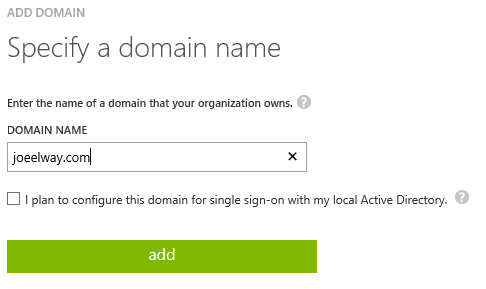
Log into the Azure management portal, browse to Active Directory, click on your Default Directory, and navigate to Domains. Click Add A Custom Domain.
Add the name of your domain here. This must be a DNS domain name that you own and can create records for on the Internet – you will need to do this to validate the domain. Note the “I plan to … single sign-on …” checkbox. If you plan to use ADFS to link your domains then check this box. Note that directory synchronization is not single-sign on, it is shared sign-on; do not check this box if you are using a sync tool instead of ADFS.
Click Add and then navigate to the next page where you will be provided with details for validating your domain.
Verify the Domain
You are told to create a TXT record in your domain (joeelway.com) on the Internet DNS servers. This will allow Microsoft to verify that you own the domain in question and that you are entitled to use this domain on the Internet – the hybrid solutions that AAD powers are usable on the Net and you wouldn’t want someone else signing into Salesforce with your domain name, would you?
Note that with my registrar, I didn’t have to enter the @ symbol anywhere – I just created a TXT record, and set the data value to equal the destination value from the Microsoft instructions.


![Azure AD requires you to prove that you own a DNS domain using a verification process [Image credit: Aidan Finn]](https://petri-media.s3.amazonaws.com/2015/06/AADDomainValidationReqs.png)
![Prove ownership of your DNS domain to Azure AD using a TXT record [Image Credit: Aidan Finn]](https://petri-media.s3.amazonaws.com/2015/06/CreateTXTRecordToValidateAADDomain.png)
![A successful Azure AD domain verification [Image Credit: Aidan Finn]](https://petri-media.s3.amazonaws.com/2015/06/AADVerificationSuccessful.png)
![The newly created and verified domain in Azure Active Directory [Image credit: Aidan Finn]](https://petri-media.s3.amazonaws.com/2015/06/NewVerifiedAADDomain-e1433536093980.png)