Getting the Most Out of Azure Site Recovery
I have recently been working on a proof of concept for small-to-medium enterprises (SMEs) on Microsoft’s DR-in the cloud service, Azure Site Recovery I thought I would share some of my learnings in this article, and I would like to thank the ASR team at Microsoft for the help they have provided me with over the past few weeks.
How long will it take to replicate?
Most SMEs operate in a bandwidth-challenged world. ASR uses Hyper-V Replica, which was originally designed to deal with bandwidth challenges. The fact is that you still need bandwidth to upload the GBs of virtual hard disks of your virtual machines to Azure. My lab at work is on an isolated network with 256 Kbps of upload speed on an ADSL connection — I can hear some of you saying, “How stone-aged!” It takes over three days to finish the initial replication of a plain Windows Server 2012 R2 virtual machine to Azure on that bandwidth. I had access to 50 Mpbs upload speeds this week and a similar machine was completed in two and a half to three hours. It could have been quicker except I enabled bandwidth throttling.
Bandwidth Throttling
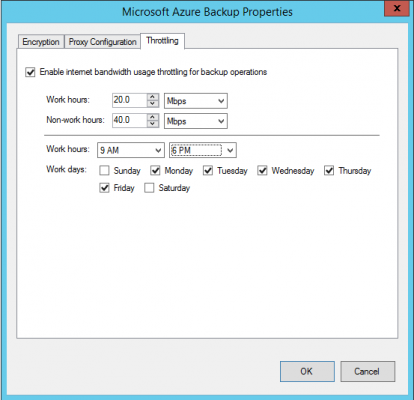
You can limit the bandwidth that’s used by ASR on a per-host basis. This is done in the Azure Online Backup tool, which is also installed when you install the ASR provider. Log into your host and launch Microsoft Azure Backup. Click Change Properties in the Actions pane when the console opens and then browse to Throttling.
You can enable throttling, customize your definition of a workday, and then set bandwidth rates on this host for work hours and non-work hours.
The D: Drive
If you don’t do any custom stuff with drive letters in your virtual machine, then this won’t affect you. If you’re like me and you change the virtual DVD drive from D: to Z:, then keep reading. Azure normally assigns the D: drive to a temporary drive that’s used for paging and optionally caching. This could be an issue if you have stored file shares or service data on the D: drive, where it suddendly gets moved to E:.
You can preserve drive letters of replicated virtual machines by using something called SAN Policy. This will cause Azure to mount the temp drive using the next available letter instead of just assuming that D: is okay.
Log into the guest OS of your VM in the production site. Run Diskpart in an elevated command prompt and execute this line:
SAN POLICY = OfflineShared
Reserved IP Addresses
Azure virtual machines do not use traditional static IP addresses. Instead, the guest OS is configured to use a dynamically assigned IPv4 address, and the Azure virtual network provides an address. By default, this address is not reserved or statically assigned. There’s no guarantee that a virtual machine will have the same IP after being de-allocated and restarted.
If you have some virtual machines that need reserved IPs, then you can do this using PowerShell. Create an Automation runbook in Azure, and add this runbook as a post-group scripted action in your recovery plan; the group will start the virtual machine, and the post-action will reserve the IP address.
Endpoints
You might have created firewall rules to allow virtual machines to receive traffic from the Internet, such as web or SMTP servers. The equivalent of a NAT rule in Azure is an endpoint, and these aren’t going to magically appear after a failover. You can use PowerShell via Azure Automation to run a scripted step in a recovery plan to reveal the necessary port on the virtual machine via the recovery plan’s cloud service.
Failing Over Public Services
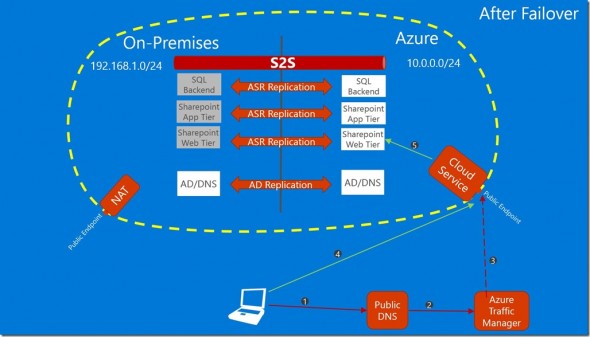
I read a very interesting post by Microsoft before I wrote this article that offered a valuable solution. What if you have a public service that is hosted on-premises, and you fail that service over to Azure after a disaster? How do you fail over the name resolution? Azure offers a feature called Traffic Manager that can handle that scenario. With this solution, Traffic Manager will failover the name resolution from your on-premises site to the Azure failover cloud service and will minimize the downtime. Realistically, the boot time of the Azure virtual machines will exceed the TTL of publicly cached DNS lookups.
Cached DNS Lookups
A common design for hybrid ASR deployment is as follows:
- One or more hosts running on premises with most, but not all virtual machines replicating to Azure.
- A site-to-site VPN or ExpressRoute connection extends the on-premises network into the Azure failover virtual network.
- A number of virtual machines are permanently running in the Azure virtual network. Examples might be domain controllers that are members of the on-premises domain, replicating domain and DNS content into Azure.
Now imagine that the following happens:
- The in-Azure virtual machines have performed forward DNS lookups, resolving the names of on-premises virtual machines to their on-premises IP addresses.
- Imagine that the TTL on those records is 3600 or one hour.
- A failover is performed with on-premises virtual machines starting up in Azure.
- After the failover, one of the permanent in-Azure virtual machines tries to access a failed over virtual machine using the FQDN.
What happens? The name resolution fails because the record was cached in the memory of the in-Azure virtual machine and the Azure DNS server(s).
I haven’t worked out the ‘how’ exactly yet, but my idea to resolve this issue is to push an IPCONFIG /FLUSH command into each of the permanent in-Azure virtual machines.
DNS Servers & Name Resolution
After a failover, lots of machines are going to fire up with different IP addresses. You will need to handle this.
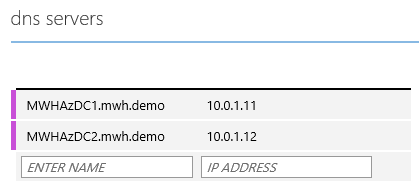
Configure the DNS servers of your virtual network. This ensures that the failed-over machines will register their names with their new addresses in the forward lookup zones. If the on-premises site has a single domain controller, then start it up first in your recovery plan.
If you have more than one domain controller, then you probably should have extended your Active Directory into Azure via an additional virtual domain controller. In this situation, you should configure these domain controllers as the DNS servers of your virtual network.
Remote Access
It’s great that you can fail over virtual machines to Azure after an on-premises disaster. But what good is that if the employees of the business cannot use those services? Not having some form of remote access is like saying that you’ve saved all of your files to a disk that’s buried under 20 meters of concrete.
You can use site-to-site networking but this assumes that (a) an office survived and (b) that latency won’t make services unusable. My suggestion is that you look to remote desktop computing in the form of:
- Remote Desktop Services (RDS)
- Citrix XenApp
- Azure RemoteApp
RDS and XenApp can be deployed in Azure virtual machines (use many smaller sized machines, such as a Standard A3 as session hosts), depending on licensing. Alternatively, you can use RemoteApp, which is a very nice and new service from Microsoft. There are a few issues with it, which all can be worked around, such as the need to upload custom templates on a regular basis or the minimum charge for 20 users. You could also use PowerShell and Automation to work around those issues with a little ingenuity.
A requirement of RemoteApp is that you use Azure Active Directory (AAD) via single sign-on (ADFS) or shared sign-on (DirSync and eventually AD Connect), as you would have to do for any of Microsoft’s business online services, such as Office 365. My tip is, if you can, do this from virtual machines that are permanently running in Azure:
- The machine is always running and always available to Azure AD.
- Shared or single sign-on will always work, no matter what happens to the on-premises site or its Internet connection – valuable to roaming or remote users.
Some Things are a Little Slow
In my testing, I found that a parts of failover and failback could be slower than expected, especially for those who have worked with Hyper-V Replica between two private sites.
Azure is slow at creating the virtual machines that attach to the replicated virtual storage. Azure, at times, is also incredibly slow at booting virtual machines into a running state.
ASR has a nice process for replicating change back to a site. In my tests of planned failover, there was little change to the virtual machines after the failover. A compare and copy process runs twice. The first time while the failed over virtual machines are running and the second after you confirm that it is okay to shut down the failed over virtual machines. There should have been very little data to copy, and I expected the process to be quick. It was actually quite slow; there were bursts of data transfer, but I believe the time taken is the scanning process where ASR compares the virtual hard disks in Azure with those on-premises to determine which blocks to copy over the network.
Another element that can startle those that are already in panic mode after a disaster is that a recovery plan can show a virtual machine as started and running, but the Virtual Machines view doesn’t show the virtual machine yet. This is simply a refresh issue. Wait about 30 seconds, refresh the view, and you’ll see the virtual machine.
A recovery plan can automate and simplify a failover and a failback, but allow for some time for this process to complete. Test failover with a test run of the recovery plan, and maybe move some test virtual machines with services/data back and forth via a planned failover.
Microsoft is aware of these minor issues and is looking at them.
Final Thoughts
There is a lot of value in setting up a proof of concept and performing failovers with Azure Site Recovery. ASR is an incredible service, making DR a realistic possibility for SMEs. But even SMEs have some complexity, so there is work to be done to automate out any wrinkles in the process. This is where PowerShell and Azure Automation can shine, adding their capabilities into the ASR recovery plan. Test the process and think about end to end situations from the big picture to the mundane. It might not even be a bad idea to try get an employee of the company to try do some work in the test environment!


