How to Expand WSUS Updates: System Center Update Publisher (SCUP)
In our first post in this new series on how to expand WSUS updates, I introduced Windows Server Update Services and showed you how to prepare the code signing certificate. In this post I will cover the main steps of having our clients trust updates that are not published explicitly by Microsoft, and I’ll introduce the tool which will make this possible: System Center Update Publisher (SCUP).
Expand WSUS Updates: Client Trusts
We will begin with the client systems to which we wish to deploy our updates. These systems will possibly be comprised of both client and server operating systems, and organized into different organization units in your Active Directory.
Assuming you have a working WSUS environment, you also likely have one or more Group Policies configuring your clients on where and how to query and deploy their respective updates. We will need to extend these policies, or generate a new policy scoped to the clients to whom you wish to deploy your custom update. The following is a guideline for the settings you will be configuring in these or other suitable alternative policies in your environment
Launch the Group Policy Management Console and select an existing suitable policy, or create a new scope policy in which we will complete the following steps.
-
In the GPO Editor, navigate to the following branch of the tree: Computer Configuration > Policies > Windows Settings > Security Settings > Public Key Policies > Trusted Publishers.
-
Right-click and from the context menu select Import.
-
Browse to the location of your Code Signing certificate file and click Import.
-
In the GPO Editor, navigate to the following branch of the tree: Computer Configuration > Policies > Admin Templates > Windows Components > Windows Updates.
-
Locate the policy called Allow signed updates for an intranet Microsoft update service location and double-click to open the settings dialog.
-
Set the policy to Enabled and then click OK.
Note: If you are not using your internal PKI, but instead you’re using a SCUP self-generated certificate, then you will need to export that certificate and distribute it as just described. However, in addition to placing the certificate in the “Trusted Publishers” store, you will also need to place the certificate in the “Trusted Root Certificate Authorities” store.
Configure SCUP for Publishing
Before we get into the work of organizing, packaging, and publishing our updates, we will first create a link from our System Center Update Publisher installation to the update service that will be supporting our clients. In my example, I will be preparing this configuration to work with WSUS.
On the main page of System Center Update Publisher, click the main menu and select Options from the drop-down list, which will launch the System Center Updates Publisher Options dialog.
-
On the Update Server Page, check the box for Enable Publishing to an update server.
-
Depending on where your update server and SCUP console are installed, choose the respective option of Connect to a local update server or Connect to a remote update server and provide the relevant URL.
-
Click on the Test Connection button to ensure the SCUP Console can communicate with your update server.
-
From the Update Server’s Signing Certificate page section: When your PKI certificate exported are available, click on Browse and navigate to the exported certificate. Select it and click OK.
-
Next, click Create. You will need to provide the export password in the dialog. Click OK for the certificate to be processed.
-
A new Test Connection dialog will be presented that confirms the certificate has being successfully connected. The dialog also directs us to ensure that we manually import our certificate on the WSUS server (and any system from which we will run SCUP) to the Trusted Publishers computer certificate stores.
- Finally, with the configuration set, we can click OK.
Organize the WSUS Updates
Our next step is to organize the updates we will be publishing into a small tree format based on vendor and product. As the list will expand over time, this will permit us to easily manage the updates.
- In the tree view, expand Overview and select the node All Software Updates.
- Right-click and select the option Create Vendor from the context menu.
-
Within the Create Vendor dialog, write your vendor’s name in the Vendor name field (for example, DigiNerve) and click OK.
-
Now, select your newly create node, and right-click to then select from the context menu Create Product.
-
In the Create Product dialog, enter the product’s name (for example, SCCM Client) and click OK.
Stage the Software
Place the client installation media on a share that is available to all of your clients’ computers. In the scenario of our example, SCCM, this will be on the distribution media for example in a folder called Client.
For my environment I am proceeding to copy the Client folder and its contents to the NETLOGON share (\\diginerve\netlogon\#_MIS\Management). This share has the added benefit of also being distributed to all field offices via replication.
Package the Update
With the update staged and ready for packaging, we can return to the SCUP console and execute the following outline procedure – adjusting, of course, as necessary for your environment.
From the ribbon, click Create and select Software Update, which will launch the Create Software Update Wizard.
- In the Package source field, provide the name of the file (for example, ccmSetup.exe).
- In the Download URL (or UNC) filed, enter the path to the staged software, for example \\diginerve\netlogon\#_MIS\Management\CLIENT\ccmSetup.exe.
- In the Success return codes filed, supply the relevant status values for your installable.
- Click Next.
On the Required Information page:
- In the Title Field, provide the package name: System Center Configuration Manager 2012 SP1 Client.
- In the Description field, you can edit and append additional information as desired.
- In the Classification, select the appropriate option from the drop-down list. I am leaving this unchanged.
- In the Vendor drop-down, select our defined vendor name, (for example, DigiNerve).
- In the Product drop-down, select the Product Name you created earlier.
- In the More info URL field, provide a link to your designated update information site (for example, http://support.diginerve.net/updates).
- Click Next.
On the Optional Information page:
- In the Bulletin ID field, I am going to set SCCM12SP1.
- In the Article ID field, I am going to repeat the Bulletin ID.
- In the Support URL, provide a link to your designated support site, eg – http://support.diginerve.net/.
- In the Severity, Impact, and Restart Behavior drop down choices, I am leaving them to their respective defaults of None Specified, Normal, and Can request a reboot.
- Click Next.
On the Prerequisites page:
- The client will only install to x86 or x64 nodes, so I am going to define that the update must deployed to these platforms.
-
In the Available software Updates and Detectoids list, locate and select WSUS Detectoid – CPU Architecture: X64 Based.
-
Click Add Perquisite to create a new rule in the Prerequisite software updates and detectoids window.
-
In the Available software Updates and Detectoids list, locate and select WSUS Detectoid – CPU Architecture: X86 Based.
-
Click Add Perquisite to update the rule in the Prerequisite software updates and detectoids window.
- Click Next.
On the Superseded Updates page, click Next.
On the Installable Rules page, click Next. We will next check to see if this update is required. In my case, I am going to check to see if %Windows%\CCM\ccmexec.exe exists.
- On the Rule Editor, click New Item to present the Applicability Rule dialog.
- In the Rule type drop-down, select the option File.
- In the Common Paths drop-down, select the option WINDOWS
- In the Path field, enter ccm.
- In the File name field, enter ccmexec.exe.
- Select The file must satisfy the following rule.
- Set the Property field drop-down to Version.
- Set the Operator field drop-down to Less Than.
- Set the Value to 5.00.7804.1000.
- Click OK.
- Click Next.
On the Installed Rules page, we need to verify if this update has being installed. Using a similar logic, I will check the file version of %Windows%\CCM\ccmexec.exe.
- On the Rule Editor, click New Item to present the Applicability Rule dialog.
- In the Rule type drop-down, select File.
- In the Common Paths drop-down, select Windows.
- In the Path field, enter ccm.
- In the File name field, enter ccmexec.exe.
- Select The file must satisfy the following rule.
- Set the Property field drop-down to Version.
- Set the Operator field drop-down to Greater Than or Equal To.
- Set the Value to 5.00.7804.1000.
- Click OK, then click Next.
- On the Summary page, review the provided details and then click Next.
- On the Confirmation page, you should see the process completed successfully. Go ahead and click Close.
Publish the Update
With the “Product” node still in focus, in the SCUP console you should see your new update now presented in the main pane. Assuming that you have followed the sequence of steps, you can now select our new update and observe the Publish button on the Ribbon illuminate. If the Publish button remains greyed out, ensure that you have successfully completed the “Configure SCUP for Publishing” section of this article.
- In the main console, select the update that you packaged and wish to publish.
- From the Ribbon, click Publish to launch the Publish Software Updates Wizard.
- On the Publish Options page, select the option Full Content then click Next.
- On the Summary page, you will be presented with the list of updates to be published. Review this and, assuming the information is correct, click Next.
On the Progress page:
- The wizard will run through the process of packaging and publishing the update.
- You may get a security warning if the application is already signed, requesting that you validate. If appropriate, go ahead and click Accept to proceed.
- The wizard will continue for a few more moments, and then should then complete the process of publishing our update.
- If the update fails, you must to ensure that you have added the code signing certificate to the Trusted Publishers computer certificate store on both the SCUP and WSUS machines.
- Finally, click Close to complete the publishing wizard.
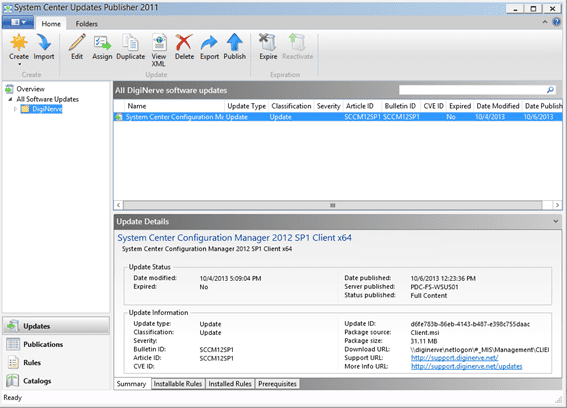
You can find more information about the published update in the Update Details pane, as shown below.
Congratulations, you have now published your first WSUS update! But hold off on celebrating – you’re not finished yet. Check back for more articles on this topic.


