Enable Telnet Client in Windows 8 and Server 2012
The Telnet client is one of the most basic connectivity and management tools that any IT professional needs, and this article will show you how to enable Telnet client in Windows Server 2012 and Windows 8. The Telnet client not only lets you connect to a remote Telnet server and run applications on that server, but is also useful for testing connections to remote servers, such as ones running web services, SMTP services and others.
Using the Telnet client is simple enough and the use of Telnet clients has been covered in several different articles on the Petri IT Knowledgebase. The idea is that once the user has logged on, they can use a command prompt interface that can be used as if it had been opened locally on the Telnet server’s console, and any command the user types is sent to the Telnet Server and executed there. The output from that command is sent back to the Telnet client.
Telnet Client Options
Note: There are many Telnet client tools, where many of them are freely available on the Internet. There are even smartphone and tablet versions that you can download from Google Play or the Apple Store, depending on the OS version on your mobile device. For example, PuTTY is one of the most used apps, as it can perform many types of remote connections, including to Telnet servers.
How to install the Telnet Client for Windows 8 and Server 2012
The Telnet client is a feature that has been included with Microsoft operating systems since Windows NT. However, it is not enabled by default for later OSs, where this started back with Windows Server 2008/Vista. So unless you are going to use a third-party tool to assist you when you perform your remote connection and connectivity troubleshooting work, you want to enable Telnet client on your machine. Just in case you need it.
There are several methods for installing or enabling the Telnet client in Windows Server 2012/R2/8.
Install the Telnet client from the GUI
There is a difference between Windows Server 2012/R2 and Windows 8.
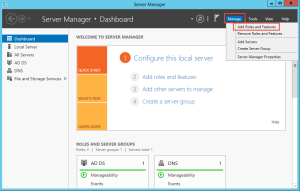
1. In Windows Server 2012/R2, open Server Manager from the taskbar icon or from the Start page.
2. Click “Manage” and then “Add Roles and Features”.
Enable Telnet Client Windows Server 2012 and Windows 8 (Image: Daniel Petri)
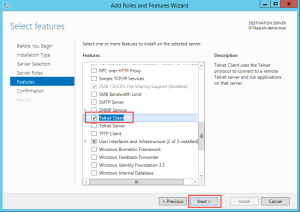
3. Click “Next” four times until you get to the “Select Features” page.
4. Click to select the “Telnet Client” feature. Click “Next”.
Add Roles and Features Wizard in Windows Server 2012 and Windows 8 (Image: Daniel Petri)
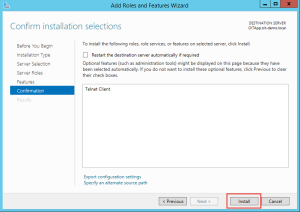
5. Click “Install”.
Installing Telnet Client in Windows Server 2012 and Windows 8 (Image: Daniel Petri)
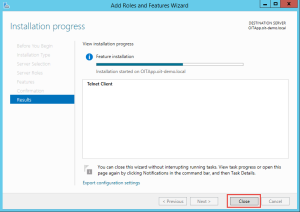
6. You can click “Close”. No need to wait for the installation to complete.
Finishing installation process for Telnet Client in Windows Server 2012 and Windows 8
(Image: Daniel Petri)
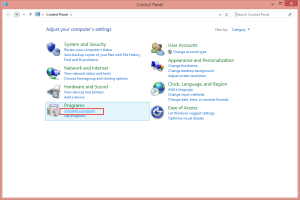
7. In Windows 8 open Control Panel and click on “Uninstall a program” under “Programs”.
Uninstalling a program in Windows 8 (Image: Daniel Petri)
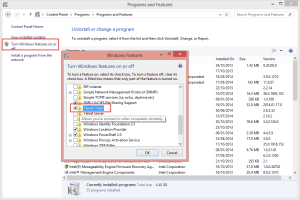
8. Click on the “Turn Windows features on or off” link.
Turn features on or off in Windows 8 (Image: Daniel Petri)
9. Click “OK”, and the feature will be installed.
Install the Telnet client from the Command Prompt
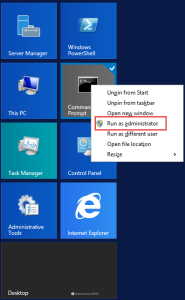
1. Open the Command Prompt window with elevated permissions (Run as Administrator).
Opening the command prompt (Image: Daniel Petri)
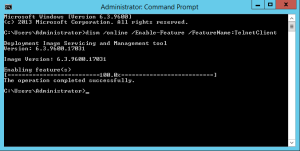
2. In the Command Prompt window type:
dism /online /Enable-Feature /FeatureName:TelnetClient
Note: DISM is short for Deployment Image Servicing and Management tool.
3. Once command finished, Telnet client will be installed.
Install Telnet client from Windows command prompt (Image: Daniel Petri)
Install the Telnet client with PowerShell
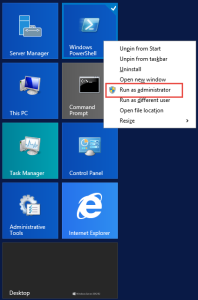
1. Open the PowerShell window with elevated permissions (Run as Administrator).
Install the Telnet client with PowerShell (Image: Daniel Petri)
2. In the PowerShell window type the following line:
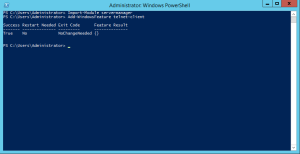
Import-Module servermanager
3. Then type:
Add-WindowsFeature telnet-client
4. Once command finished, Telnet client will be installed.
Finished installation Telnet client with PowerShell (Image: Daniel Petri)


