In this Ask the Admin, I’ll show you how to enable PowerShell Remoting in Windows 8.
PowerShell Remoting is not enabled by default in Windows 8, but can be easily configured from the command line or by using Group Policy. Windows Remote Management (WinRM) is the technology behind PowerShell Remoting. When enabled, the WS-Management service is set to start automatically, an HTTP listener is configured, the default WinRM Windows Firewall rules are turned on, and permissions are set to allow local administrators to establish remote connections.
Enable PowerShell Remoting from the Command Line
If you want enable PowerShell Remoting on PCs that are not joined to a domain, or just on a handful of devices, then use the command line as shown below.
- Log in to Windows 8.
- Switch to the Start menu by pressing the WINDOWS key.
- On the Start screen, type powershell. Make sure that Windows PowerShell is selected in the search results and press CTRL+SHIFT+ENTER. Give consent or enter administrative credentials if prompted.
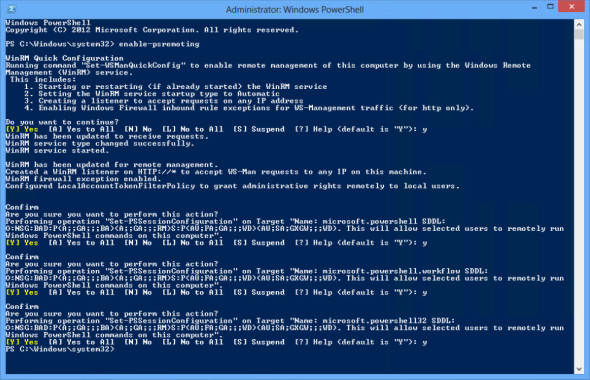
- In the PowerShell prompt, type enable-psremoting and press ENTER.
- You will then be prompted to confirm if you want to continue with the configuration. You can either confirm each step individually by typing [Y], or collectively by typing [A] and pressing ENTER.
Enable PowerShell Remoting from the command line (Image: Russell Smith)
Alternatively, you can add the –force parameter to avoid having to confirm the configuration.
enable-psremoting –force
Once the command has completed, the WinRM listener will be ready to accept remote connections from any IP address.
Enable PowerShell Remoting using Group Policy
To enable PowerShell Remoting on PCs joined to an Active Directory domain, log on to a server or management PC that has the Remote Server Administration Tools (RSAT), using a domain account with permission to create new Group Policy Objects (GPOs) and link them to Organizational Units (OUs).
Configure a WinRM Listener
Let’s start by configuring a WinRM listener on HTTP:
- To start GPMC, open Server Manager using the icon on the desktop taskbar. Alternatively, you can use the icon on the Start screen.
- In Server Manager, select Group Policy Management from the Tools menu.
- In GPMC, expand your Active Directory (AD) forest and domain in the left pane.
- In the left pane of GPMC, right click Group Policy Objects and click New.
- In the New GPO dialog, give the new GPO a name and click OK.
- Expand Group Policy Objects in the left pane of GPMC, right click the GPO you just created and select Edit… from the menu.
- In the left pane of the Group Policy Management Editor window, expand Computer Configuration > Policies > Administrative Templates > Windows Components > Windows Remote Management (WinRM) and click WinRM Service.
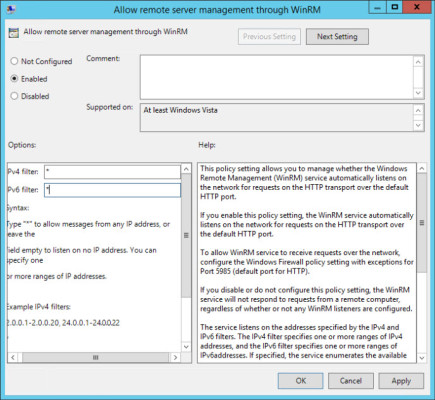
- In the right pane, double click Allow remote server management through WinRM.
- In the Allow remote server management through WinRM dialog, check Enabled.
- In the IPv4 filter and IPv6 filter fields under Options, type * in both boxes to allow connections from any IP address, and then click OK.
Enable PowerShell Remoting using Group Policy (Image: Russell Smith)
Set the WS-Management Service to Start Automatically
Now let’s configure the Windows Remote Management service to start automatically:
- In the left pane of the Group Policy Management Editor window, expand Computer Configuration > Policies > Windows Settings > Security Settings and click System Services.
- In the right pane, scroll down the list of services and double click Windows Remote Management (WS-Management).
- In the Windows Remote Management dialog, check Define this policy setting, and then check Automatic under Select service startup mode. Click OK.
Enable Windows Firewall Rules for WinRM
Finally we need to enable the default Windows Firewall rules for Windows Remote Management.
- In the left pane under Security Settings, expand Windows Firewall with Advanced Security and click Inbound Rules.
- Right click Inbound Rules, and select New Rule from the menu.
- In the New Inbound Rule Wizard window, check Predefined and select Windows Remote Management from the menu. Click Next.
- Click Next on the Which rules would you like to create? screen to create the two default Windows Remote Management rules.
Note that you should consider deselecting the default rule for the Public firewall profile to ensure that Windows Remote Management isn’t exposed on unknown networks. Additionally, you might want to tighten the default Windows Remote Management firewall rule for Domain and Private networks.
- On the final screen of the wizard, make sure that Allow the connection is selected and then click Finish.
- Close the Group Policy Management Editor window.
Now you can link the new Group Policy Object (GPO) to an OU that contains your Windows 8 computer accounts. When Group Policy is next updated on devices within scope, Windows Remote Management will be enabled. For more information on linking GPOs and working with the Group Policy Management Console, see Working with Group Policy on Petri.


