User Account Control (UAC) was introduced in Windows Server 2008 and Windows Vista, and it was intended to provide an extra layer of system security by prompting a user for permission when a service or application tries to make changes to a system or install new software, or to modify existing applications. (See also: How to Disable UAC in Windows Vista.)
The primary purpose of UAC was to restrict user access to a least privilege model, where a user operates with a limited number of system privileges until more advanced privileges are required. When a program attempts to make changes to the system, UAC triggers an administrator prompt that requires administrator permission to continue. UAC helps keep Windows more secure by requiring users permission for system changes, which can help stop the spread of malware and other malevolent software. UAC was also a bit of a user-experience headache, which led to UAC being ridiculed in the infamous Mac vs PC TV ads and led to changes in Windows 7 that made UAC less obtrusive. (See also: How to Disable UAC in Windows 7.)
Changes in Windows 8 UAC
The most significant change to UAC in Windows 8 is that setting UAC to “Never Notify” in User Account Control Settings (see detailed steps on how to do this below) doesn’t actually turn off UAC completely, as it did in Windows 7. In the vast majority of cases this isn’t an issue, but some legacy applications — especially those designed to work with Windows XP that may expect perpetual administrator-level access — may have issues working properly. To get more background on the the changes in Windows 8 UAC, I spoke with Chris Hallum, a Microsoft product manager who specializes in Windows 8 client security.
“When you put UAC in the never-notify position the key difference is… [that] you’ll never get a prompt to elevate and UAC will auto-approve elevation. The key thing to realize is that if the app you’re running attempts to perform a function that requires elevation and it just assumes it’s running in admin mode, the app will fail unless it properly written,” Hallum said.
“It’s critical that the app be implemented in a way where it requests elevation before executing a function that requires it. If you have a poorly written app, you could try the registry hack (Editor’s note: See below for details on how to disable Windows 8 UAC via the registry) to work around the prompts but the consequences [of changing the Windows 8 registry to disable UAC]… are pretty extreme and all but break Windows.”
Hallum continued by saying that good Windows application development practices (that have been applied since UAC was introduced) translates into newer applications not having any issues with the way UAC is handled in Windows 8.
4 Ways to Disable Windows 8 UAC
There are a number of ways to disable UAC in Windows 8, and I describe four of them below. They include disabling the UAC using the Windows 8 GUI, disabling UAC using Windows 8 search, disabling UAC using Group Policy, and disabling UAC by editing the Windows 8 system registry (not recommended!).
Option 1: Disable UAC using the Windows 8 GUI
- Right-click on an open area of the Windows 8 start screen to bring up the All apps icon, which will appear in the lower-right corner. Double-click on that icon to bring up the Windows 8 Apps screen.
Figure 1: The Windows 8 ‘All apps’ icon.
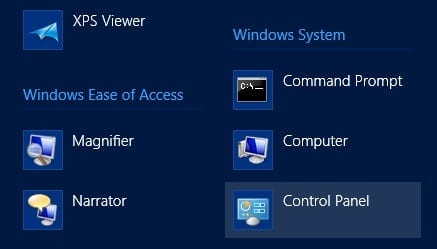
- On the Apps screen, scroll to the right and look for the Windows System category. Double-click on the Control Panel icon, as shown below.
Figure 2: The Windows 8 Control Panel icon.
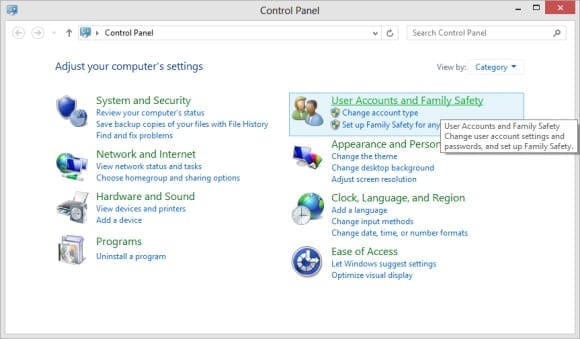
- On the Control Panel screen, double-click on User Accounts and Family Safety.
Figure 3: Accessing Windows 8 user account settings.
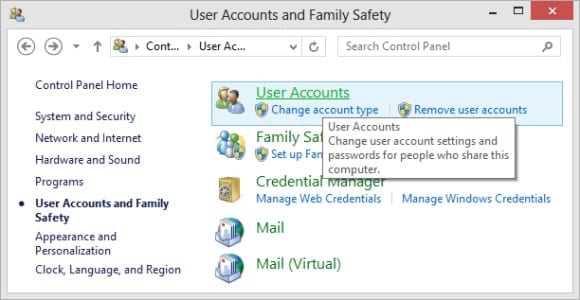
- On the User Accounts and Family Safety windows, select User Accounts.
Figure 4: Selecting User Accounts.
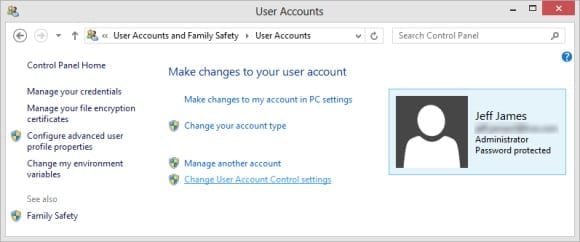
- Next, select Change User Account Control Settings.
Figure 5: Changing user account control settings.
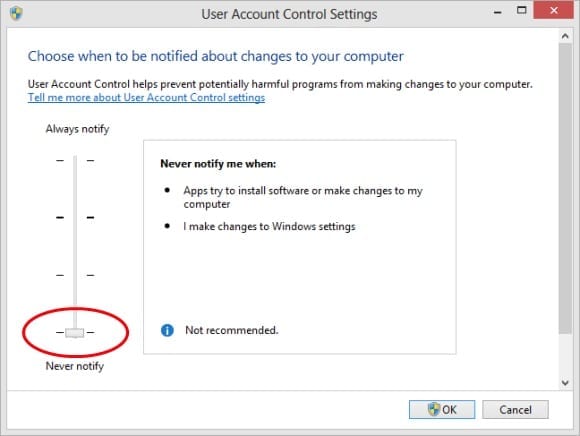
- From the Change User Account Control Settings screen, use the vertical slider to select the desired UAC security level. In order to disable UAC*, move the slider all the way to the Never Notify setting at the bottom. (*Please note that this alone does not — technically speaking – disable UAC in Windows 8 entirely. Keep reading for more details.)
Figure 6: Setting UAC to ‘Never Notify’ on the ‘User Account Settings’ screen.
Option 2: Disable UAC with Windows 8 Search
- Access the Windows 8 Start Screen by hitting the Windows Key, then type user account control settings in the search text field.
- Click on the search results in the Settings heading, then double-click on the Change user account control settings icon on the left side of the screen.
- Next, refer back to Figure 6 (shown above) and the steps listed there.
Figure 7: Using Windows 8 search to access the UAC settings screen.
Option 3: Disable UAC by Using Group Policy
This option uses the Local Group Policy Editor (filename: gpedit.msc) to change Windows 8 UAC settings.
- Access the Windows 8 Start Screen by hitting the Windows Key, then type gpedit.msc in the search text field. In Settings, click on the search results, then double-click on the gpedit.msc icon on the left side of the screen.
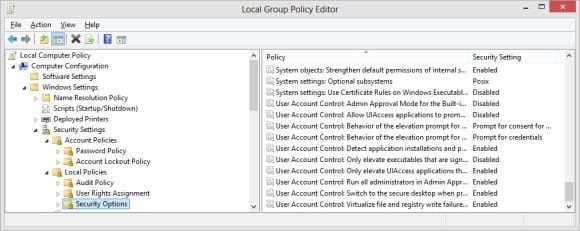
- Once the Local Group Policy Editor app opens, use the left panel to navigate to the Computer Configuration > Windows Settings > Security Settings > Local Policies > Security Options pane.
- In the right window, scroll down until you see all the entries beginning with the ‘User Account Control’ text. You can modify UAC on a much more granular level here than you can through the traditional GUI. You can also refer to the Group Policy section in our Disabling UAC in Windows 7 article for more details about this method, which shares many elements with the Windows 8 version.
Option 4: Disable UAC by editing the Windows 8 system registry (NOT recommended)
You can also force Windows 8 to disable UAC by modifying the system registry. To do this, edit the registry by setting the value of HKEY_LOCAL_MACHINE\SOFTWARE\Microsoft\Windows\CurrentVersion\Policies\System to zero, then restart the system.
WARNING: Disabling UAC via this method also breaks many elements in Windows 8. As Hallum explains, “If you disable UAC via the reg hack the Windows 8 Start Screen and Windows Store apps will no longer function,” Hallum said. “Customers don’t want to go there.”


