Deploy Windows 10 Using MDT and WDS, Part 2: Create an MDT Task Sequence and Configure WDS
In the first part of this two-part series, I showed you how to deploy the Microsoft Deployment Toolkit (MDT) and import a Windows 10 image ready for distribution over the network using Windows Deployment Services (WDS). In the second part, you’ll create an MDT task sequence to manage the deployment of Windows 10, and configure WDS.
Create an MDT Task Sequence
A task sequence specifies a list of jobs are required to install the OS after the PXE-enabled device boots. In this lab, we’ll use one of the standard task sequences supplied out-of-the-box in MDT.
- Open Deployment Workbench on the MDT server.
- In the left pane of Deployment Workbench, expand Deployment Share, your deployment share, right-click Task Sequences and select New Task Sequence from the menu.
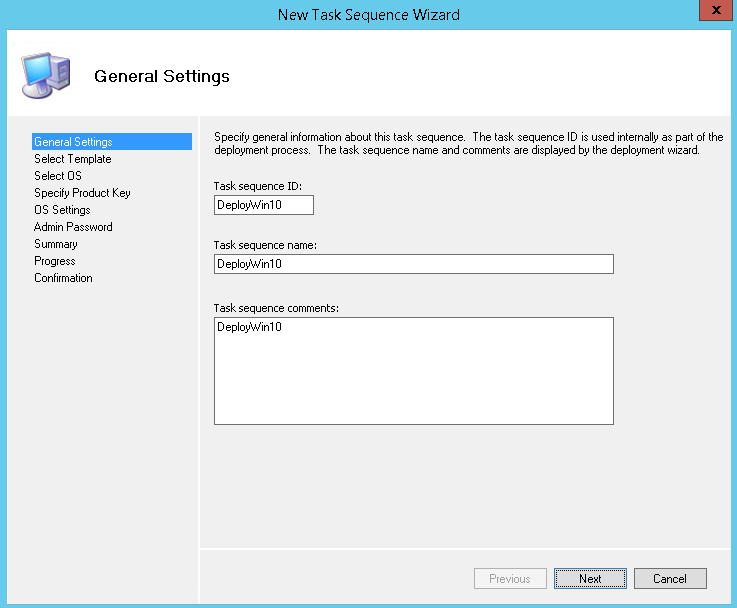
- In the New Task Sequence Wizard, give the new sequence an ID and name, and then click Next.
- On the Select Template screen, select Standard Client Task Sequence from the menu to configure a complete client task sequence, and click Next.
- On the Select OS screen, select Windows 10 Enterprise Evaluation in Windows 10 Enterprise Evaluation x64 install.wim, or the OS of your choice, and click Next.
- On the Specify Product Key screen, select Do not specify a product key at this time. I’m using an evaluation version of Windows for this lab, so I don’t need a product key. You can choose a MAK key or retail product key if necessary. Click Next to continue.
- Type an organization name on the OS Settings screen, and click Next to continue.
- On the Admin Password screen, select Use the specified local Administrator password, type and confirm a password, and click Next.
- Click Next on the Summary screen.
- Click Finish on the Confirmation screen to complete the process.
- Right-click the new task sequence and select Properties from the menu.
- In the Properties dialog box on the General tab, make sure that This can run on any platform is selected.
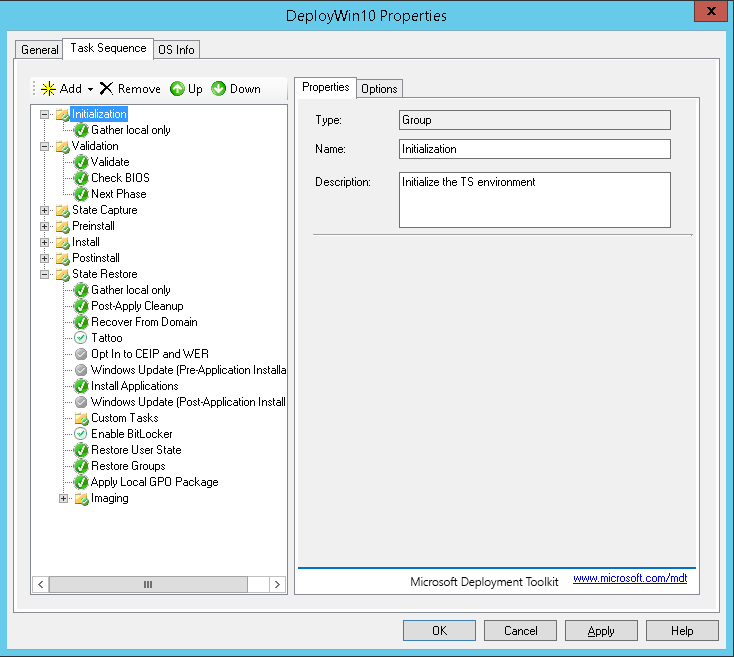
- Switch to the Task Sequence tab. Here you can see each step of the task, and customize the options if you wish. For this lab, we’re going to use the default settings. Click OK.
Now there’s a task sequence in place, we need to update the deployment share.
- Right-click the deployment share in the left pane of Deployment Workbench and select Update Deployment Share from the menu.
- In the Update Deployment Share Wizard, select Completely regenerate the boot images and click Next.
- On the Summary screen, click Next.
- Wait for the boot images to be regenerated, and click Finish on the Confirmation screen.
Configure WDS
Before completing the steps below, the WDS server must be configured with an NTFS partition that is separate from the OS system partition. I recommend at least 20GB or larger.
- Log in to the WDS server with an account that has access to the domain, and local administrator permissions.
- On the desktop taskbar, right-click the PowerShell icon and select Run as Administrator from the menu.
- In the PowerShell window, type Install-WindowsFeature -Name WDS -IncludeManagementTools and press ENTER.
- Wait for Windows Deployment Services to install, and reboot the server if prompted to do so.
- Click the Server Manager icon on the desktop taskbar.
- In Server Manager, select Windows Deployment Services from the Tools menu.
- In the left pane of the Windows Deployment Services MMC, expand Servers, right click your WDS server, and select Configure Server from the menu.
- Click Next on the Before you Begin screen in the Windows Deployment Services Configuration Wizard.
- On the Install Options screen, check Integrated with Active Directory and click Next.
- On the Remote Installation Folder Location screen, change the path. On my server, I have a 20GB NTFS partition (E:) configured for WDS. So, I changed the path to E:\RemoteInstall and clicked Next. Alternatively, you can click Browse to find the location.
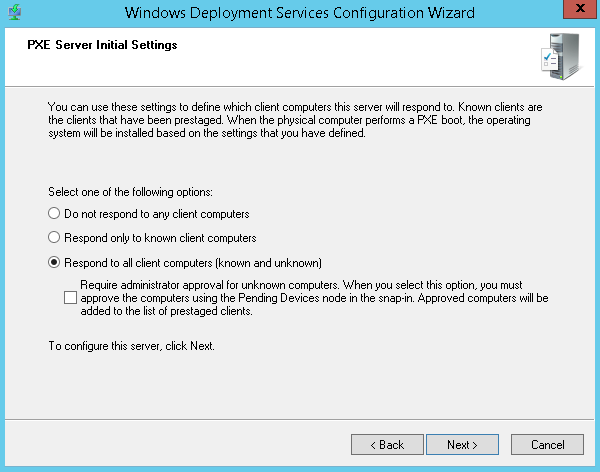
- On the PXE Server Initial Settings screen, check Respond to all client computers (known and unknown), and click Next. For the purposes of this lab, we won’t test prestaged computers, so the PXE service point must respond to unknown computers.
- Uncheck Add images to the server now, and click Finish.
Add a Boot Image
The next step is to add a boot image to the WDS server.
- Expand Servers in the left pane of the WDS management console, expand your WDS server, right click Boot Images and select Add Boot Image from the menu.
- In the Add Image Wizard, click Browse on the Image File screen.
- We need to locate the boot WIM images on the deployment share located on the MDT server. In my lab, the share URL is \\mdt\deploymentshare$, which I pasted into the address bar of the Select Windows Image File dialog box. Then double-click on the Boot folder, select LiteTouchPE_x86.wim and click Next.
- On the Image Metadata screen, click Next to accept the default image name and description.
- Click Next on the Summary screen.
- Click Finish on the Task Progress screen.
- Repeat these steps to add the LiteTouchPE_x64.wim boot image to WDS.
Set WDS Server Options
Finally, there are some options that we need to set for WDS.
- Right-click your WDS server in the left pane of the console and select Properties from the menu.
- Switch to the Boot tab.
- Make sure under Known clients and Unknown clients that Require the user to press the F12 key to continue the PXE boot is selected.
- In the Default boot image (optional) section, click Select to the right of x86 architecture, select Lite Touch Windows PE (x86) from the list of images in the Select Default Boot Image dialog box, and click OK.
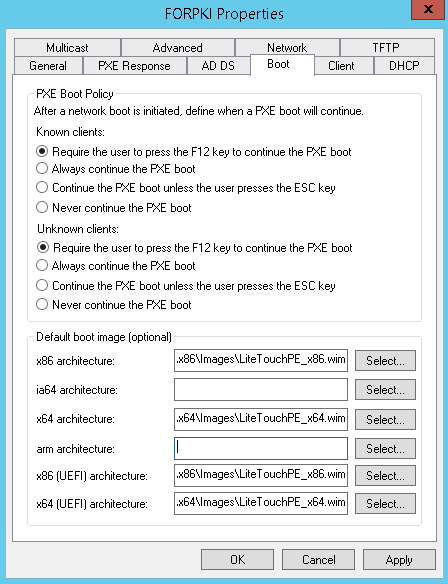
- Click Select to the right of x64 architecture, select Lite Touch Windows PE (x64) from the list of images in the Select Default Boot Image dialog, and click OK.
- Repeat this procedure respectively for the x86 (UEFI) architecture and x64 (UEFI) architecture images, then click OK.
- Finally, restart the WDS service by right-clicking your WDS in the left pane of the management console, and select All Tasks > Restart from the menu.
- Click OK in the Server dialog box.
In this article, I showed you how to customize the Windows 10 deployment in MDT using a task sequence and configure WDS. In the final part of this series, I’ll show you step-by-step how to deploy Windows 10 over the network using the WDS server.


