In this article we will discuss how you can use a previously created QoS-enabled virtual switch to implement converged networks using virtual NICs in the management OS of a Hyper-V host.
Creating Converged Networks: Prerequisites
You must have the following requirements in place to make a converged network with a virtual NIC.
- Windows Server 2012 (WS2012) or Windows Server 2012 R2 (WS2012 R2) Hyper-V deployed on the host.
- A virtual switch with MinimumBandwidthMode enabled.
See our previous post, “Creating a NIC Team and Virtual Switch for Converged Networks,” to learn how to configure the virtual switch.
Choosing a QoS Mode
You have two options for how you implement QoS minimum bandwidth rules:
Weight: Each virtual NIC (actually a virtual switch port that moves with the virtual machine) is assigned a share of the available bandwidth. This option is flexible and preferred.
Absolute: Each virtual NIC is assigned a specific amount of bandwidth, specified in bits per second. This is the least preferred and least flexible option.
Creating and Configuring Management OS Virtual NICs
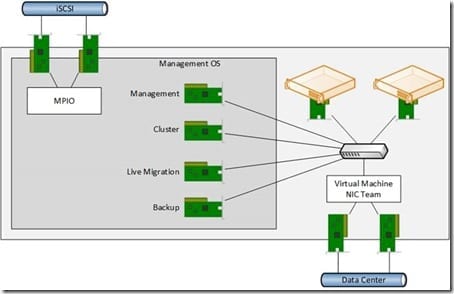
Say you want to create a converged network design such as that shown in the below example:
A clustered Hyper-V host with converged networking using virtual NICs.
This host uses four management OS virtual NICs for the four required host networks:
- Management
- Cluster communications
- Live Migration (and the 2nd private cluster network)
- Backup
You can create a management OS virtual NIC using PowerShell. The following example will create a virtual NIC called Management that will appear in the host’s operating system (Control Panel > Network Connections) as a Hyper-V Virtual Network Adapter called vEthernet (Management). This virtual NIC will have its own IP address and communicate through the virtual switch (ConvergedNetSwitch) just like a virtual machine does, but on behalf of the host instead of on behalf of a virtual machine. It effectively works just like a physical NIC but with a smaller infrastructure cost.
Add-VMNetworkAdapter -ManagementOS -Name "Management" -SwitchName "ConvergedNetSwitch"
You now can configure the minimum amount of virtual switch bandwidth that the virtual NIC will be guaranteed (if required by the virtual NIC). This example sets a minimum bandwidth weight of 10.
Set-VMNetworkAdapter -ManagementOS -Name "Management" -MinimumBandwidthWeight 10
Strictly speaking, this is not 10%. It is a share of the total weight assigned. Microsoft recommends never assigning a total weight (sum of all virtual NICs and the virtual switch default bucket) of more than 100. A good practice is to assign a total weight of 100; therefore the weight of 10 would actually be 10% (10/100).
You can then rerun these cmdlets to create the remaining virtual NICs in the management OS and assign QoS rules:
#Create and configure the Cluster network Add-VMNetworkAdapter -ManagementOS -Name "Cluster" -SwitchName "ConvergedNetSwitch" Set-VMNetworkAdapter -ManagementOS -Name "Cluster" -MinimumBandwidthWeight 10 #Create and configure the Live Migration network Add-VMNetworkAdapter -ManagementOS -Name "Live Migration" -SwitchName "ConvergedNetSwitch" Set-VMNetworkAdapter -ManagementOS -Name "Live Migration" -MinimumBandwidthWeight 20 #Create and configure the Backup network Add-VMNetworkAdapter -ManagementOS -Name "Backup" -SwitchName "ConvergedNetSwitch" Set-VMNetworkAdapter -ManagementOS -Name "Backup" -MinimumBandwidthWeight 10
In this example, the default QoS bucket in the virtual switch has a weight of 50, and this means we have a total weight of 100. We won’t assign QoS rules to the virtual NICs of virtual machines, so the virtual machines will contend for the 50% assigned to the virtual switch’s bucket.
You can add further cmdlets to assign IP configurations, configure DNS, and so on. Here’s how you could assign the IP configuration for the Management virtual NIC:
# Configure the Management vNIC with an IP address New-NetIPAddress -InterfaceAlias "vEthernet (Management)" -IPAddress 10.1.1.101 -PrefixLength 24 -DefaultGateway 192.168.1.1 # Configure the DNS address of the Management vNIC Set-DnsClientServerAddress -InterfaceAlias "vEthernet (Management)" -ServerAddresses "10.0.1.21"
Assuming that you have trunked the physical switch ports to which the virtual switch is connected, you could also bind each management OS virtual NIC to a VLAN:
Get-VMNetworkAdapter -ManagementOS "Management" | Set-VMNetworkAdapterVlan -Access -VlanId 101
A good practice will be to place each line of PowerShell into a single .PS1 script and run it on each new host, changing just the IP addresses as required. This will not only give you consistent results, but it will also save you time whether you’re working in a large data center or you’re a consultant moving from one customer site to another.


