Configure High Availability for Non-Mailbox Servers
Although Mailbox Servers are usually given top priority when providing high availability (HA) in Exchange, you should also configure high availability to the non-mailbox servers. Just imagine this – if your Hub Transport server is not available, then your organization cannot send or receive any mail. Similar disruptions can likewise be experienced if the Edge Transport, Client Access, and Unified Messaging (UM) servers go down.
Thus, to make your system more resilient, it would be prudent to extend high availability to non-mailbox server roles. In this article, I’ll present you a typical environment that can assure HA for the various server roles and then show you how to configure high availability for your non-mailbox servers.
A typical environment that provides High Availability for the various server roles
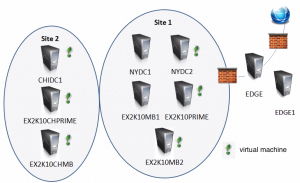
Figure 1: Shows an environment that can exhibit high availability.
Site 1 has two physical boxes (NYDC1 and EX2K10MB1) and three child virtual machines (NYDC2, EX2K10PRIME, and EX2K10MB2) residing on a single Hyper-V parent system.
Site 2, on the other hand is made up of three servers (CHIDC1, EX2K10CHPRIME, and EX2K10MB), all running on one Hyper-V server and hence is a purely virtualized system.
There are also two physical boxes in the perimeter, EDGE and EDGE1.
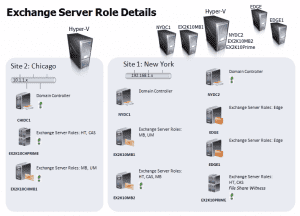
Figure 2: Site 1 is assumed to be in New York, while Site 2 is in Chicago.
Notice that in Site 1 there is one more server for each server role; two servers for each role, to be more exact. This is done to provide the needed resilience for each role. Thus, Site 1 can assure high availability because there are multiple Client Access Servers (CAS), multiple Hub Transport (HT) servers, and multiple Edge Transport servers there.
All server roles mentioned are also present in Site 2. This is in preparation for any situation that may require a site failover.
With the exception of the Hub Transport, it is not enough to simply deploy multiple servers for each server role to achieve high availability. Other things need to be done. Let’s now have a look at each non-Mailbox server role to see what else is needed.
Configure High Availability for the Hub Transport Server
For the Hub Transport, all that’s needed is to deploy a second HT server on a site to achieve HA there. In addition to high availability, this set up will automatically bring about load balancing between HT servers, Mailbox (MB) servers, and UM servers found in the same Active Directory (AT) site.
Furthermore, the Edge Transport (ET) server will also facilitate automatic load balancing between HT servers for inbound SMTP traffic at the AT site where the ET is subscribed to.
To prepare for site failover, at least one HT server should be deployed per site.
Configure High Availability for the Edge Transport Server
To configure high availability for Edge Transport servers is slightly more sophisticated because in addition to setting up multiple ET servers, those ET servers also need to have identical configurations. You can achieve this either by manually configuring each server or by employing a couple of scripts, namely: ExportEdgeConfig.ps1 and ImportEdgeConfig.ps1.
The first script, which is used on the first ET server, exports all settings to an XML file. You will copy that XML file to the succeeding server and then use the second script there to import all settings from the copied file.
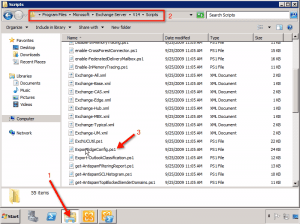
Now, go to the first Edge Transport server and navigate through the following folders: Program Files > Microsoft > Exchange Server > V14 > Scripts. Look for the scripts named ExportEdgeConfig.ps1 and ImportEdgeConfig.ps1 in the Scripts folder.
Figure 2: Shows the directory where ExportEdgeConfig.ps1 and ImportEdgeConfig.ps1 can be found.
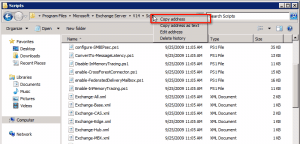
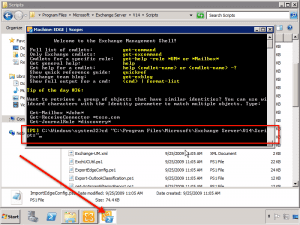
You will have to run these scripts in the Exchange Management Shell and you will need to navigate through the same set of folders before you can get to them. To simplify that process, copy the path while you’re here.
So when you’re in the Exchange Management Shell, you just have to use the copied path. Go to the shell now and change the directory using the copied path.
Figure 3: While you’re in Exchange Management Shell, copy the path.
You can now use the script by typing:
./exportedgeconfig – cloneconfigdata:”C:cloneconfigdata.xml”
This will create the XML file named cloneconfigdata.xml in the C: drive.
Figure 4: Shows what happens after pressing enter.
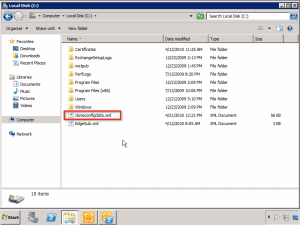
You can then navigate to the C: drive through the GUI to verify whether the XML file is actually there.
Figure 5: Shows the XML file located on the C: drive.
This XML file will have to be copied to every single ET server for HA to work. Assuming you have already done that for the second ET server, go back to the Exchange Management Shell in that server, change to the Scripts folder, and run the ImportEdgeConfig.ps1 script.
To run the script, type in (this is one line):
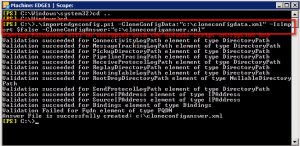
./importedgeconfig -cloneconfigdata:”C:cloneconfigdata.xml” -isimport $false -cloneconfiganswer:”C:cloneconfiganswer.xml”
Figure 6: Shows the script running from the C: drive because the script was copied to the C: drive so I wouldn’t have to change directories anymore.
We specified -isimport $false because we don’t want to import yet. We also created an answer file cloneconfiganswer.xml that we can later tweak if we need to in order to import the cloneconfig data. If you typed in the command as shown above, you’ll find cloneconfiganswer.xml in the C: drive.
Figure 7: Shows how cloneconfiganswer.xml looks like in notepad.
Once you’re ready to import the configuration, go to the shell and type:
./importedgeconfig -cloneconfigdata:”C:cloneconfigdata.xml” -isimport $true -cloneconfiganswer:”C:cloneconfiganswer.xml”
Yes, everything’s similar to the previous command except for -isimport $true.
Figure 8: Shows you how your screen should look when completing all of the above.
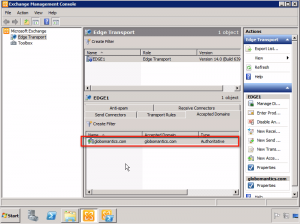
You can confirm this by going to the Exchange Management Console. In the Accepted Domains tab, you’ll find a newly accepted domain like the one below.
Figure 9: Shows the new domain that has been created.
Assuming this was a newly created Edge Transport server, there shouldn’t have been anything in there prior to the import procedure. The presence of that newly accepted domain therefore shows that your import procedure was a success.
You should note though that the cloning process that makes use of those two scripts doesn’t duplicate the subscription settings. Hence, the new Edge server will still have to undergo the subscription process and EdgeSync. But that belongs to another article.
The presence of a cloned version of the first ET server is not yet your last step towards achieving HA for ET servers. Because unlike a secondary Hub Transport server, which automatically goes to work the moment it is deployed, a secondary Edge Transport server has to rely on DNS. Hence, you still need to set up DNS Round-Robin and multiple MX records so that incoming connections will use all available ET servers.
Configure High Availability for the Client Access Server
To achieve high availability for Client Access Servers, you need to deploy more than one CAS. Secondly, you need to either employ Microsoft Network Load Balancing (NLB) or deploy third-party load balancing hardware.
If you want to use NLB, remember that it will not work if the CAS is on the same server as the Database Availability Group MB server, just like the configuration shown earlier in this article (see EX2K10MB2 in the section “A typical environment that provides High Availability for the various server roles”)
If you have a similar configuration as the one shown above and hence can’t use NLB, then you can use third-party load balancing hardware like the Barracuda 340 or BIG-IP load balancers.
Finally, you need to set up a CAS Array. This will allow you to group CAS servers into arrays so that if a CAS server goes down, the client can be automatically redirected to a functioning CAS and hence be able to stay connected.
Once you have your CAS array deployed and load balanced using either NLB or a hardware load-balancing solution, and you have DNS configured to point toward it, then you can use this Exchange Management Shell cmdlet:
New-ClientAccessArray -Name <> -FQDN <> -Site <>
wherein you have to provide a name, the name of the FQDN clients are going to use to connect to your Exchange organization through Outlook, and the site. For example,
New-ClientAccessArray -Name “server.contoso.com” -Fqdn server.contoso.com -Site “Redmond”
If you already have configured Exchange databases, then you also need to revisit those pre-existing databases and configure the RPCClientAccessServer property using the FQDN. So for example, you would use:
Set-MailboxDatabase <> -RPCClientAccessServer
and enter the database name and the FQDN.
So when a new database is created, it will automatically detect the CAS array and point users to the load balanced URL.
Configure High Availability for the Unified Messaging Server
Just like all the other servers mentioned earlier, you can achieve high availability by deploying multiple Unified Messaging servers. At least two of these should be placed in a single dial plan. So, if one UM server fails, the other UM server can take its place to deliver that same dial plan.
In addition, you also need to configure VoIP Gateways to round-robin the calls. In effect, this will provide load balancing and redundancy, so that if the call isn’t accepted by one UM server, it can failover to the second.
Summary
High Availability is traditionally thought of being important only for mailbox servers but as the above article describes, there are many other services that you can and should create a high-availability environment for. This ensures that these services are virtually always ready and functioning for the end-user. Hopefully the article is useful for you in setting up high availability in non-mailbox servers.


