Security has always been an overwhelming field for IT administrators. It’s something that can never really be defined in terms of percentage. When was the last time you heard an administrator say he or she is 100 percent secured? I’m guessing never. There’s always a burden of securing the network, securing the servers, installing important security patches across all machines, and cluelessly hoping one does not become a victim of a zero-day exploit.
Sometimes it’s inevitable, and bad things do happen. But what bothers me is when things go wrong because of the silliest of mistakes ending up in big blunders. As a precaution, I personally avoid installing third-party software unless and until it’s either from a reputed publisher or absolutely necessary. On the other hand, there are users who randomly run any executable they find lying around and bring in all sorts of infected flash drives they used at a cybercafé to send pictures of their new pet to all the family members. Dealing with browser toolbars, icon docks, and similar crapware like that is a nightmare for administrators like me with partial OCD. How do we deal with this?
Of course we can disable access to removable devices altogether from group policy and prevent users from installing any software. But doing that has an adverse effect on employee productivity, like users who may want to install genuine software for legitimate reasons. This is where AppLocker comes to the rescue. It allows you to maintain a fine balance between accessibility and security. Although this feature has been around since Windows Server 2008 R2, I’ve seen few people actually use it – probably because not many people are aware of how powerful this feature is. That’s why we’ll revisit this old friend and learn how to configure Applocker in Windows Server 2012 R2 in this post.
Applocker in Windows Server 2012 R2: Create and Enforce Rules
AppLocker is an application lockdown and control mechanism. It gives the administrator a very granular control over which applications are allowed to execute and which are blocked. This includes executables (.exe), Windows Installers (.msi & .msp), scripts, or Modern UI apps.
You have a three conditions to choose the basis for screening the application.
Publisher rule: If your application has been digitally signed by a publisher, then this is a viable option to go for. Here you can choose from a wide range of parameters like publisher name, product name, version, filename, etc., as basis to allow or deny execution. For example, you could either choose to block all Adobe software (publisher name), or just Adobe Flash (product name), or just version 13.0.0.206 (version), or files from Adobe named flash.exe (filename).
Path rule: When you want to block or allow access to executables only in a specified UNC path, you can choose this option. For example, you could block F:\Games and allow D:\CorpData.
File hash rule: If your application is not digitally signed by a publisher, you can use this option to block or allow access based on the file hash. For example, this could be any file that may not have a publisher name and could be anywhere in the file system.
To understand this better, let us consider a scenario: You want to implement a solution in which you can use removable devices to transfer documents and other files, but any executables on the removable device will prevented from running. Here’s how we go about it in Windows Server 2012 R2 in three parts:
Part 1: Create Rules for AppLocker
- Open the Local Security Policy console and navigate to Security Settings > Application Control Policies > AppLocker.
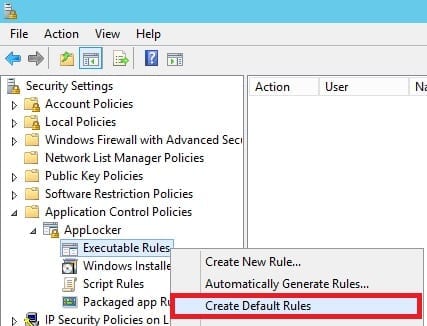
- Expand AppLocker, right-click on Executable Rules, and select Create Default Rules. This is to ensure that rules that you create do not interfere with execution of critical operating system files. Doing this generates three default rules that explicitly allows operating system files to run without being affected by other rules that you may create.
- Right-click on Executable Rules and select Create New Rule.
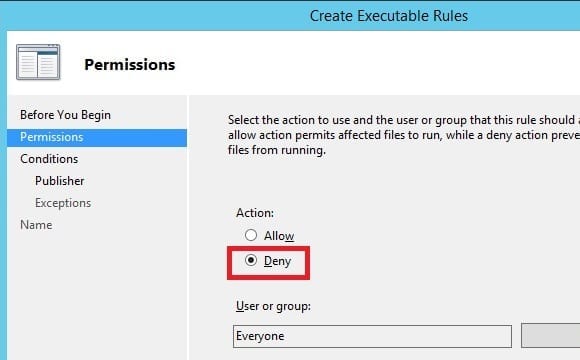
- Skip past the Before You Begin page. On the Permissions page, select Deny. You can choose to apply this rule only to specific user groups if you want to. I’ll leave the defaults for now and click on Next.
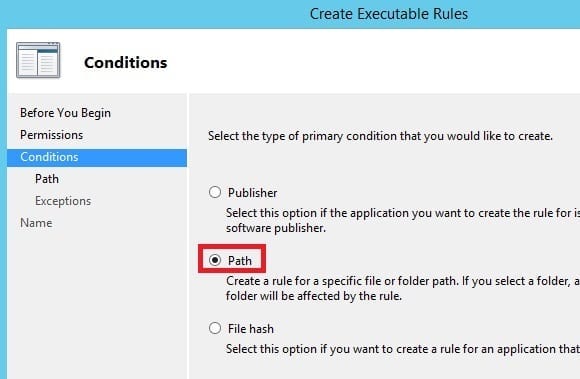
- On the Conditions page, I’ll select Path and click on Next.
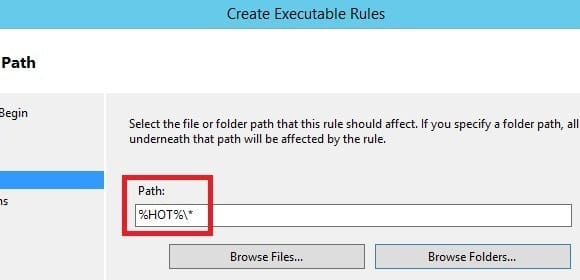
- On the Path page, I’ll click on Browser Folders… and select any removable storage device like a flash drive that is plugged in and then select OK. You’ll note that the path changes to %HOT%\*, which is a generic identifier for all removable storage devices. Click on Next.
- On the Exceptions page, add any exceptions to this rule if you have any and click on Next.
- On the Name page, give it a user-friendly, easy-to-remember name and click on Create. You should see the new rule you just created pop up under the default rules.
Part 2: Enforce Rules in AppLocker
In the first part we created all the rules needed for AppLocker in our demo scenario, but have not enforced the rules to take effect. We’ll do that here.
- Click on AppLocker.
- Under Configure Rule Enforcement section, click on the Configure rule enforcement link.
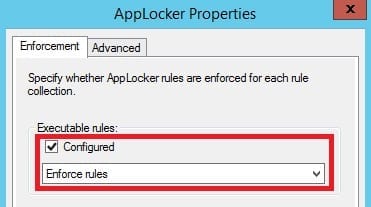
- In the Enforcement tab under Executable rules, mark the Configured checkbox and ensure the drop-down is selected to Enforce rules.
- Click on Apply and then OK.
Part 3: Start Application Identity
If you carefully read under the Configure Rule Enforcement section, it also says “For the AppLocker policy to be enforced on a computer, the Application Identity service must be running.” We’ll do this bit in this final part to bring AppLocker to life.
- Go to services.msc, and right-click on Application Identity.
- Set the Startup type to Automatic and click on the Start button under Service status.
- Click on Apply and then OK.
That’s it! Now wait for a couple minutes for all this to come into effect and you’re good to go. To test, try running an executable from any removable device. You’ll get this error message:
You’ll have no problems running any executable from your local disk. This solves the problem of unsolicited software in removable devices being executed voluntarily or involuntarily. Although what we configured here is only enforced on the local server, you can extend the same functionality of AppLocker to your domain computers by using Group Policy instead of the Local Security Policy console. It’s pretty much the same. I think I’ll leave that up to the readers to try that out and explore more about this.
If you have any questions, jot them in the comments section.


