How to Block Specific File Types in Windows Server 2012?
Ever had a user upload music files or executables to your file servers? Not only can this be a security risk, but it also eats away at expensive storage space. In this Ask an Admin, I’ll show you how to use the File Server Resource Manager (FSRM) to block unwanted file types.
What Is File Screening?
The File Server Resource Manager first appeared in Windows Server 2008. It included the ability for administrators to define which file types users can save to file servers. Administrators can block defined file types from an entire volume, or to specified folders.
Install File Server Resource Manager (FSRM)
Before you can enable file screening on your file server, you will need to make sure the File Server Resource Manager is installed. The quickest way to install FSRM in Windows Server 2012 is to open a PowerShell console on the server with local administrative privileges and run the following command:
Add-WindowsFeature –Name FS-Resource-Manager –IncludeManagementTools
Configure File Screening
Log on to your server as a local administrator. After FSRM is installed, you can open it from the Tools menu in Server Manager.
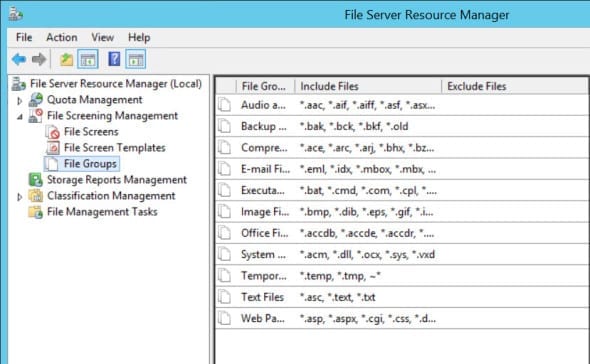
- In the left pane of FSRM, expand File Screening Management and click the File Groups node. In the central pane, you’ll see conveniently grouped file types so that you can create rules without individually specifying file extensions.
- Now click File Screen Templates in the left pane. Here you can see some predefined rules that you can apply to volumes or folders.
- Double-click the Block Audio and Video Files template in the central pane. In the properties dialog box, the Settings tab shows the actions that will apply if you use this template.

The main part of the template configuration is that the file types specified in the Audio and Video Files group will be actively blocked. You can use passive screening if you just want to monitor what is happening but not prevent users from saving files. In addition to active and passive screening, you can choose to send alerts via email, run a command or report, and log attempts to save blocked files to the Event Log.
- Close the properties dialog.
- If you right-click a template in the central pane of FSRM, the context menu gives you the option to edit the existing template or create a new template based on the settings of the template you have chosen.
- Now right-click File Screens in the left pane and select Create File Screen from the menu.
- In the Create File Screen dialog, click Browse and select a volume or folder to which the new rule should be applied, and then click OK.
- Under How do you want to configure file screen properties?, select the desired template from the drop-down menu and click Create. The new file screen rule will appear in the central pane.
Create an Exception
Exceptions can come in handy if you want a file type, which is blocked by the main rule, to be allowed in a specific location.
- Right-click File Screens in the left pane again and select Create File Screen Exception from the menu.
- Select the group to exclude under File groups.
- Click OK to complete the process.


