Attaching a Content Type to a List or Library in SharePoint 2013
- Blog
- SharePoint
- Post
If you’ve been following along in our recent articles about content types, you know what content types are, and how to create a content type in SharePoint 2013. But that’s only one part of content types. Now that you’ve got one created, you need to configure your lists and libraries to use those content types. In this article I will show you how to enable a list or library to use content types in SharePoint 2013, and I’ll also show you how to assign a specific content type to be used.
Enable a List or Library to use Content Types in SharePoint 2013
By default, a list or library created in SharePoint 2013 will have some content types that it already is configured to use. A task list expects task items, a contact list expects contact items, and a document library contains generic documents. If you want to customize what content types the list or library can use, you’ll need to make those changes at the list/library settings level.
You’ll need to edit permissions at a minimum on the list or library to manage it. By default all lists and libraries inherit permissions from the site that they are part of. So you’ll either need edit permissions on the site, or you’ll need to have the list/library stop inheriting permissions and be assigned permissions on the list/library
List/Library Settings
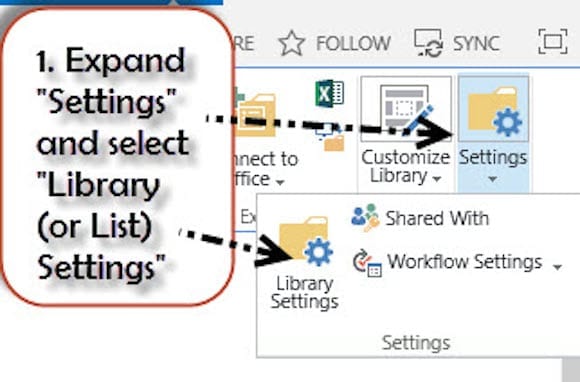
- Browse to the list or library that you’re wanting to use the content type on, then select the List/Library tab of the ribbon. Click on List/Library Settings.
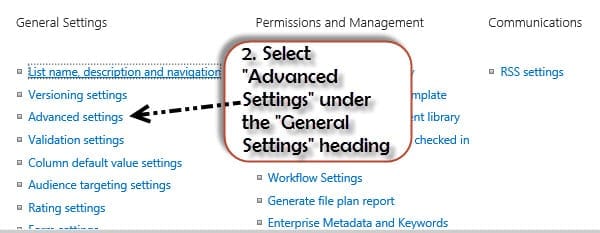
- On the list/library settings page, select Advanced Settings from under the General Settings heading.
Turn on Content Type Management
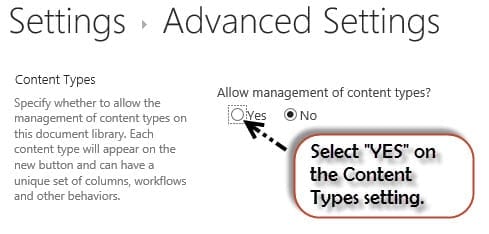
- In the Advanced Settings page, the setting to enable management of Content Types for the list or library is the top setting. Change the setting to Yes and then select OK.
Add a Content Type to a List or Library in SharePoint 2013
Your content types are in the site collection content type gallery. If you wanted to create a new content type or edit an existing one, you would want to go there. We won’t need to go there since your content type should already be created at this point.
Since you’ve enabled the list to use content types, a new section for managing them is made available back in the List or Library Settings page.
Any content types already used by the list or library will be displayed. Click the link to add an existing site content type.
Add an Existing Site Content Type
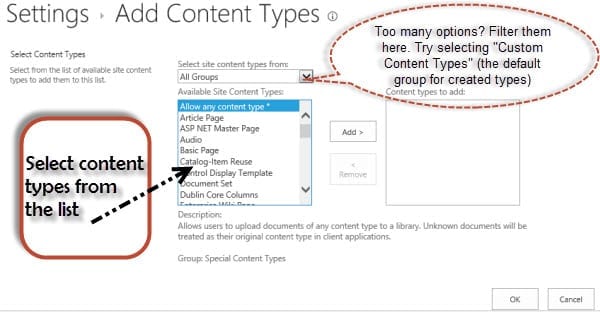
At the Add a Content Type page you’ll see a full list of all available content types. There is also a drop-down menu which will allow you to filter the list based on the content type groupings. Which content type group a content type belongs to is usually straightforward.
- If you have created your content type, then you were prompted to assign it into a group during the creation process. The default setting for new content types is the “Custom Content Type” group. So if you’re having trouble picking out your content type from the long list, you can try applying that filter.
- To add the content types, select them from the left window and click Add. Click OK when you’re finished.
Configure “New” Menu Options
Now that the content type has been added to the library or list, you have the choice about whether or not to show the content type as an option if somebody selects the “New…” icon while working with the list. This is going to make the library or list much more useable, especially for a list or library that uses many different content types.
- Click Change New Button Order and Default Content Type.
- Once you’re at the Change New Button Order settings page, you can choose which of your content types are available in the new button menu. You can also set the order for each of the visible content types. Once they are set the way you want them, click OK to save your settings.
That’s It!
With your list or library made ready for the management of content types, and your content content types added into the list, you’re ready to see the fruits of your labor.
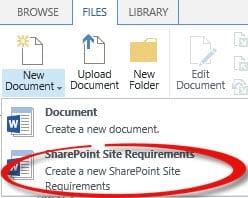
If you view your list, and press the New item button, you’ll get your New Button options available to you and in just the order you set.
There are so many uses for content types in SharePoint 2013, so you’ll be glad to have this tool in your toolkit.
Did this article help you? Let us know in the comments below. If you haven’t already, you ought to subscribe to Petri IT Knowledgebase – it’s a free subscription that gets delivered right to your inbox with lots of helpful tips, tricks, and articles all about enterprise IT.


