Using Office 365 ProPlus with the Office Deployment Tool
In the first part of this two-part article series on Office 365 Pro Plus, I started by explaining what Office 365 ProPlus is, followed by a quick walkthrough of the Click-To-Run installation approach. While the super-easy click-to-run install is very useful for home offices or SMB-segment customers, it is not the most advised deployment approach for larger organizations. Another concern companies of such size have is control. The IT department wants to define who should get the Office 365 Pro Plus components installed and who not. That’s where the integration between the Office 365 Pro Plus cloud-based installation and your existing deployment solution can come together. Today I’ll discuss how to use Office 365 ProPlus with the Office Deployment Tool.
Office 365 ProPlus and the Office Deployment Tool
The magic tool behind this integration is the Office Deployment Tool. It’s actually a small exe-file, that allows you to do the following:
- Download the Office 365 Pro Plus install files from the Microsoft cloud.
- Deploy, uninstall and update by using command-line script (*).
- Create a package file that you can reuse in App-V (Microsoft Application Virtualization engine).
(*) the command-line based install allows you to integrate with about any existing corporate deployment tool you might already have:
- Active Directory Group Policy software application deployment
- Integrate as task sequence in MDT 2012/2013 (Microsoft Deployment Toolkit)
- Create an application package you can publish from SCCM 2012 / 2012 R2
- Create an installation command-line sequence in ANY OTHER tool you are using. I’ve heard of successful deployments out of LanDesk, Altiris, etc.), so it is not at all only possible by using Microsoft tools.
Office Deployment Tool for Click-to-Run
In this section, I will demonstrate the different possibilities from the Office Deployment Tool.
- Download the Office Deployment Tool for Click-to-Run from the Microsoft website.
- Extract / Install the Office Deployment Tool on your deployment server or any machine you want to use for this.
- Select Click here to accept…
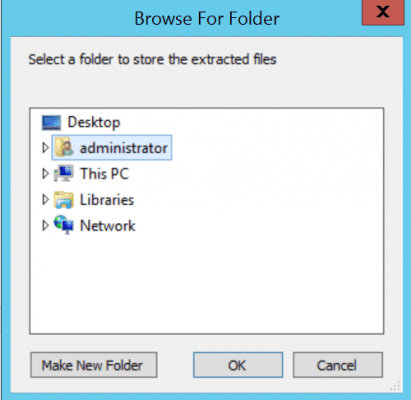
- Browse for a folder where you want to save the exe-file (e.g. c:\ODT).
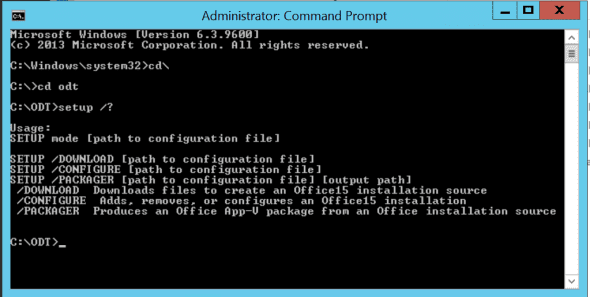
- Run the setup.exe tool from an admin command prompt.
- Now, as you can see, the missing component is the [configuration file] for each of the different options we can specify. Microsoft makes it already a bit easy for you, by providing a sample configuration.xml file. When opening this file, the content looks like this:
<Configuration>

<!--  <Add SourcePath="\\Server\Share\Office\" OfficeClientEdition="32" >

<Product ID="O365ProPlusRetail">

<Language ID="en-us" />

</Product>

<Product ID="VisioProRetail">

<Language ID="en-us" />

</Product>

</Add>  -->

<!--  <Updates Enabled="TRUE" UpdatePath="\\Server\Share\Office\" /> -->

<!--  <Display Level="None" AcceptEULA="TRUE" />  -->

<!--  <Logging Name="OfficeSetup.txt" Path="%temp%" />  -->

<!--  <Property Name="AUTOACTIVATE" Value="1" />  -->

</Configuration>
Check out this Technet document for all possible configuration parameters.
While this is not a requirement as such, my personal best practice is to create separate XML-files for my different setup.exe options, allowing me to have control of the different steps. For example, I’ve created the following XML-files in my demo environment:
- Download.XML
- Install.XML
- Package.XML
The contents look like this:
| Sample Install.xml | Sample Download.xml |
| <Configuration><Add SourcePath=”C:\Data\” OfficeClientEdition=”32″ ><Product ID=”O365ProPlusRetail“><Language ID=”en-us” /></Product><Product ID=”VisioProRetail”><Language ID=”en-us” /></Product>
</Add> <Updates Enabled=”TRUE” /> <Display Level=”None” AcceptEULA=”TRUE” /> <Logging Name=”OfficeSetup.txt” Path=”c:\temp” /> </Configuration> |
<Configuration><Add SourcePath=”c:\data” OfficeClientEdition=”32″ ><Product ID=”O365ProPlusRetail“><Language ID=”en-us” /></Product><Product ID=”VisioProRetail”><Language ID=”en-us” /></Product>
</Add> <Logging Name=”OfficeSetup.txt” Path=”C:\Temp” /> </Configuration> |
The fields marked in red may need some explanations.
C:\Data – This is the location where I save the Office 365 Pro Plus install files
Product ID – This parameter define the different install packages and applications I want to install; as you can see, Visio Professional is also available as part of the subscription
Logging Name – While this parameter is optional, it is very interesting in the beginning to troubleshoot possible issues during the download of the deployment itself.
Download the Install Files with Setup.exe
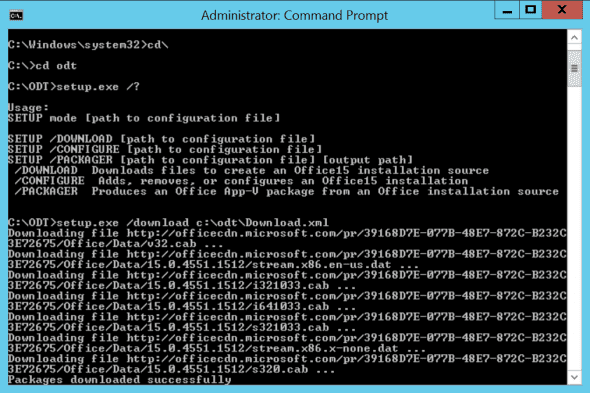
Assuming you have created a download.xml file, based on my example input, you should now run the following command: Setup.exe /download c:\ODT\download.xml
The install files are now stored in the C:\Data folder, as was configured in my download.xml file.
In fact, that’s the only thing you have to do to allow deployment in the next step.
Custom Deployment Command Line Script
In this step, I want to show you how easy it is to actually “deploy” the Office 365 Pro Plus. Only thing you need is a command line script, which is actually comprised of the following syntax: C:\ODT\setup.exe /configure install.xml
That’s it! By using this command line, you can integrate your deployment in Active Directory Group Policy software deployment, using the same parameter settings in MDT 2012/2013, or any other deployment tool you have. It’s even possible to perform a manual installation from a PC in your network, by connecting to the shared folder: \\deploymentserver\ODT<sharedfolder>\setup.exe /configure install.xml
Create an Application Virtualization (App-V package) – Optional
If you are already using application virtualization in your enterprise environment today, the last setup switch parameter will be very welcome to you. The /packager parameter allows you to create an App-V package on-the-fly. This package can then be deployed from within App-V or published as an App-V package from within SCCM 2012 for example.
The command line might look similar to this:
C:\odt\setup.exe /packager c:\odt\package.xml c:\data\O365package
The only main difference between the other earlier commands is this one needs an output directory, which is the location where the App-V package will be created.
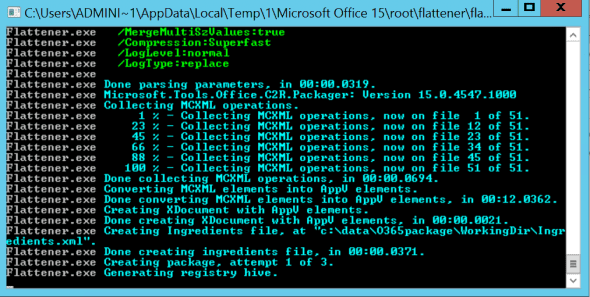
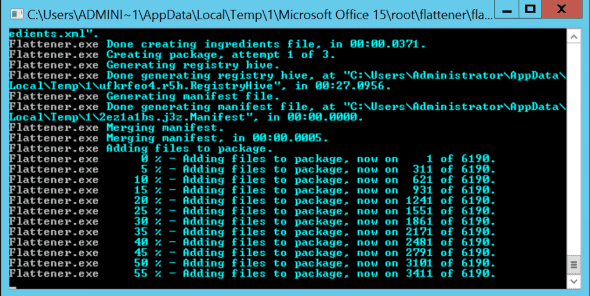
This process will take about 15 minutes, depending on your hardware resources, showing the following processes.
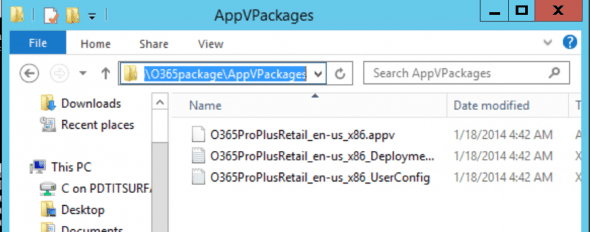
When the process is successfully completed, the end result are the App-V packages in the specified directory (e.g. c:\data\O365Package in my example).
This package is all you need to import in your App-V Manager. And you’re done!
That’s about it for this second part of the article, I hope you liked it and can make use of it in your own environment.
Until next time!


