System Center Virtual Machine Manager 2012 SP1: Installation
In this post we will show you how to install System Center Virtual Machine Manager 2012 SP1/Virtual Machine Manager (SCVMM/VMM) in just a few easy steps. Of course, this assumes that you have prepared the System Center Virtual Machine Manager 2012 SP1 hardware requirements, the SCVMM software requirements, and you have prepared the environment for VMM. If you haven’t done that yet, go do so.
How to Install System Center Virtual Machine Manager 2012 SP1
- First, insert the installation DVD or mount the ISO and run the setup program. A splash screen will appear.
- Click the Install link. In the Select the Features to Install screen, choose both VMM Management Server and VMM Console.
- Enter the license information, including the product key. You get a time-limited trial if you do not enter the key. You can add this afterwards in the VMM Console. You can normally choose the default installation location.
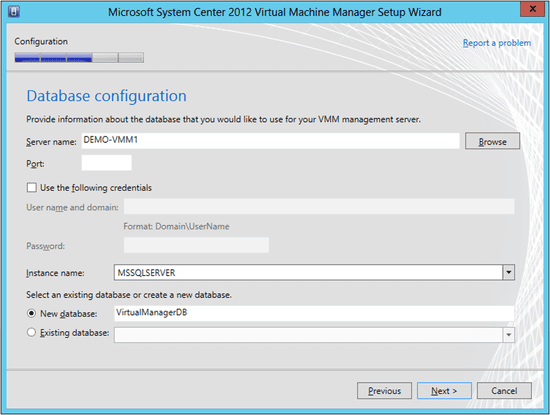
- In the Database Configuration screen, enter the name of the VMM server. Leaving Port blank will cause VMM to default to TCP 1433. If the user you are logged in as does not have admin rights in the SQL Server instance, then you can check Use The Following Credentials and supply an alternative username and password for a user with sufficient privileges.
- Choose the SQL Server Instance. The final option defaults to creating a new database called VirtualManagerDB. You have the option to reuse an existing VMM database if one exists (in the case of an upgrade or repair).
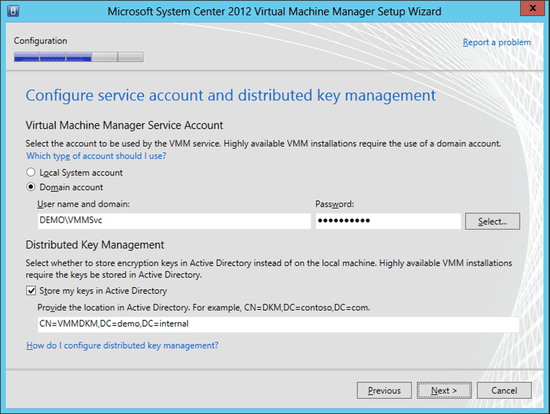
- The next screen allows you to put some of your environment preparation into use. By default the VMM service will log in using the Local System account. This limits VMM functionality, so you should opt instead to using the domain-based service account that you should have created.
- By default, the encryption keys for the sensitive data in the VMM database are stored on the VMM server. Check the Store My Keys in Active Directory option, then enter the location of the DKM container that you should have already created and configured.
The Port Configuration screen gives you the opportunity to customize the ports that are used by VMM. Normally you will not change these settings.
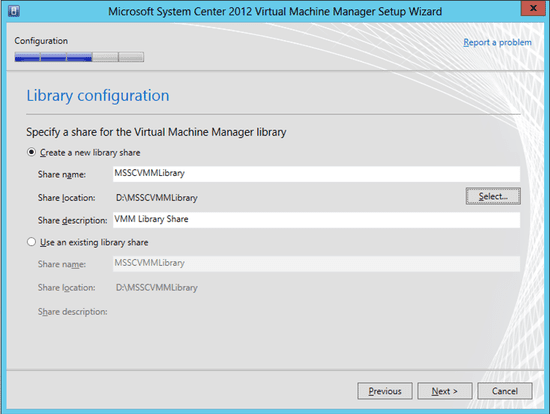
The Library Configuration screen allows you to customize the VMM library location, share name, and share description. You might have an existing library (upgrade or install) that you would like to use. Best practice is to place this library on a non-system drive. This will protect the operating system and allow you to enable volume deduplication to optimize VMM library storage utilization. Note that you can add extra libraries later in the VMM console.
- Complete the wizard and you are nearly done. The second-to-last step is to apply the latest Update Rollup for System Center 2012 SP1 – Virtual Machine Manager. These URs are being released pretty regularly, so use your favorite search engine to find the latest one and install it.
- Finally, run Windows Update and update/reboot your VMM server until all updates are applied.


