vSphere 4.1 comes with a new performance-enhancing feature called memory compression. It can give your system a performance boost when it starts running low on RAM. Just like swap memory, memory compression is not equal to real memory but can help to prevent degradation of performance when you’re running low on memory. For comparison, memory compression is faster than swap on disk but slower than real memory.
vSphere 4.1’s memory compression is switched on by default and it reinforces other memory performance techniques also found in vSphere such as: Transparent Page Sharing (TPS), Ballooning, and Hypervisor Swapping.
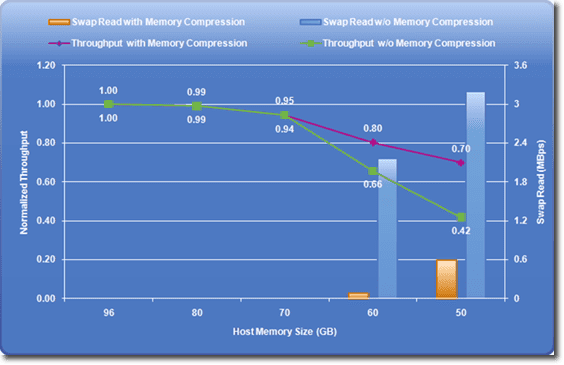
As you can see from the graph below, memory compression improves throughput.
(Graphic thanks to VMware.com)
(Instructional video below provides a walkthrough of the steps contained in this article.)
We’ll now proceed to show you where memory compression configurations can be carried out.
Note: Before you go on to the next section, we’d like to warn you that making changes to anything in the Advanced Settings is strongly discouraged unless you’ve already made a thorough assessment of your infrastructure’s performance in relation to memory compression.
Where to configure Memory Compression in vSphere 4.1
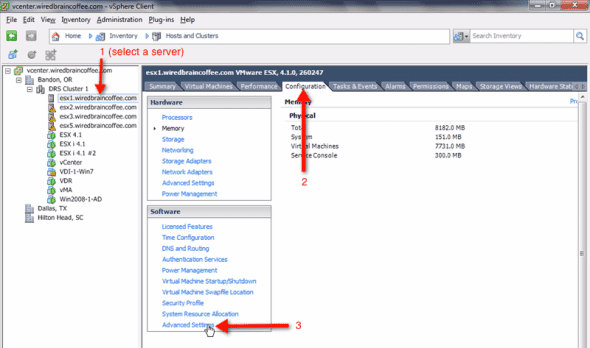
To start, go to your vSphere Client and select an ESX server whose memory compression settings you’d like to configure. Now, navigate to that server’s Configuration tab and, in the Software panel, click the Advanced Settings link.
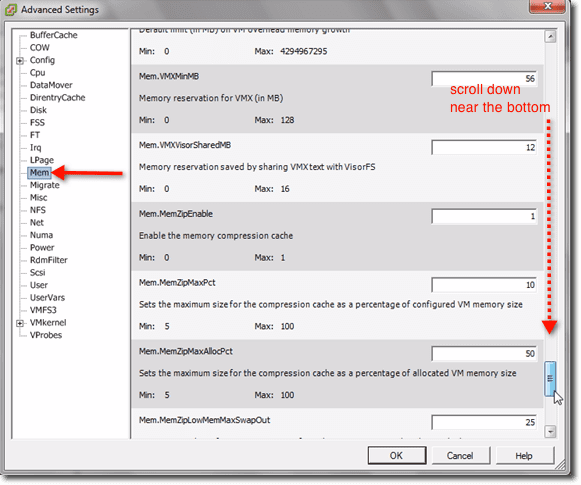
In the Advanced Settings window, open the Mem set of settings by clicking that name in the left-hand-side panel. The settings we’re looking for are found near the bottom, so you’ll have to scroll down until you reach the first setting that starts with Mem.Mem.Zip.
All settings related to memory compression start with Mem.Mem.Zip. For instance, there’s Mem.Mem.ZipEnable, which allows you to Enable (set to 1) or Disable (set to 0) Memory Compression. Other memory compression settings include:
- Mem.Mem.ZipMaxPct
- Mem.Mem.ZipMaxAllocPct
- Mem.Mem.ZipLowMemMaxSwapOut
- Mem.Mem.ZipBalloonXferPct
- and so on
Below each setting, you’ll see a short description of what each setting does as well as their corresponding Minimum and Maximum values.
All settings take effect after you click the OK button.
Now that you know where to make changes to the Memory Compression settings in case you really need to, let me show you where you should go to find out if those settings really need any tweaking.
How to check performance information related to Memory Compression
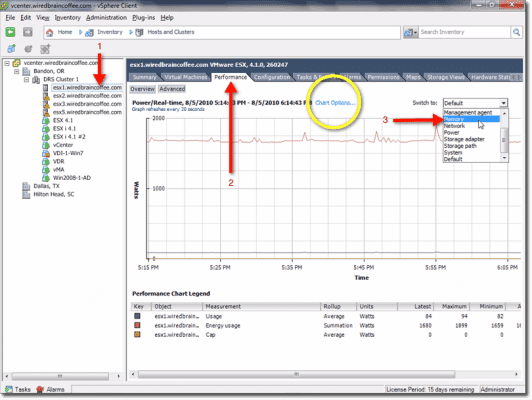
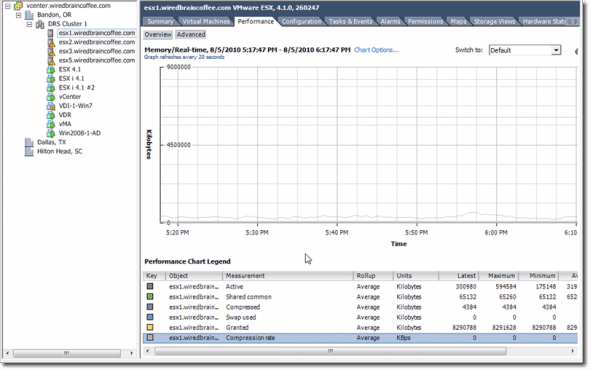
Again, make sure the right ESX Server is selected, then go to that server’s Performance tab. Now, expand the drop-down list right beside the label that says Switch to: and then click Memory.
Initially, the next window won’t contain any stats regarding memory compression. You’ll have to add them first. To do that, click the link that says Chart Options. I’ve enclosed that with a yellow circle in the screenshot above.
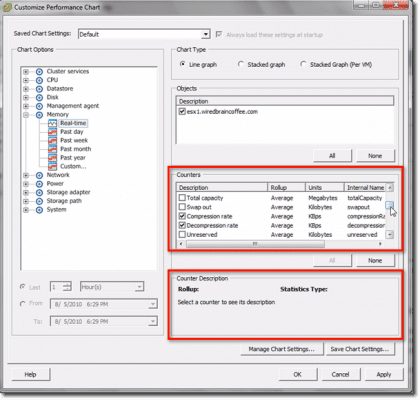
In the succeeding window, go to the Counters panel and scroll down that vertical scroll bar. The counters related to memory compression are the following:
- Compression rate
- Decompression rate, and
- Compressed (which refers to the amount of compressed memory)
Each time you select a counter, a short description about it will be given in the Counter Description panel.
After clicking the OK button, you’ll be brought back to the previous window where you’ll then see the newly added memory compression stats in the graph as well as in the Performance Chart Legend.
The graphs representing the newly added memory compression-related counters are not yet visible in the screenshot shown above. That’s because, as mentioned earlier, memory compression kicks in only during times when the system is running low on RAM.
Summary
This article provides an overview of memory compression, a new feature in vSphere 4.1. We explained how memory compression helps to prevent degradation of performance when you’re running low on memory, and how it’s not as fast as real memory but a lot faster than swap (on disk). Additionally, we covered configuring memory compression on your vSphere virtual infrastructure.


