Larger virtual machines (up to 1 TB RAM in WS2012 Hyper-V) and denser hosts (up to 4 TB RAM) means that there can be a lot of memory for live migration to copy and synchronize in order to move virtual machines around with unperceivable service downtime. Today I’ll show you how to make the most of Hyper-V live migration using 10GbE networking in this article to maximize the 10GbE or faster network bandwidth to make that migration quicker.
When 1 Gbps Networking Isn’t Fast Enough
The live migration of virtual machines copies and then synchronizes the RAM of VMs from one host to another. Imagine that you are running a data center with hosts and virtual machines that have huge amounts of RAM. Load balancing virtual machines, performing preventative maintenance (such as Cluster Aware Updating), or trying to drain a host for unplanned maintenance could take an eternity if you’re trying to move hundreds of gigabytes or even terabytes of RAM around on 1 Gbps networking. This was why it was recommended to look at embracing 10 GbE or faster networking, at least for the live migration network in a Hyper-V cluster. Sadly, even with all the possible tuning, Windows Server 2008 R2 could not get much more than 70% utilization of this bandwidth, and there wasn’t a good way to use this expensive NIC and switch port for more than just live migration.
Windows Server 2012 (WS2012) and later make adopting 10 GbE or faster networking more feasible. Firstly, WS2012 can make use of all of the bandwidth that you provide it, including 56 Gbps Infiniband. Secondly, you can (thanks to Quality of Service and converged networks) use this expensive bandwidth to perform many functions, which means you require fewer overall NICs and switch ports per host, helping to offset some of the investment in this higher capacity networking. For example, 10 GbE networking could be used for live migration, cluster communications, and the SMB 3.0 storage (which is more affordable than traditional block storage).
Tuning Your Hosts
Many who have convinced their bosses to invest in 10 GbE or faster networking have a disappointing first experience because they have not performed the necessary preparations. They’ll rush to do a test live migration, and maybe see 2 Gbps utilization with occasional brief spikes to 4 or 6 Gpbs and then rush to blame the wrong thing. Whether you are running W2008 R2 Hyper-V or faster, there are four things to consider if you want to make full use of the potential bandwidth:
- Firmware: Make sure you have the latest stable firmware for your host server and your network cards.
- Host BIOS Settings: Your host hardware might be configured to run at a less than optimal level, and therefore not handle the interrupts fast enough to make full utilization of the bandwidth. Your server’s manufacturer should have guidance for configuring the BIOS settings for Hyper-V. Typically you need to disable some processor C states and set the power profile to maximum performance.
- Drivers: Download and install the latest stable version of the network card driver for your version of Windows Server that is running in the host’s management OS. Do not assume that the in-box or Microsoft driver will be sufficient, as it usually is not.
- Jumbo Frames: Configure the maximum possible size jumbo frame on your NICs and the switch(es) in-between the hosts. The jumbo frames setting can be found (the name varies from one NIC model/manufacturer to another) in the Advanced settings of a NIC’s properties in Control Panel > Network Connections.
You should test end-to-end jumbo frames by running a ping command such as ping -l 8400 -f 172.16.2.52 to verify that all NICs and intermediate switches are working correctly. The –l flag indicates the packet size to be used by ping. Note that experience shows that this must be slightly smaller than the actual packet size configured in the NIC settings. The –f flag indicates that the packet should not be fragmented. A successful ping indicates that Jumbo Frames are working as expected.
Now you can test your live migration and you should see much more bandwidth being used, depending on if you have converged networks and if you have configured QoS (WS2012 or later) or SMB bandwidth limitations (WS2012 R2).
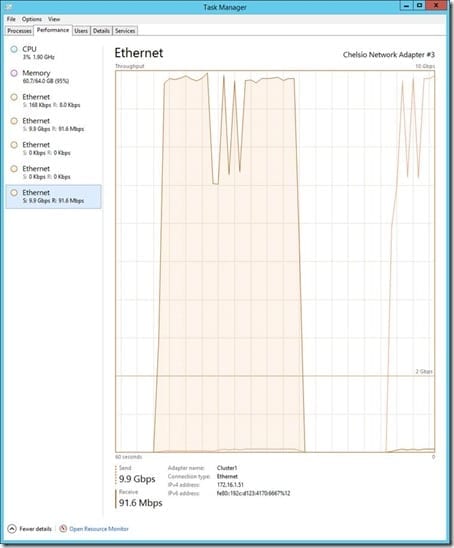
The results of taking a few minutes to tune a host are simply amazing. The below screenshot is taken from a host that is using dual iWARP (10 GbE NICs with RDMA) NICs for WS2012 R2 live migration. Both NICs are fully utilized providing live migration speeds of up to 20 Gbps. In this example, a Linux virtual machine with 56 GB of RAM is moving from one WS2012 R2 Hyper-V host to another in under 36 seconds.
Hyper-V live migration making full use of 10 GbE networking.
Thank you to Didier Van Hoye (aka @workinghardinit, MVP) for his help with this article.


