Importing Hyper-V VMs into vSphere
I recently released a new 2 hour training course called Best of vSphere 4.1 for vNerds, and as part of that course I explored the new vSphere 4.1 feature which allows you to import Hyper-V virtual machines to VMware vSphere. As a robust platform for cloud-based infrastructure, featuring high levels of availability and responsiveness, VMware vSphere offers a great solution for business continuity and disaster recovery.
If you’re an IT administrator in the process of migrating your entire organization’s cloud solution from Hyper-V to vSphere, or just parts of it, this article can serve as a practical step-by-step guide for importing Hyper-V virtual machines.
What You Need to Prepare
The process of migrating a VM from Hyper-V to vSphere isn’t hard, but before you can proceed with importing any Hyper-V virtual machine, you’ll need to have the following:
- vSphere 4.1 (at least one ESXi or ESX Server)
- vCenter 4.1
- vCenter Converter 4.2 installer
As of this writing, those are the latest versions of vSphere, vCenter, and vCenter Converter respectively. As mentioned, the ability to import Hyper-V virtual machines is a new feature that comes with vSphere version 4.1.
Since vCenter Converter (which you’ll need in the importation process) is an optional module for VMware vCenter Server, we’re assuming you don’t have it on your vCenter Server yet. That’s why we’ve opted to include a very brief vCenter Converter installation section below. Let’s start with that.
Installing vCenter Converter on Your vCenter Server
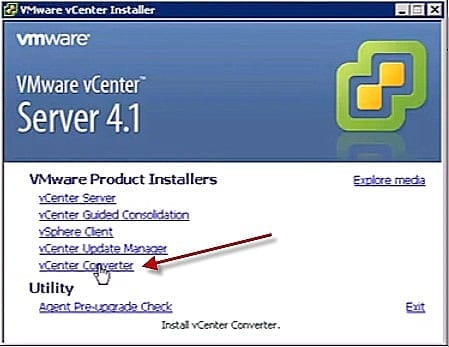
Go to your vCenter Server and insert or mount the vCenter Converter 4.2 installation media. This is actually the same media you used to install vCenter Server to begin with. Launch the installation program and, in the screen that first appears, select vCenter Converter.
After you choose an appropriate language, the installation will immediately begin. Follow the instructions in the installation wizard. At some point, you will need to enter your vCenter Server name (e.g. vcenter.yourdomain.com) and your vCenter credentials (usually your Windows username and password). Enter those and proceed with the rest of the installation process until the Converter installation is completed.
Adding the vCenter Converter Plug-In to the vSphere Client
The previous activity will only install vCenter Converter on the server side. You still have to add the vCenter Converter plugin to your vSphere Client. In this case, you need to move to your vSphere Client, which is assumed to be connected to your vCenter Server.
From the menus at the top of your vSphere Client user interface, select Plug-ins > Manage Plug-ins.

Once inside the Plug-in Manager, scroll down until you get to the section labeled Available Plug-ins. You should find vCenter Converter 4.2 among the items there. To the right of that item, click the corresponding Download and Install link. Everything from this point up to the end of the installation is pretty straightforward, so just proceed until you reach the Installation Completed notification.
After clicking the Finish button, navigate back to the Plug-in Manager where you’ll find the vCenter Converter Plug-in already marked Enabled. Close the Plug-in Manager and the vSphere Client.
Selecting the Hyper-V Source
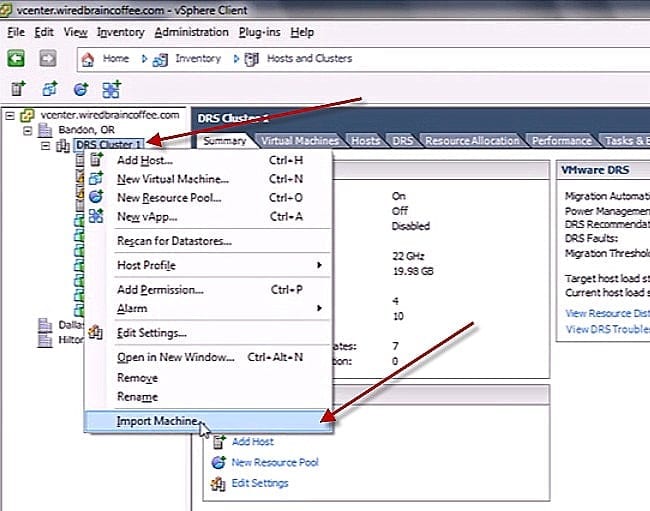
Reopen the vSphere client to use the newly added vCenter Converter application. In this section you’ll be selecting the source of your Hyper-V VM. Note that all succeeding objects can only be seen after adding the vCenter Converter plug-in. To start, right click either a cluster or an ESX server and, in the corresponding pop-up menu, click Import Machine.
When the Import Machine window appears, click the Select source type drop-down list and select Hyper-V Server. Note that this option is only available in vSphere 4.1.
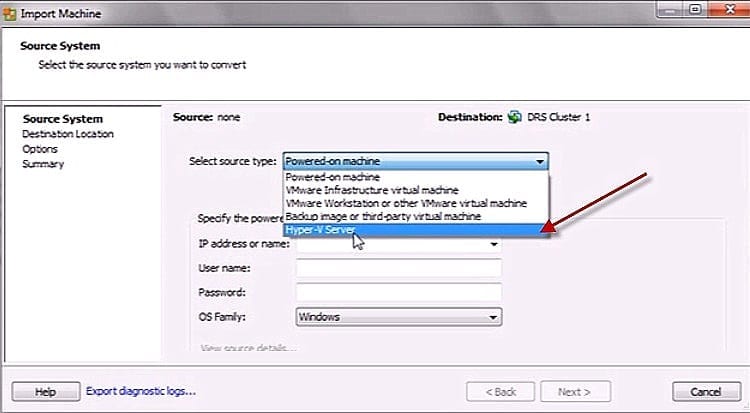
The subsequent fields will change accordingly, depending on the source type you select. For instance, selecting Hyper-V Server will only bring forward the Server, User name and Password fields.
Enter the name of your Hyper-V Server in the Server field (e.g. yourhyperv.yourdomain.com) and the corresponding admin login details in the username and password fields. Click the Next button to proceed.
A dialog box will then pop-up to inform you that VMware vCenter Converter agent needs to be temporarily installed on the remote source machine you specified just recently. It will also ask you whether you want to:
- Have the system uninstall the Converter agent files automatically if the import succeeds, or
- Uninstall the files later.
You might want to select the first option (automatic uninstallation) while you’re still getting familiar with the entire process.
After selecting an option, click the Yes button to deploy the agent on the Hyper-V server. While the agent is being deployed, navigate to your Hyper-V server to shut down the machine you’ll be importing.
Note: Some people believe it is alright to import a Hyper-V virtual machine even without shutting it down. However, our experience with other VMs tells us that it is always safer to shut it down first, so that’s what we’re going to do.
Shutting Down the Hyper-V VM
Navigate to your Hyper-V Server’s Hyper-V Manager and find the VM that you want to import. We are assuming its current State is Running. Now, right-click on the VM and, in the pop-up menu, select Shut Down.
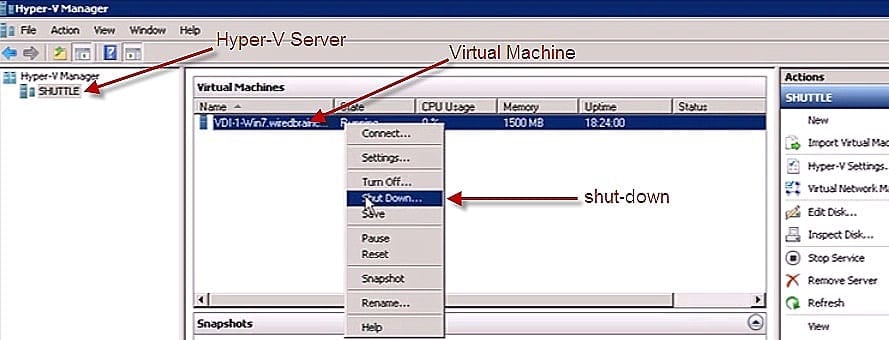
You’ll then be asked to confirm the action. Do so. The State of the VM will then shift from Running to Stopping and finally to Off.
Now that the Hyper-V virtual machine has been shut down, you can then head back to the VCenter Server to proceed with the import.
Configuring the Destination Information for vSphere
If the vCenter agent deployment process was successful, you’ll then find the VM that you shut down earlier with its Power state labeled as Powered Off.
Select that VM and click the Next button. You can now specify the destination in your vSphere infrastructure on which you will be importing the VM.
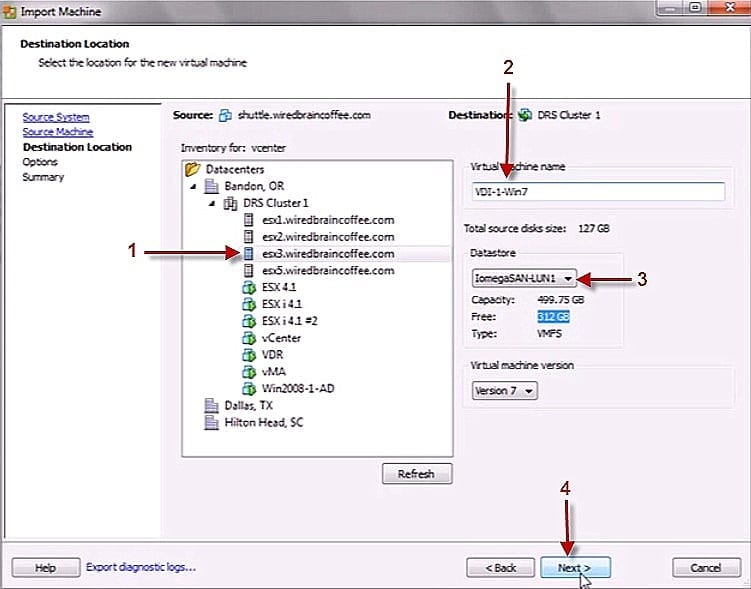
Perform the following tasks as shown in the screenshot below:
- Select the destination.
- Assign a name to the virtual machine.
- Select where you will want to store the imported data. Take note of the Total source disks size and choose a Datastore that has enough Free space to accommodate it.
- When you’re done, click the Next button.
Finalizing the Import Process
As a final step, you’ll be asked to set up parameters relevant to the conversion process. Change whatever needs changing. Otherwise, just click Next.
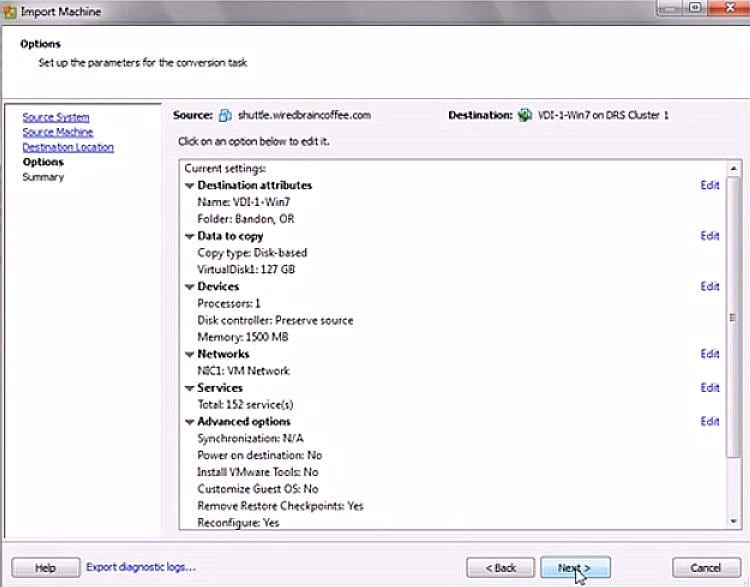
You’ll then be given a chance to review all settings and if everything’s ok, you may simply click the Finish button.
The actual importation task will then commence. At this point, you can already see the virtual machine in question among the items under the cluster that you right-clicked earlier (see the first screenshot under the section Selecting the Hyper-V Source).
You can also monitor the progress of the importation task in the Recent Tasks panel, which you can bring forward by clicking the Tasks button located near the lower-left corner of the vSphere Client window.
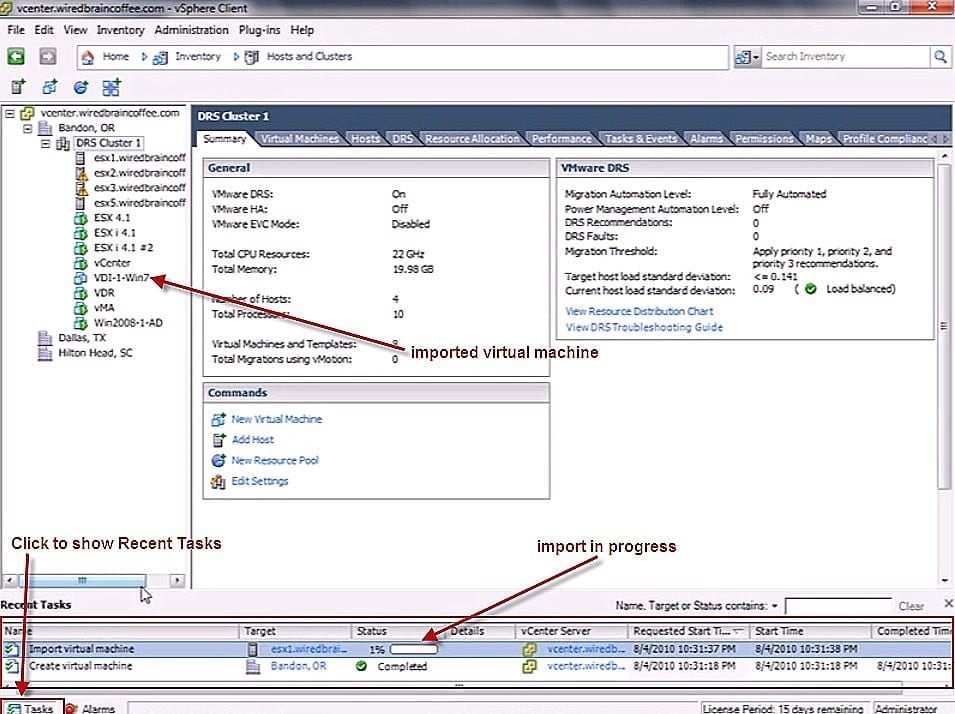
Once completed, the Status of that task will state accordingly.
Testing the Newly Imported Virtual Machine
Before you can test the newly imported VM, you’ll need to power it on. Go to the newly imported virtual machine (the one labeled “imported virtual machine” in the previous screenshot) and right-click it. In the pop-up menu, select Power > Power On.
To test, just click on that same item and, in the Commands panel, select Open Console.
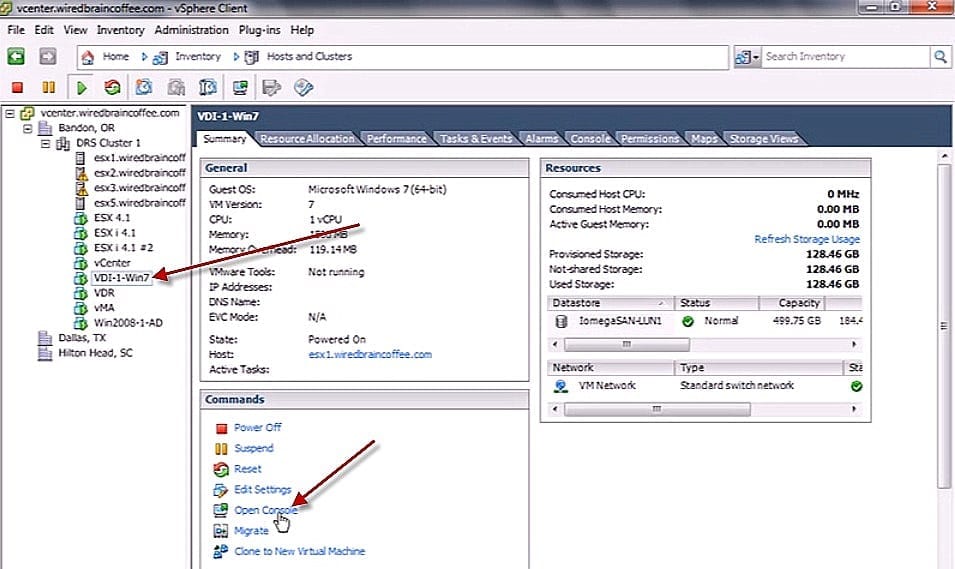
Barring any unforeseen events, your newly imported VM should run as it was previously running in Hyper-V.
This article obviously is not an exhaustive coverage of the vCenter Converter. If you need more information, we suggest you get a copy of the VMware vCenter Converter Installation and Administration Guide version 4.2, which can be downloaded for free from vmware.com.
Best of vSphere 4.1 for vNerds Training video is free with any Train Signal vSphere Training Purchase.