Create Exchange 2010 Multiple Mailbox Reports with PowerShell
In my last article, “Create Exchange 2010 Individual Inbox Reports with PowerShell,” we looked at using the Get-MailboxFolderStatistics cmdlet to report on details of a single mailbox. If you missed that article I suggest you read it first otherwise you won’t understand the following examples. I always tell people the best thing about PowerShell is that if you can do something for a single item, you should be able to do it for 10, 100, or 1,000. So let’s go ahead and do the same on a bigger scale, shall we?
Exchange Mailbox Reporting: Scaling Out
Now that we have a framework from the previous article, it’s time to scale out. All I need to do is get a collection of mailboxes. I can either get all mailboxes or limit myself to a particular mailbox database. I’ll get everything and first check out overall total usage. Because of the way Exchange handles pipeline processing, I recommend first getting all of the mailboxes you want to report on. In my case, all my users are under one OU, so this helps filter out system mailboxes. I’ll save the mailboxes to a variable.
$mb = Get-Mailbox-OrganizationalUnit "OU=Employees,DC=globomantics,dc=local"
Next, I can pipe the collection of mailboxes to ForEach-Object and get the top level information for each.
$data =$mb | foreach {
get-mailboxfolderstatistics $_ | Select -first 1 -property @{Name="User";Expression={(Split-Path $_.Identity -Parent)}},
@{Name="Folder";Expression={Split-Path $_.Identity -Leaf}},
@{Name="Items";Expression={$_.ItemsinFolderandSubFolders}},
@{Name="Size";Expression={$_.FolderandSubFolderSize.tobytes()}}
}
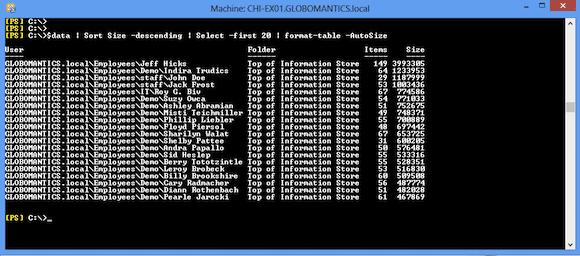
If you recall from the previous article, Get-MailboxFolderStatistics is returning a collection of objects for each mailbox element. I only want the top-level item, so I’m selecting only the first object. The report data is saved to the variable $data, which I can slice, dice and format as necessary. Figure 1 below shows the top 20 mailboxes based on the Size property.
Now, let’s break this down for Inbox, Deleted Items, and Sent Items. Again, I’ll pipe my collection of mailboxes to an expression that will calculate the report data.
$d = $mb | get-mailboxfolderstatistics |
where {$_.name -match "Inbox|Deleted|Sent"} |
Select @{Name="User";Expression={(Split-Path $_.Identity -Parent)}},
@{Name="Folder";Expression={Split-Path $_.Identity -Leaf}},
@{Name="Items";Expression={$_.ItemsinFolderandSubFolders}},
@{Name="Size";Expression={$_.FolderandSubFolderSize.tobytes()}}
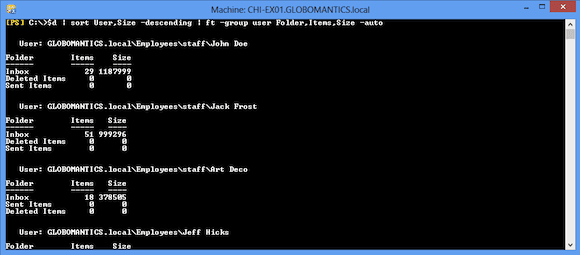
I like saving the results to a variable because I can now format or analyze the data. Perhaps I want to look at folders for each user. I could use an expression like this:
$d | sort User,Size -descending | ft -group user Folder,Items,Size -auto
Or perhaps I want to find the user with the most Sent Items.
$d | where {$_.folder -eq 'Sent Items'} | sort Size -desc | select -first 1 | format-list
I’ll admit my test server doesn’t have the most interesting data (as you can see below in Figure 3), but I hope you get the idea.
I’ll leave you with one more example – one that probably more than anything else demonstrates that there’s no limit to what you can get out of PowerShell.
$d | Group Folder | Select Name,@{Name="TotalMB";Expression={[math]::round(($_.Group | measure Size -sum).sum/1MB,2)}} | format-table –AutoSize
What I’m showing in the image below is the total size of the three folders I originally selected, formatted in MB to two decimal places and displayed as an auto-formatted table.
In my examples I’ve displayed formatted results on the screen. But it isn’t that much more work to export results to a CSV file, to create an HTML report, or to send results via an email message.
When using the Exchange cmdlets to prepare reports, don’t be afraid to dig down to discover what is really under the hood. Exchange attempts to make many things easy for you to understand, but sometimes you want to take matters into your own hands as I’ve done here. Find the cmdlet that gives you the data you want, and then process the data using your PowerShell skills to get the information you need.


